How to set up Netgear Orbi rbr20 in your home network?
Netgear Orbi rbr20 works in a proficient way to provide the robust Wi-fi speed to users by combining all the routers allowing them to work efficiently. Netgear Orbi is a whole Wi-fi mesh system that joins all the routers together resulting in extending the coverage area of the system.
Steps to setup Netgear Orbi rbr20 in your home network
- First, unbox your Netgear Orbi rbr20 along with the configuration card that comes along with it.
- To start the Orbi setup process, a user has to perform the connection process.
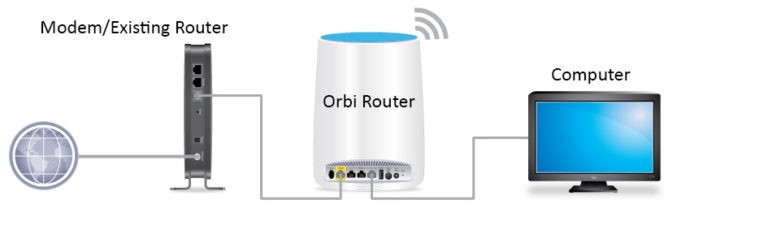
- Take an Ethernet cable and connect its one end to the LAN port of your Netgear Orbi rBr20 and the other end to the Ethernet port of your modem.
- Now, plug in the power cable of your Orbi to an available electric outlet within the range of your Wi-fi network.
- Wait for your Netgear Orbi rbr20 to start up properly. You can also take the help of the LED of your Orbi to determine whether your device has successfully turned on or not.
- When the Power LED of your Netgear Orbi becomes solid white, that means your Netgear Orbi has successfully turned on.
- Plugin the Orbi satellites within the range or in the same room of your Orbi Wi-fi mesh system using the power adapters.
- Now when the connection process is completed, go to your mobile device and open the app store.
- Search for the Netgear Orbi app in a play store. Once it is downloaded, open the app.
- Launch the Orbi app from the home screen of your smartphone. Agree to all the licenses and terms being displayed on the main page of your mobile device.
- Allow the network to access your Netgear Orbi device by clicking on the Continue button.
- In the next window, tap the Allow button to allow your Orbi device to search for the devices and connect to them in your local network. Click on the Allow notifications.
- Now, you will be prompted to create a new Netgear account. If you already have a Netgear account, click on the Sign-in option. If you don’t have an account, select the “Create a New Netgear account” option.
- Enter all the necessary details required to create a NETGEAR account including name, Password, a region then clicks on the Continue tab.
- Turn on Face ID if you want to by clicking the enable face ID option.
- In the next window, you will be notified of the completion of the Netgear account. Click on the Save button
How To Setup Netgear Router Via Routerlogin.net?
Steps to configure the Netgear Orbi using the Orbi app on your mobile device
- To start the configuration process, click on the Continue button of the configuration page of orbilogin.com window
- Now, allow your camera to scan the QR code of your Orbi device to identify it. You can find the barcode beside the product label of your Netgear Orbi rbr20.
- Click on the Ok button to permit the camera to access your mobile device.
- Point the camera of your mobile device towards the scanner and click on the Continue. The Wi-fi Network Name of your Orbi device will be displayed on your screen.
- Locate your modem and click the Continue tab.
- Restart your modem by disconnecting all the wires connected to it. Wait for a couple of minutes to power it back on.
- Now, plug in your modem and wait for a few minutes to allow the LED lights of your modem to get stable.
- Go back to your Orbi app on your mobile device click on the Continue tab.
- From the next window, you can position the satellites that you placed during the connection process of your Netgear Orbi rbr20.
- If there is a strong connection, your satellites will show the solid blue LED on its bottom surface. If the Orbi satellites light amber or magenta, users are recommended to move satellites closer to the Wi-fi mesh system.
- Your orbilogin.com interface will start connecting to the default Orbi Wi-fi network.
- Once connected to the network, your Orbi app will search for the satellites.
- If your Orbi device is unable to find the satellites, we recommend moving your satellites closer to the Netgear Orbi wi-fi mesh system and try again.
- Personalize your Wi-fi settings, including the secure Network name and Wi-fi password then click on the Next button. Users are recommended to set a unique SSID name
- In the next window, set up a login password that will allow you to interact with the orbilogin.com interface of your Netgear Orbi device
- Just in case you forget the login password of the Netgear Orbi login window, you can recover it by giving the answers to the security questions that you are going to assign in this step. Setup security questions to enable the recovery process of your Netgear Orbi login window.
- When done, click on the Next button. Your new settings will start applying on your Netgear Orbi device.
- Your Orbi device will start searching for the available firmware for your Netgear Orbi rbr20.
- If there is firmware available for your Orbi device, click on the Update button to initialize the firmware update process.
- When the Orbi’s device gets successfully updated, click on the Next button.
- Your device starts the reboot process to apply the settings you configured which will take about 3 minutes.
- Once you are connected with the new settings of your Netgear Orbi, you are all set up. Click on the Next button.
- On the main dashboard of the orgilogin.com configuration page, you will see all the settings and features you can access on your Orbi device.
- For the latest information regarding your Netgear Orbi, you can type Netgear.com/support on the address bar of your browser.
Note: While setting up the security questions, make sure you assign the relevant security questions that provide convenience trousers to easily answer those questions during the recovery process of the login password. You can interact with the interface of the orbilogin.com window to perform the recovery process of the login password of the Netgear Orbi login window.