Your UPS is not charging, and the indicators are misleading. No lights, false battery readings, or sudden power loss during outages are common signs. Thousands of users report the same issue: the unit shows full charge but dies instantly, or it won’t power on at all. The root cause is often not the battery itself, but a failed charging circuit, a known hardware defect, or a firmware glitch. This guide walks you through proven diagnostic steps, user-reported fixes, and how to decide between repair and replacement. You’ll learn how to test your UPS safely, spot dangerous internal defects, and avoid wasting money on unnecessary battery swaps.
Check Power and Indicator Lights First

No Lights When Plugged In
If your UPS shows zero response when plugged in, the issue may start before the internal circuit. No lights usually mean no power reaching the unit, but the outlet isn’t always to blame.
- Test the outlet with a lamp or multimeter to confirm power is present
- Inspect the power cord for fraying, cuts, or loose connections
- Try a different outlet on a separate circuit
- Listen for clicks or hums when plugging in; silence suggests a dead input circuit
⚠️ Critical: If the UPS still shows no response after these checks, the problem is likely internal, such as a blown fuse, failed rectifier, or damaged PCB.
Solid or Blinking Light Patterns
Some UPS units display status lights that can be misleading. A solid green light doesn’t always confirm active charging.
- Unstable green light (flickering): Indicates charging circuit instability
User: mayer (Jul 1, 2017): “Green light turns on and off repeatedly, which points to failed regulation.” - Full battery icon with no load: Test under real conditions by plugging in a lamp and simulating an outage
- Battery symbol with rapid discharge: Could mean the battery isn’t accepting charge
✅ Pro Tip: Use the UPS self-test button if available. If it fails or alarms immediately, suspect an internal charging issue.
Test the Charging Circuit with a Multimeter
Measure Output Voltage Without Battery
This is the most reliable way to check whether your UPS can actually deliver a charging voltage. The reading tells you if the internal regulator is working.
Steps:
1. Power off and unplug the UPS
2. Disconnect the battery
3. Set your multimeter to DC voltage (20V or 50V range)
4. Connect red probe to (+) and black probe to (–) on the battery terminals
5. Plug in the UPS and read the voltage
- Expected reading: 13.5V to 14.5V for 12V systems, 27V to 29V for 24V systems
- Low or zero reading (e.g., 0V, 5.2V, or 13.87V): Charging circuit is dead
User: Jack (Dec 6, 2021): “Measured 13.87V, which is not enough to charge a 12V battery.”
❌ If voltage is below 13V on a 12V system, the charging regulator has likely failed.
Check for False Battery Detection
Some UPS models fake battery status even when the battery is completely disconnected.
- With battery removed, plug in the UPS
- If it shows “fully charged” or runs a self-test, the detection circuit is broken
- This means the UPS won’t trigger charging even with a good battery installed
🛠️ This behavior is common in CyberPower and older APC models, where firmware doesn’t validate actual battery presence.
User: Jack (Dec 6, 2021): “With battery removed, the UPS still shows full battery. It doesn’t detect the missing battery.”
Verify Battery Health and Compatibility
Confirm Battery Specifications
A mismatched battery won’t charge properly and may damage the UPS over time.
- Check the model number on the UPS label (e.g., CP1500PFCLCD)
- Match voltage (12V or 24V) and Ah rating (7Ah or 9Ah)
- Use only manufacturer-recommended replacements
⚠️ Installing a higher Ah battery can overload the charging circuit and shorten its lifespan.
Test with a Known-Good Battery
Even brand-new batteries can be defective right out of the box.
How to test:
1. Obtain a verified working battery with matching specs
2. Install it and let it charge for 8 or more hours
3. Monitor indicator lights and self-test results
- If charging still fails → the UPS is the problem
- If it works → the original battery was defective
✅ User: Steven P (Dec 4, 2021): “Swapped the battery and had the same issue. The problem was the UPS, not the battery.”
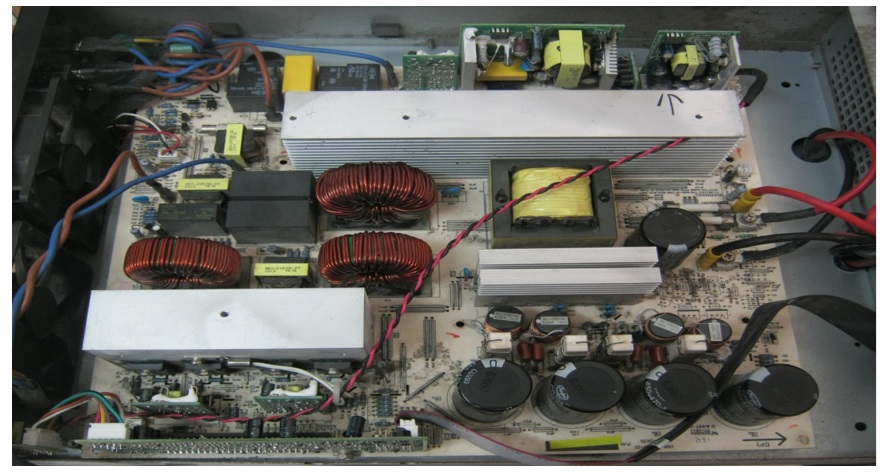
Spot the Yellow Glue of Death in CyberPower UPS Units

Identify This Hardware Defect
CyberPower users should pay close attention here. The “Yellow Glue of Death” is a well-documented failure that kills charging circuits in many models.
What it is: A thermally conductive adhesive applied to MOSFETs and voltage regulators. Over time, it degrades and causes short circuits and charging failures.
How to check:
1. Unplug the UPS and discharge internal capacitors
2. Open the case (skip if under warranty, as this may void coverage)
3. Inspect near power components for:
– Yellowish, sticky residue
– Cracked or oozing adhesive
– Corroded or discolored PCB traces
Affected models include:
– CyberPower CP1500PFCLCD
– GS1500U
– Multiple 1000VA to 1500VA units manufactured between 2015 and 2020
❌ User: Alex Duval (Oct 11, 2024): “Three units failed the same way. It wasn’t the battery, it was the yellow glue.”
User: Michael McAuliffe (Jan 23, 2023): “After researching ‘CyberPower yellow glue of death,’ I realized repair wasn’t worth it.”✅ Fix options: Clean residue with isopropyl alcohol, reflow solder joints, or replace the entire board.
Diagnose Firmware and Design Flaws
False Full Battery Reporting
Some UPS units lie about charge status due to flawed firmware logic.
- Battery shows 100% but drains in seconds
- No low-battery warning during an outage
- Self-test fails repeatedly
🧩 Root cause: The microcontroller doesn’t read actual voltage and relies on timers or preset logic instead.
Workarounds to try:
– Perform a factory reset if the model supports it
– Unplug the UPS for 15 or more minutes to reset internal logic
– Reconnect and let it charge for 24 uninterrupted hours
⚠️ If the issue persists, firmware cannot be updated and replacement is the best long-term option.
Charging Regulator Failure
The charging IC or MOSFET may fail silently without any visible alarm.
Symptoms to watch for:
– Battery feels warm but isn’t charging
– UPS fan runs constantly even at low load
– Faint burning smell near ventilation grilles
🔍 Open the case and inspect for:
– Bulging or leaking capacitors
– Burnt spots on the PCB
– Loose or cracked solder joints✅ Use a thermal camera or IR thermometer to spot abnormally hot components during operation.
Decide Whether to Replace or Repair
When to Replace the UPS
Don’t waste time and money on a unit that can’t be reliably fixed.
Replace if:
– The unit is over 5 years old
– It’s affected by the Yellow Glue of Death
– Charging circuit voltage reads zero or is unstable
– Multiple batteries have failed in the same unit
– It’s out of warranty and repair costs exceed 50% of a new unit
💡 Replacement is often safer and cheaper for older models with known design flaws.
When Repair Makes Sense
Only attempt repair if you have experience working with electronics and understand the safety risks.
Repairable issues include:
– Blown fuse (simple swap)
– Failed external charging module
– Cleanable corrosion or glue residue
– Replaceable PCB (available from parts suppliers)
⚠️ Safety first: UPS capacitors store lethal voltage. Discharge them fully before opening the case.
✅ To discharge safely, connect a 10kΩ resistor across the battery terminals for 5 minutes before handling internal components.
Prevent Future Charging Issues
Schedule Regular Battery Replacements
Even healthy batteries only last 3 to 5 years under normal conditions.
Best practices:
– Replace every 3 years in high-temperature environments
– Monitor runtime through UPS management software
– Log self-test results monthly to spot gradual decline
📅 Set a calendar reminder so you replace batteries before they fail unexpectedly.
Keep the UPS in a Cool, Dry Location
Heat damages both batteries and internal electronics.
- Avoid placing the UPS in garages, attics, or near heat sources
- Ensure airflow around all vents
- Clean dust from fans and grilles every 6 months
❌ High temperatures accelerate Yellow Glue degradation and shorten component lifespan.
Use a Surge-Protected Outlet Only
Never plug a UPS into:
– Extension cords
– Power strips without surge protection
– Shared circuits with refrigerators or air conditioners
✅ Plug directly into a wall outlet with built-in surge protection for stable, clean power.
Frequently Asked Questions About UPS Not Charging
Why does my UPS show full battery but dies instantly during an outage?
This usually indicates a failed charging circuit or false battery reporting from faulty firmware. The UPS isn’t actually charging the battery, so it has little to no runtime when power is cut. Testing the charging voltage without the battery will confirm whether the circuit is working.
Can a new battery fail to charge in a UPS?
Yes. Even brand-new batteries can be defective, but a persistently failing charge after a battery swap usually points to a UPS internal fault. This is especially common in CyberPower models affected by the Yellow Glue of Death.
How do I test if my UPS charging circuit is working?
Remove the battery, set a multimeter to DC voltage, and measure across the battery terminals while the UPS is plugged in. A healthy 12V system should read between 13.5V and 14.5V. Anything significantly lower means the charging regulator has failed.
What is the CyberPower Yellow Glue of Death?
It’s a thermally conductive adhesive used on internal components that degrades over time, causing short circuits and charging failures. It primarily affects CyberPower 1000VA to 1500VA models made between 2015 and 2020, including the CP1500PFCLCD.
Is it worth repairing an older UPS that won’t charge?
Usually not. If the unit is out of warranty and repair costs exceed half the price of a replacement, buying a new UPS is more cost-effective. Design flaws and degraded internal components often make repairs temporary.
How long should a UPS battery last before replacement?
Most UPS batteries last 3 to 5 years under normal conditions. In hot environments or with frequent power events, replacement every 3 years is recommended to maintain reliable backup performance.
Key Takeaways for Fixing a UPS That Is Not Charging
A UPS not charging is rarely just a dead battery. Most often, the issue lies in a failed charging circuit, false diagnostic reporting, or a known hardware defect like the CyberPower Yellow Glue of Death. Start with simple checks: confirm outlet power, inspect indicator lights, and measure charging voltage without the battery installed. Then test with a known-good battery to isolate the fault. If the unit still won’t charge or shows phantom full status, inspect the internal components or plan a replacement. For older models with documented design flaws, replacing the UPS is safer and cheaper than attempting repairs. Stay proactive by monitoring battery health, keeping the unit cool, and replacing aging hardware before it fails when you need it most.