
You just bought a Netgear extender to kill dead zones, but the setup stalls when you try to connect it to your Spectrum router. LEDs blink endlessly, setup pages refuse to load, or your devices still drop signal right after pairing.
This guide shows you exactly how to connect Netgear WiFi extender to Spectrum router using WPS, a web browser, or the Nighthawk app. You will learn the correct order of steps, how to read LED status lights, and where to place your device for maximum speed without any confusing jargon.
Place Your Extender Correctly Before Setup
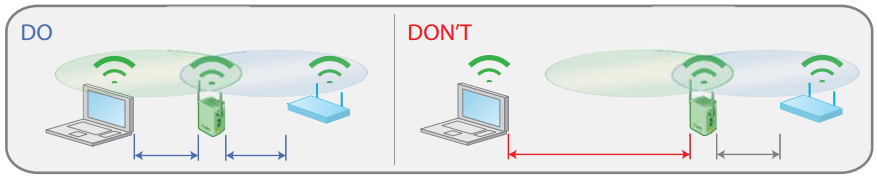
Poor physical placement causes most failed setup attempts for new users. You must position the hardware correctly before pressing any buttons to ensure a stable initial connection.
Optimal Distance for Initial Configuration
Place the Netgear extender in the same room as your Spectrum router. Keep the distance between them around 10 to 15 feet during the entire configuration process.
- Plug the device directly into a wall outlet.
- Avoid using power strips or surge protectors during setup.
- Wait for the Power LED to turn solid green or blue.
This stabilization usually takes 1 to 2 minutes. If the light does not appear, press the Power or On/Off button manually. Some models have a switch labeled Access Point or Extender. Ensure this switch is set to Extender mode before proceeding.
Perform a Factory Reset if Needed
If you have used this extender before, you must reset it to clear old network data. Locate the small reset button near the WPS button on the side or back of the unit.
- Use a paperclip or pen to press the button.
- Hold it down for at least 10 seconds.
- Watch for the Power LED to turn red then switch to solid green.
Releasing the button too early will not clear your settings. The green light is your only confirmation that the reset worked. Skip this step only if the device is brand new out of the box.
Use WPS to Connect Netgear Extender to Spectrum Router

The WPS method is the fastest way to link your devices if your Spectrum router supports it. Many modern Spectrum routers have a dedicated WPS button on the front or back panel.
Execute the WPS Pairing Sequence
Timing is critical when using WPS to connect Netgear WiFi extender to Spectrum router systems. You must complete the steps within a specific time window to succeed.
- Press the WPS button on your Spectrum router first.
- Wait for a light to blink on the router confirming activation.
- Press the WPS button on your Netgear extender within 2 minutes.
The WPS LED on the extender will blink while pairing. This process can take up to 2 minutes to complete. Success is confirmed when the WPS LED and Router LED both turn solid green or blue.
Handle Dual-Band Network Connections
Some extenders only connect one frequency band at a time via WPS. If your model supports both 2.4 GHz and 5 GHz, you may need to repeat the process.
Always start with the 2.4 GHz band since it has better range. This band is essential for smart home devices like bulbs and thermostats. Repeat the WPS steps to pair the 5 GHz band if your specific model requires separate pairing for each frequency.
Configure Manually Via Web Browser Interface

Use this method if your Spectrum router lacks a WPS button or if the automatic pairing fails. This approach gives you full control over every setting and network name.
Connect Device to Default Extender Network
Open the Wi-Fi settings on your phone, tablet, or laptop. Look for a network named NETGEAR_EXT or Netgear_Ext in the available list.
- Avoid networks with long number strings at the end.
- These indicate a previously used unit needing a reset.
- Connect to the network using no password or the default word “password”.
Your device will warn that there is no internet access. This is normal behavior. Select “Stay Connected” or “Always Connect” to proceed with the setup.
Access the Setup Portal Page
Open a web browser like Chrome, Safari, or Edge. Type one of the following addresses into the address bar to reach the configuration page.
- http://mywifiext.net
- http://mywifiext.local
- http://mywifiext.com
Try the IP addresses 192.168.1.250 or 192.168.0.250 if the URLs do not work. Switch to Incognito mode or a different browser if the page fails to load. Ensure you are still connected to the extender network and not your main home Wi-Fi.
Complete the Manual Configuration Steps
Select Manual Setup when prompted to bypass auto-detection issues. The system will scan for local networks and display your Spectrum Wi-Fi name.
- Choose your Spectrum SSID from the list for both 2.4 GHz and 5 GHz.
- Enter your Spectrum Wi-Fi password exactly as it appears on the router.
- Name your extended network with a unique name or match the main SSID.
- Create an admin username and a strong unique password.
- Answer two security questions for account recovery.
Click Next to finish. The extender will reboot automatically. Wait 2 to 3 minutes for all LEDs to stabilize before moving the device.
Set Up Using the Nighthawk Mobile App
Newer Netgear models work best with the Nighthawk app for a guided experience. This method is ideal for users who prefer mobile interfaces over desktop browsers.
Follow the App Guided Installation
Download the Nighthawk app from your device store or visit nighthawk-app.com. Open the app and tap Menu followed by Set Up a New Nighthawk System.
- Select Range Extender and tap Get Started.
- Confirm the Power LED is solid green or blue.
- Tap Next and connect your phone to the NETGEAR_EXT network when prompted.
- Return to the app and tap Wifi Is Connected.
- Select your Spectrum 2.4 GHz and 5 GHz networks from the list.
- Enter your Spectrum Wi-Fi password for each band.
- Create your admin credentials and answer security questions.
The app will check for firmware updates automatically. Tap Update if prompted and wait 5 to 10 minutes without unplugging the device. The process finishes when the Power and Router LEDs turn solid green.
Relocate Extender for Maximum Signal Coverage
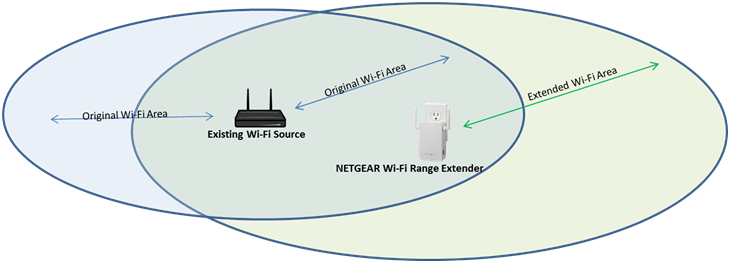
Moving the device to its final location is the most critical step for performance. Incorrect placement after setup causes weak signals and slow speeds in your dead zones.
Move to the Halfway Point
Wait until all LEDs are solid and no longer blinking. Unplug the extender from the initial outlet near the router.
- Move the device halfway between your Spectrum router and the dead zone.
- Plug it directly into a wall outlet in the new location.
- Wait up to 4 minutes for the device to reconnect and stabilize.
Avoid placing the unit behind furniture, inside cabinets, or near microwaves. Metal objects and thick walls can block the signal path between the router and extender.
Interpret LED Signal Strength Indicators
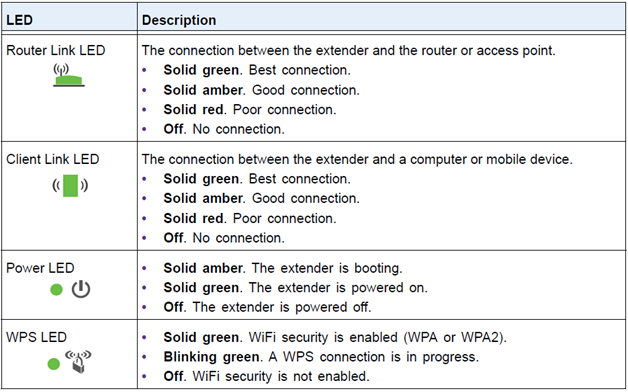
The Router LED color tells you if the new location is viable. Check this light immediately after the device reconnects in the new spot.
- Solid Green/Blue: Strong signal. The location is optimal.
- Flashing Amber: Weak signal. Move the extender closer to the router.
- Solid Red: No connection. The device is too far away.
- Blinking: Still connecting. Wait a few more minutes.
A fourth LED often lights up when a client device like a phone connects to the extender. This confirms active data transmission through the extended network.
Verify Compatibility Across Netgear Models
These connection methods work across nearly all Netgear extender families. Confirming your specific model helps you anticipate available features like One WiFi Name.
Supported Model Categories
WiFi 5 (AC) Series
Includes popular models like EX2800, EX3700, EX6150, EX6400, and EX7000. These 29 models support WPS and web setup.
WiFi 6 Series
Includes EAX10, EAX15, EAX20, and EAX80. These 15 models offer faster speeds and better device handling.
WiFi 7 Series
Includes EXS18, EXS25, and EXS27. These newest models provide the latest connectivity standards.
Higher-end models in the EAX series feature One WiFi Name technology. This allows seamless roaming between your router and extender without manual switching on your devices.
Troubleshoot Common Connection Errors
Even with perfect execution, issues can arise during the process. Use these specific fixes to resolve the most frequent problems users face.
Resolve Access and Pairing Failures
Cannot access mywifiext.net
Try alternative addresses like mywifiext.local or the IP 192.168.1.250. Use Incognito mode to bypass cache issues. Ensure your device is connected to the extender network and not your main Wi-Fi.
WPS connection fails repeatedly
Press the router button first and the extender button within 2 minutes. Verify your Spectrum router actually supports WPS, as some ISP modems disable it. Switch to manual web setup if WPS continues to fail.
Weak signal after moving the device
Check the Router LED color immediately. If it is amber or red, move the extender closer to the main router. Reboot both the extender and Spectrum router to refresh the connection.
Smart home devices won’t connect
Ensure the 2.4 GHz band is explicitly extended. Create a dedicated 2.4 GHz SSID on the extender for IoT devices if you are using unique names. Verify the password matches exactly if using seamless roaming.
Maintain Your Extender Performance
Regular maintenance ensures your extended network remains fast and secure over time. Simple habits prevent future connection drops and security vulnerabilities.
Update Firmware and Reboot Regularly
Check for firmware updates monthly via the Nighthawk app or the web interface. Updates fix bugs, improve speed, and patch security flaws.
Unplug the device for 10 seconds if it freezes or acts strangely. Replugging it often resolves minor glitches without needing a full reset. Only perform a factory reset when switching routers or selling the device.
Frequently Asked Questions About Connecting Netgear to Spectrum
What is the default password for NETGEAR_EXT?
The default password is usually “password” or there is no password required at all. You must connect to this temporary network to begin the setup process before configuring your actual Wi-Fi security.
Why will mywifiext.net not load on my phone?
Your phone might be connected to your main Spectrum Wi-Fi instead of the extender. Switch your Wi-Fi settings to the NETGEAR_EXT network and try accessing the page again using a private browsing window.
How far can I place the extender from my Spectrum router?
During setup, stay within 10 to 15 feet. For final use, place it halfway to the dead zone but ensure the Router LED remains solid green. If the light turns amber or red, you are too far away.
Do I need to reset my Netgear extender for a new router?
Yes, a factory reset is mandatory when switching to a new router. Hold the reset button for 10 seconds until the light turns green to clear all old network credentials and settings.
Can I use the same Wi-Fi name for my extender and router?
Yes, you can name the extended network exactly like your main Spectrum SSID. Some Netgear models have an “Enable One WiFi Name” feature that automates this for seamless roaming.
Key Takeaways for Connecting Netgear WiFi Extender to Spectrum Router
Successfully learning how to connect Netgear WiFi extender to Spectrum router requires patience and correct positioning. Always start with the device close to your router, perform a factory reset if it was used before, and wait for solid green LEDs before moving it to its final location.
Whether you use WPS, the web interface, or the Nighthawk app, the core principles remain the same. Verify your signal strength using the LED colors and update your firmware regularly to maintain top performance. Start your setup today by plugging the device into a wall outlet near your Spectrum router.



