Netgear AC1200 router Setup – Routerlogin.net
How to set up a Netgear AC1200 router in a local network?
A user must keep the Quick Start guide along with him during the setup process, instructions regarding the connection process will be given on that guide. There is a sticker that came along with your router, you are going to require it during the setup process. You can also note down the default Wireless settings that are given on that card. A user requires the default Wireless credentials when he for the first time connects to the router’s network.
Steps to setup a Netgear AC1200 router in a local network
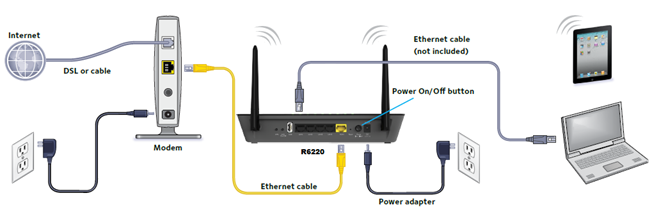
- To start the setup process, plug in the power adapter of the modem to an electric outlet.
- Connect your router and modem using an Ethernet cable. Join one end of the cable at the back of your modem and the other end to the Internet port of your router.
- To turn on the device, press the Power button on the back panel of your Netgear AC1200 router.
- Wait for a few seconds until the three LEDs ( Power LED, Wi-fi LED, Status LED) turn solid green.
- When your router successfully turns on, you can connect it to your computer.
- Move on to your computer, open the Wi-fi settings and search for the available Wi-fi networks.
- Select the Network name that was given on the card that came along with the router.
- Enter the default Wi-fi password given on the sticker in the provided field. Click on the Connect button.
- Once you are connected to the router’s network the routerlogin.net configuration page appears on the screen.
- You need to assign a login password on the new password field and retype it on the Confirm password field.
- Select the security questions that you want to assign for the password recovery process.
Note: In the future, if a user forgets the login password of the Netgear router login window, he can recover it using the recovery process.
- Click on the Next button
- The next window will show that you are successfully connected to the Internet. Click on the Next to move on to the further step.
- It takes you to the Firmware update page. If a new firmware is found, it will notify you of it.
- Click on the yes button to start the upgrade process. It may take a few minutes.
- On the next page, you can customize the Wireless settings of the network. You can bring adjustments in Wi-fi name, Wi-fi password, Security options, and SSID broadcast.
- Users must assign a different name to each of the Wi-fi bands of the Netgear router.
- To secure the network, users are recommended to disable the SSID broadcast of the router’s network.
- Make sure the Wi-fi password is different from the admin password of the Netgear AC1200 router.Click on the Next button when you are done.
- The summary page appears on the screen allowing you to review the settings you did.
- Click on the Finish button and the router starts the reboot process to apply the settings you made.
Note: Users are recommended to assign easy security questions so that during the recovery process, one can easily guess their answers. If a user is unable to answer the security questions, he has to restore the default settings to the router. When the reset process is done, you can type the default login password i.e “admin” on the password field of the routerlogin.net login window.