
Your Wi-Fi signal fades in distant rooms, yet a spare NETGEAR router sits idle in a drawer. You can transform that unused device into a powerful wireless repeater to extend your network coverage without running any new cables. This solution eliminates dead zones by rebroadcasting your existing signal wirelessly.
This guide explains exactly how to use a NETGEAR router as a repeater without cable using secure WDS bridging or model-specific repeating modes. You will learn to gather critical network data, configure MAC address filtering, and avoid common IP conflicts that cause connection failures. We cover setup steps for standard models and Nighthawk series devices like the R7000.
Select the Correct Repeating Method for Your Model

NETGEAR devices support two distinct wireless bridging technologies. Your specific router model determines which approach you must take to extend your network successfully. Choosing the wrong method leads to configuration errors or total connection failure.
Compare WDS Bridging Versus Dedicated Repeater Mode
WDS (Wireless Distribution System) works across most major router brands including TP-Link and Asus. It allows your NETGEAR unit to connect wirelessly while maintaining full WPA2 security encryption. Both routers must share the same wireless channel and password for this to function.
Dedicated Repeater Mode exists only on specific Nighthawk models like the R7000 and R6100. This proprietary firmware option requires your primary router to have no security password enabled. This major limitation exposes your base network to unauthorized access unless you disable wireless clients on the main unit.
Verify Your Router Firmware Capabilities
Check your specific model number before starting any configuration work. High-end Nighthawk units include a dedicated “Repeating Function” menu that simplifies the process slightly. Older or budget-friendly NETGEAR models typically lack this feature entirely.
Navigate to Advanced > Wireless in your admin panel to look for WDS options. If you cannot find these menus, your firmware may not support wireless repeating. Resetting the device to factory defaults often reveals hidden menu options.
Gather Essential Network Data Before Configuration
Successful wireless bridging requires precise information from both your main internet source and the secondary NETGEAR device. Missing a single digit in a MAC address or password prevents the link from establishing.
Collect Primary Router Settings
Log into your main internet router admin panel to record these exact values. You need the SSID name written exactly as it appears including capitalization. Find the Wi-Fi MAC address under Status or Wireless settings for WDS pairing.
Set your wireless channel manually to a fixed number like Channel 1 or 9. Auto-channel selection breaks repeater connections immediately. Note your current security type and password if using WDS. Record the DHCP IP range to avoid address conflicts later.
Retrieve NETGEAR Repeater Information
Connect your computer to the spare NETGEAR router via Ethernet or default Wi-Fi. Access the admin interface at 192.168.0.1 or 192.168.1.1. Go to Advanced > Router Information to find the unique Wireless MAC address.
Ensure the firmware is fresh by resetting the device if it was previously used. Write down the default LAN IP address displayed on the label. You will need these values to configure the bridge correctly.
Configure WDS Repeater for Secure Wireless Extension
This universal method maintains network security and works with most router combinations. Follow these steps to create a stable encrypted bridge between your devices.
Set Fixed Channel on Primary Router
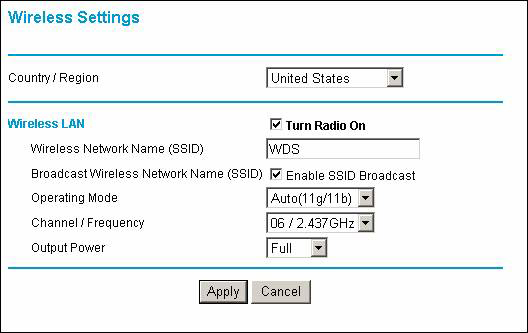
Log into your main router interface through a web browser. Navigate to Wireless Settings > Basic to begin configuration. Change the channel setting from “Auto” to a specific number like Channel 1.
Ensure WPA2-PSK security is active with a strong password. Save these settings before moving to the next device. Leaving the channel on Auto causes the WDS link to drop randomly.
Adjust NETGEAR Wireless Parameters
Access the NETGEAR admin panel using a direct connection. Go to Setup > Network Settings to change the LAN IP address. Set it to 192.168.1.2 if your main router uses 192.168.1.1.
Navigate to Wireless Settings > Basic on the NETGEAR unit. Set the SSID to match your main network name exactly. Select the same fixed channel you chose earlier. Enter the identical Wi-Fi password used on the primary router.
Enable WDS Mode on NETGEAR Device
Click Advanced > Wireless > WDS in the menu sidebar. Select the option to Enable WDS Repeater Mode. Enter the MAC address of your primary router in the designated field.
Input the Wi-Fi password again to authenticate the link. Note the MAC address displayed for the NETGEAR router itself. Click Apply to save changes and reboot the device.
Finalize Bridge Settings on Main Router
Return to your primary router admin page for the final step. Go to Advanced > Wireless > WDS settings. Enable WDS Repeater Mode on this end as well.
Click Scan to find your NETGEAR device SSID. If it does not appear, enter the NETGEAR MAC address manually. Input the Wi-Fi password and apply settings. Wait two minutes for the status to show “Connected.”
Setup Dedicated Repeating Mode on Nighthawk Models
Owners of R7000 or R6100 routers can use a specialized mode. Be aware this method requires disabling security on your main network which poses significant risks.
Disable Security on Base Station
Warning: Your network will be open to neighbors. Connect to your base router and log into the admin panel. Go to Wireless > Wireless Settings and set Security to None. Remove all passwords completely.
Disable Smart Connect to prevent band switching issues. This step is mandatory for the repeating function to activate. Without disabling security the system refuses to connect.
Lock Wireless Channel Manually
Stay in the Wireless Settings menu on the base station. Change the channel from “Auto” to a fixed value like Channel 9. The system displays an error if you skip this step.
Enable Disable Wireless Clients in the Repeating Mode settings. This prevents devices from connecting directly to the unsecured base station. It forces all traffic through the repeater path.
Configure Nighthawk Repeater Settings
Connect to the default Wi-Fi of your R7000 or R6100. Access the admin panel at 192.168.0.1. Go to Advanced > Router Information and record the MAC address.
Log back into the base router and go to Advanced > Advanced Setup > Repeating Mode. Select the 2.4 GHz band and enter the repeater MAC address. Save the settings before proceeding.
Log into the repeater router admin interface again. Navigate to Advanced > Wireless > Repeating Function. Select 2.4 GHz and check the “Repeating” box. Set Security to None and Channel to 9. Assign a static IP like 192.168.0.19. Enter the base router MAC address and click Apply.
Avoid Common Configuration Mistakes
Small errors in settings cause the entire wireless bridge to fail. Review these frequent issues to ensure your setup works reliably.
Resolve Auto Channel Conflicts
Using “Auto” channel selection is the primary cause of failure. Both routers must stay on the exact same fixed channel at all times. If one device switches channels the link breaks immediately. Always disable Auto Channel on both units.
Prevent IP Address Overlaps
Never leave both routers set to 192.168.1.1. This creates a conflict that stops internet access. Change the repeater LAN IP to something outside the main DHCP pool. The repeater should not run its own DHCP server.
Match Security Protocols Exactly
For WDS the SSID and password must match character for character. Encryption types like WPA2 must be identical on both ends. Any mismatch prevents the handshake from completing.
Optimize Repeater Placement
Place the repeater halfway between the main router and the dead zone. It needs a strong signal to rebroadcast effectively. Putting it too far away results in high signal bars but no internet data.
Optimize Dual-Band Performance and Speed

Extending your network involves trade-offs in speed and latency. Understand these limitations to manage expectations properly.
Configure 5 GHz Band Separately
WDS settings apply to only one band at a time. You must repeat the entire configuration process for the 5 GHz interface. Use a fixed 5 GHz channel like 36 or 149.
Ensure both routers support the same 5 GHz standards. Note that 5 GHz has a shorter range than 2.4 GHz. Place the repeater closer to the main router for 5 GHz bridging.
Understand Throughput Limitations
Wireless repeating reduces maximum speed by about 50 percent. The radio receives and transmits data sequentially rather than simultaneously. Streaming high-definition video may buffer if the backhaul link is weak.
Latency increases slightly due to the extra hop. Devices may not roam seamlessly between routers like they do with mesh systems. They often stick to the weak signal until disconnection occurs.
Troubleshoot Connection Failures Effectively
Diagnose issues step by step if the repeater does not work immediately. Most problems stem from simple setting mismatches.
Fix No Internet Errors
Check if the repeater LAN IP is outside the main DHCP range. Verify both routers use the same fixed channel. Confirm the password is correct and security types match. Reboot the main router first then the repeater.
Repair WDS Link Issues
Verify MAC addresses are entered correctly on both devices. Ensure WDS is enabled on both ends of the connection. Check that firmware is up to date on both units. Reset both routers and try the process again if needed.
Address Security Mode Errors
The system shows a “No Security” error if you mix modes. You must either switch to the WDS method or disable security on the base. There is no workaround for this firmware restriction.
Maintain Network Security and Stability
Regular maintenance keeps your extended network running smoothly over time. Neglecting updates can lead to vulnerabilities or dropped connections.
Update Firmware Regularly
Check for firmware updates on both routers every few months. Updates often fix WDS bugs and improve stability. Outdated firmware may lose repeater functionality after power outages.
Monitor Connected Devices
Watch the repeater admin page for unknown devices regularly. This is crucial if using Repeating Mode with an unsecured base. Unauthorized users could access your network backbone if client access is not disabled.
Reconfigure After Password Changes
Changing the main router password breaks the WDS link immediately. You must re-enter the new password in the WDS settings on the NETGEAR unit. Document your setup to make future changes easier.
Frequently Asked Questions About Using NETGEAR Router as Repeater Without Cable
Can I use any NETGEAR router as a wireless repeater?
Most NETGEAR routers support WDS bridging but not all have Dedicated Repeater Mode. Check your model specifications to confirm compatibility. Older models may require third-party firmware to enable repeating features.
Does using a NETGEAR router as a repeater reduce internet speed?
Yes wireless repeating typically cuts throughput by about 50 percent. The device must receive and retransmit every packet sequentially. This physical limitation affects all wireless extender setups regardless of brand.
Why does my WDS connection fail when using Auto Channel?
Auto Channel allows routers to switch frequencies dynamically which breaks the bridge. WDS requires both devices to stay on a fixed channel like 1 or 9. Manual channel assignment is mandatory for stable operation.
Is it safe to use Dedicated Repeater Mode on Nighthawk routers?
It is risky because the base router must have no password protection. Anyone nearby can connect to your main network unless you disable wireless clients. WDS is the recommended secure alternative for most users.
Do I need to configure 2.4 GHz and 5 GHz bands separately?
Yes WDS and repeating settings are specific to each frequency band. You must repeat the entire setup process for the 5 GHz interface. Settings do not automatically apply to both bands simultaneously.
Key Takeaways for Using NETGEAR Router as Repeater Without Cable
Using a spare NETGEAR router as a repeater is an effective way to eliminate Wi-Fi dead zones without cabling. The WDS method provides a secure universal solution while Dedicated Repeater Mode offers a model-specific alternative with security trade-offs. Success depends on manual channel selection static IP assignment and precise MAC address configuration.
Start by gathering all network data and choosing the method that fits your security needs. Follow the step-by-step instructions carefully to avoid common pitfalls like IP conflicts. Your extended network will provide reliable coverage for everyday browsing and streaming tasks.



