
A loose Wi-Fi signal often ruins online gaming or video calls, but a wired connection solves this instantly. Learning how to connect to a Netgear router with an Ethernet cable gives you maximum speed and stability for all your devices.
This guide details every step to link your modem, router, and computer using the correct ports. You will discover the proper cable types, power sequences, and troubleshooting fixes for common connection errors.
Connect Modem to Netgear Router
Your internet journey begins at the wall jack where your service provider delivers the signal. Whether you use cable, DSL, or fiber, the modem must receive this signal before the router can distribute it.
Plug in Your Modem First
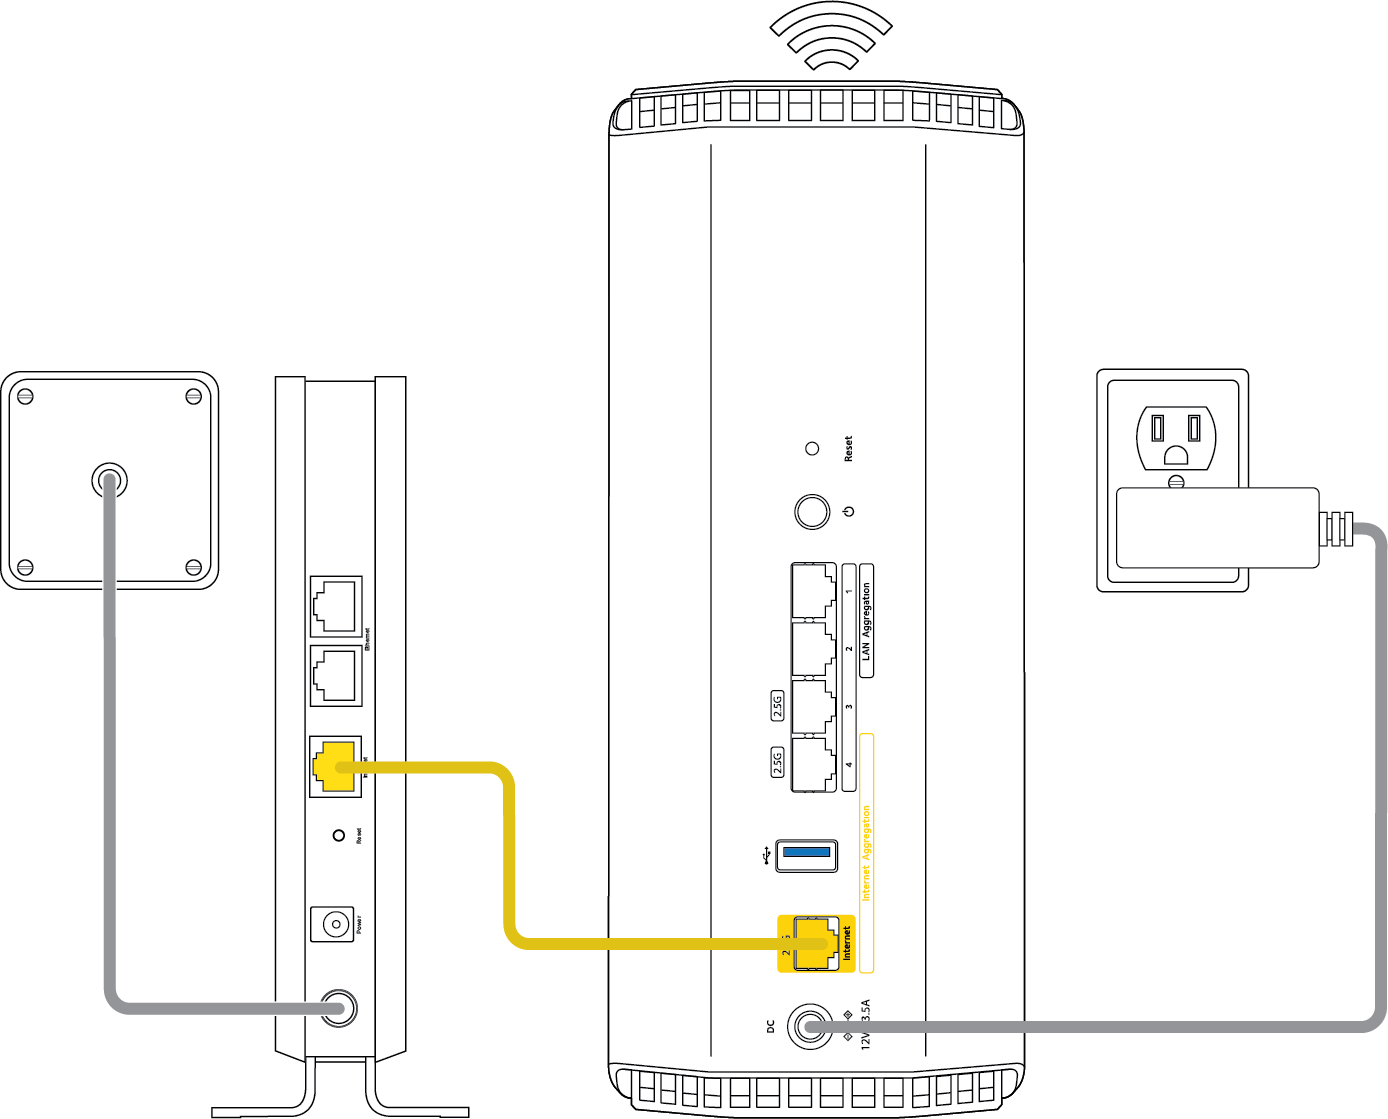
Start by attaching your modem to the wall jack using the appropriate coaxial or phone line. If your modem has a backup battery, remove it temporarily to ensure a clean restart during setup. Plug the modem into a power outlet and wait about 60 seconds for the status lights to stabilize.
Once the power and internet lights appear steady, reinsert the backup battery if your model uses one. This specific order prevents communication errors between your modem and the new router. Skipping this wait time often leads to failed handshakes later in the process.
Use Correct Ethernet Cable
Locate the Ethernet cable included with your Netgear router or grab a standard Cat 5e or Cat 6 cable. Insert one end into the Ethernet port on your modem, which is often labeled “LAN” or “Ethernet.” Connect the other end to the port on your Netgear router labeled “Internet” or “WAN.”
Never plug the modem cable into one of the numbered LAN ports by mistake. The WAN port is usually yellow and separated from the cluster of gray or white LAN ports. A reversed connection prevents internet access even if all lights appear normal.
Power On the Netgear Router

The sequence of powering your devices matters significantly for a successful network handshake. Proper timing ensures the router correctly requests an IP address from your internet service provider.
Connect Power and Wait
Attach the power adapter to your Netgear router and plug it into a direct wall outlet. Avoid using power strips with surge protection for this initial setup, as they can sometimes interfere with the boot process. Watch the LED lights blink as the system starts up.
Wait two to three minutes for the system light to turn solid white or blue, depending on your specific model. Do not unplug the device or press buttons during this critical startup window. If the internet light stays red after three minutes, restart both the modem and router.
Connect Devices via Ethernet
Now that your router is online, you can link your computers, consoles, or smart TVs directly. Wired connections provide the lowest latency and highest throughput for bandwidth-heavy tasks.
Link Computers or Consoles
Take a second Ethernet cable and plug one end into the network port on your device. Insert the other end into any available numbered LAN port on the back of your Netgear router. These ports are typically grouped together and numbered 1 through 4.
Most devices detect the wired connection automatically within seconds. On Windows, the network icon should change from a globe to a computer monitor symbol. Gaming consoles like PlayStation or Xbox will show a wired connection status in their network settings menu.
Verify Connection Stability
Open a web browser or streaming app to confirm the connection is active and stable. Look at the LAN port light on your router corresponding to your device number. It should glow steadily or blink rapidly when data transfers occur.
If the light remains off, try a different cable or move to another LAN port. Faulty cables are a frequent cause of connection failures, so swapping components helps isolate the issue quickly.
Identify Router Ports Correctly
Confusion between port types is the most common reason for setup failure. Understanding the physical layout of your router prevents simple but costly mistakes.
Know WAN vs LAN Ports
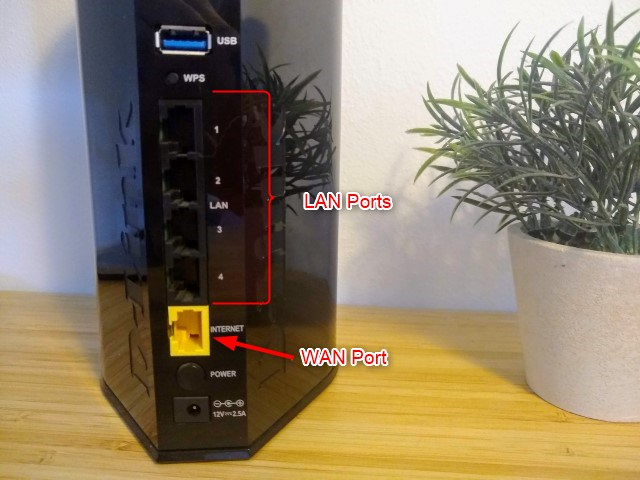
The WAN port connects to the outside world, while LAN ports connect your local devices. On most Netgear models, the WAN port is distinctively colored yellow and labeled “Internet.” The LAN ports are usually gray, white, or blue and numbered sequentially.
Always follow this flow: Modem to WAN, then Router LAN to Device. Plugging the modem into a LAN port creates a local network with no internet access. Check the diagram under your router if the labels are hard to read.
Locate Ethernet Ports on Devices
Desktop towers, laptops, and smart TVs feature an Ethernet jack often marked with a three-computer icon. Push the cable connector firmly until you hear a distinct click. A small LED next to the port should illuminate to indicate activity.
Some ultrabook laptops lack built-in Ethernet jacks entirely. In these cases, use a USB-to-Ethernet adapter to create a wired connection. These adapters work plug-and-play on most modern operating systems without extra drivers.
Troubleshoot Ethernet Connection Issues
Even with correct cabling, occasional glitches can prevent internet access. Systematic troubleshooting resolves most connectivity problems quickly.
No Internet After Cabling
If your device says “Connected” but pages will not load, restart your entire network stack. Power down the router and modem, unplug them for 30 seconds, then power the modem first. Wait for the modem lights to settle before turning the router back on.
Check the Internet or WAN light on your router specifically. A solid blue or white light indicates a good link to the modem. If it is red or off, reseat the Ethernet cable connecting the modem to the router.
LAN Port Not Responding
If a specific LAN port shows no light when a device is connected, try these steps:
* Test with a different Ethernet cable
* Plug the device into another LAN port
* Restart the router completely
* Update the router firmware via the Nighthawk app
If one port fails while others work, the port itself may be damaged. Avoid using that specific port and rely on the remaining functional ones. If no ports respond, reset the router to factory settings.
Device Not Recognizing Cable
On Windows computers, navigate to Settings and select Network & Internet to view Ethernet status. If the system reports no network access, run the built-in network troubleshooter tool. Mac users should go to System Settings, select Network, and click Renew DHCP Lease.
Gaming consoles have their own diagnostic tools:
* Xbox: Settings > General > Network settings > Test network connection
* PlayStation: Settings > Network > Test Internet Connection
* Nintendo Switch: System Settings > Internet > Test Connection
Failed tests usually point to a router or modem issue rather than the console itself.
Optimize Wired Network Performance

Maximizing your wired speed requires quality components and smart configuration settings. These adjustments ensure you get the full bandwidth you pay for.
Use Quality Ethernet Cables
Cable quality directly impacts speed, especially for Gigabit internet plans. Use Cat 6 or higher cables to support speeds over 300 Mbps reliably. Cat 5e works for basic needs but suffers more interference over long distances.
Keep Ethernet cables under 100 feet to maintain signal integrity. Avoid running cables parallel to high-voltage power lines to reduce electromagnetic interference. Shielded cables offer extra protection in electrically noisy environments.
Prioritize Wired Devices
Netgear routers include Quality of Service (QoS) features to manage bandwidth allocation. Access your router dashboard by typing http://routerlogin.net in a browser. Log in with your admin credentials to access advanced settings.
Navigate to Advanced > QoS Setup to configure priorities. Set your wired gaming console or work computer to high priority. This ensures critical devices get bandwidth first during heavy network usage times.
Maintain Secure Wired Connections
Physical access to your LAN ports can pose a security risk if left unchecked. Simple configuration changes protect your local network from unauthorized wired devices.
Disable Unused LAN Ports
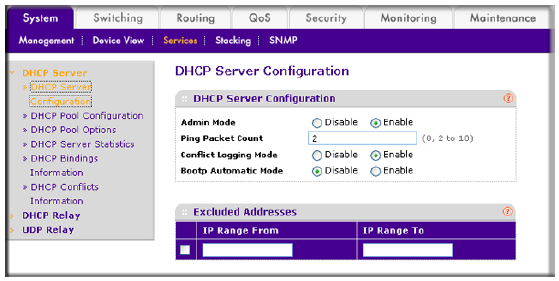
While you cannot disable individual physical ports, you can limit network access via DHCP settings. Log into http://routerlogin.net and go to Advanced > Security > Access Control. Enable the feature to block unknown devices from accessing the WAN.
Adjust the DHCP range to limit the number of assignable IP addresses. For example, setting a range of 100 to 105 allows only six devices to connect. This prevents strangers from plugging into an open port and gaining network access.
Update Router Firmware Regularly
Outdated firmware can cause stability issues and security vulnerabilities. Use the Nighthawk app or the web interface to check for updates frequently. In the app, tap Settings and then Router Update to start the process.
On the web interface, go to Advanced > Administration > Router Update. Enable automatic updates if your model supports this feature. New firmware versions often improve Ethernet compatibility and fix known bugs.
Frequently Asked Questions About Connecting to Netgear Router with Ethernet Cable
Can I use any Ethernet cable for my Netgear router?
You can use any standard Ethernet cable, but Cat 5e or Cat 6 is recommended for best performance. Older Cat 5 cables may limit your speed to 100 Mbps instead of Gigabit speeds. Using the cable included with your router ensures compatibility.
Why is my router internet light red after connecting the cable?
A red light means the router cannot communicate with the modem or the internet service. Check that the cable connects the modem to the yellow WAN port, not a LAN port. Restarting both devices in the correct order often fixes this issue.
Do I need to configure settings to use Ethernet?
No, Netgear routers automatically detect and configure wired connections by default. Simply plugging in the cable should provide immediate internet access. You only need to configure settings if you want to prioritize specific devices.
How many devices can I connect via Ethernet?
Most Netgear routers have four LAN ports for wired connections. You can connect a switch to one port to expand the number of available wired connections. There is no strict limit on devices if you use additional networking hardware.
What if my computer does not recognize the Ethernet cable?
Ensure the cable clicks firmly into place and that the router port light activates. Try a different cable or a different LAN port on the router. If the issue persists, run the network troubleshooter in your operating system.
Key Takeaways for Connecting to Netgear Router with Ethernet Cable
Successfully connecting to your Netgear router with an Ethernet cable requires plugging the modem into the yellow WAN port and devices into the numbered LAN ports. Following the correct power-up sequence ensures your modem and router handshake properly without errors. Regular firmware updates and quality Cat 6 cables maintain optimal speed and security for your network.
Start by checking your physical connections today to eliminate Wi-Fi lag. If issues persist, restart your equipment in the specified order or consult your model’s manual for specific port locations. Enjoy your faster, more reliable wired internet experience.



