
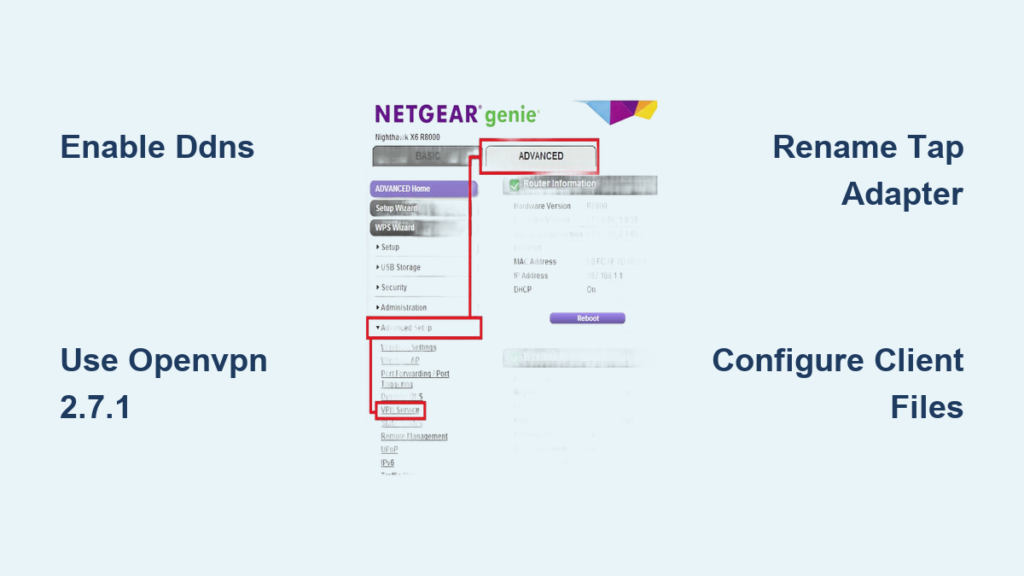
You need secure access to your home files while traveling, but public Wi-Fi puts your data at risk. A proper Netgear router VPN setup creates an encrypted tunnel directly to your network, solving this problem instantly. Many users struggle with connection errors because they miss critical configuration steps like adapter renaming.
This guide walks you through enabling Dynamic DNS, installing the correct OpenVPN version, and fixing common connection failures. You will learn exactly how to configure your router and Windows PC for a stable, secure remote link. Follow these specific instructions to ensure your Netgear router VPN setup works reliably every time.
Enable Dynamic DNS for Stable Remote Connections

Your home internet IP address changes periodically, which breaks remote connections if not managed. Dynamic DNS (DDNS) assigns a fixed domain name to your changing IP so your device can always find your router. Without this step, your OpenVPN client cannot locate your home network to start the secure tunnel.
Why DDNS Is Mandatory for VPN
Most ISPs assign dynamic IP addresses that shift without notice. The OpenVPN client requires a static address or domain to initiate a handshake with your router. DDNS services update your domain record automatically whenever your public IP changes. This ensures your connection string remains valid regardless of IP fluctuations.
Configure DDNS in Router Settings
- Open a browser on your local network and go to
routerlogin.net. - Log in using your admin credentials (default username is admin).
- Navigate to ADVANCED > Advanced Setup > Dynamic DNS.
- Choose a provider like No-IP or DynDNS from the dropdown menu.
- Enter your account credentials or create a new free account.
- Click Apply and verify the status reads “Active” or “Connected.”
Pro Tip: No-IP offers a free tier that integrates seamlessly with NETGEAR routers for basic home use.
Activate the Built-in OpenVPN Server
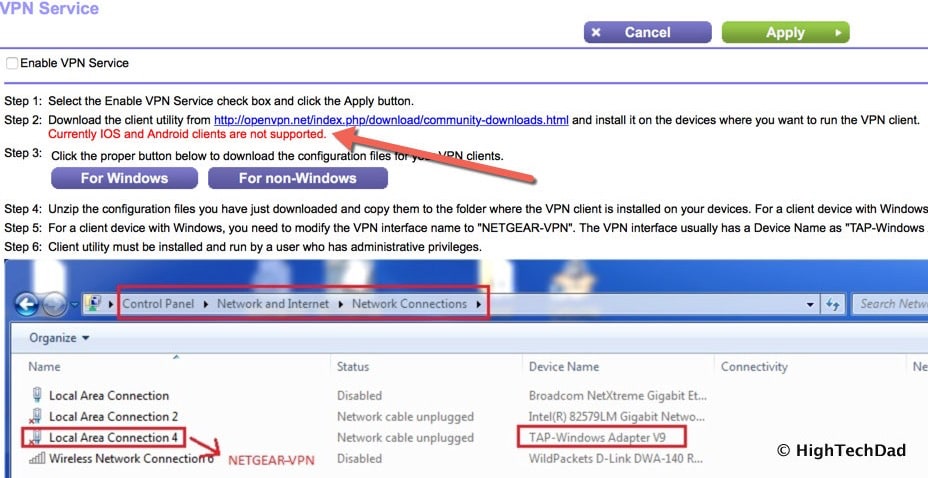
Once DDNS is active, you must enable the VPN server function within your router firmware. This feature turns your router into a gateway that accepts encrypted connections from outside your home. The process generates necessary security certificates automatically.
Access and Enable VPN Service
- Remain logged into your router admin panel.
- Go to ADVANCED > Advanced Setup > VPN Service.
- Check the box labeled Enable VPN Service.
- Click Apply to generate the self-signed certificate.
The system opens UDP port 1194 by default. This port allows external traffic to reach the VPN server securely.
Adjust Security and User Settings
Customize these settings to match your security needs before downloading files:
- Server Port: Keep 1194 unless your ISP blocks it.
- Authentication: Select certificate-only or add username/password protection.
- Allowed Users: Define which admin accounts can connect remotely.
- Encryption: Choose AES-256 for maximum data protection.
Click Apply to save all changes. Avoid using ports below 1024 as some networks restrict them.
Download Unique OpenVPN Configuration Files
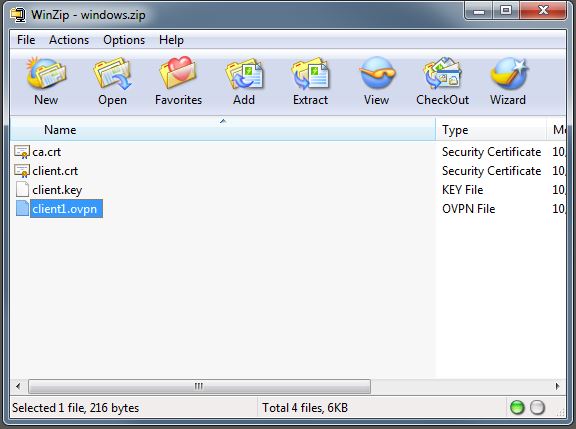
Your router generates a specific set of files required for your Windows client to authenticate. These files contain unique keys and certificates that identify your specific device to the server. Losing or sharing these files compromises your network security.
Retrieve the Client Package
- On the VPN Service page, click the For Windows button.
- Save the downloaded
.zipfile to a secure location. - Extract the contents which include:
client.ovpn(Main configuration)ca.crt,client.crt,client.key(Security certificates)README.txt(Official instructions)
Security Note: Treat this zip file like a physical key. Do not email it or store it on public drives.
Install Compatible OpenVPN Client Software
Using the wrong version of the OpenVPN client is the most common cause of failure. Newer versions often introduce TLS changes that break compatibility with existing Netgear firmware. You must install a specific legacy version to ensure stability.
Download OpenVPN Version 2.7.1
- Visit the official OpenVPN community downloads page.
- Locate the Windows Installer section.
- Download OpenVPN 2.7.1 or an earlier version explicitly.
- Avoid version 2.7.2 or newer as they may fail to connect.
Run the Installation Wizard
- Right-click the installer and select Run as Administrator.
- Click Next and accept the license agreement.
- Keep all default components selected during setup.
- Install to the default path:
C:\Program Files\OpenVPN. - Allow the installation of the TAP-Windows adapter when prompted.
Common Mistake: Installing the latest available version often results in “TLS key negotiation failed” errors. Stick to version 2.7.1.
Place Configuration Files in Correct Directory
The OpenVPN client will not detect your router profile unless files are in the exact expected folder. Proper placement ensures the software loads your specific certificates upon launch.
Move Files to Config Folder
- Unzip the package downloaded from your router.
- Copy all extracted files (
client.ovpnand certificate files). - Paste them into this specific directory:
C:\Program Files\OpenVPN\config
- Ensure no other
.ovpnfiles conflict in this folder.
Check: Restart the OpenVPN GUI completely after moving files to refresh the profile list.
Rename TAP Adapter to NETGEAR-VPN
This specific step is critical and frequently overlooked. The default configuration file references a specific network interface name. If your Windows network adapter does not match this name exactly, the tunnel cannot establish.
Change Network Connection Name
- Press Windows + R, type
ncpa.cpl, and hit Enter. - Locate the adapter named TAP-Windows Adapter V9.
- Right-click the adapter and select Rename.
- Change the name strictly to:
NETGEAR-VPN
Verify Exact Naming Convention
- Use uppercase letters for N, V, and P.
- Include the hyphen between NETGEAR and VPN.
- Do not add extra spaces or characters.
Why This Matters: The
client.ovpnfile explicitly calls forNETGEAR-VPN. A mismatch causes the “TUN/TAP adapter not available” error even if everything else is correct.
Establish Secure Remote Connection
With configuration complete, you can now initiate the encrypted tunnel to your home network. This process authenticates your device and routes your internet traffic through your home router.
Launch and Connect
- Open OpenVPN GUI from your Start menu.
- Right-click the OpenVPN icon in the system tray.
- Select Connect under the
clientprofile. - Enter your router admin username and password when prompted.
Wait approximately 15 seconds for the handshake to complete. A green icon indicates success.
Verify Connection Status
- Check the system tray for a green OpenVPN icon.
- Visit an IP lookup site to confirm your IP matches your home network.
- Try accessing a local resource like a NAS drive to test latency.
Troubleshooting: If authentication fails, verify your router admin password has not changed recently.
Troubleshoot Common Netgear VPN Errors
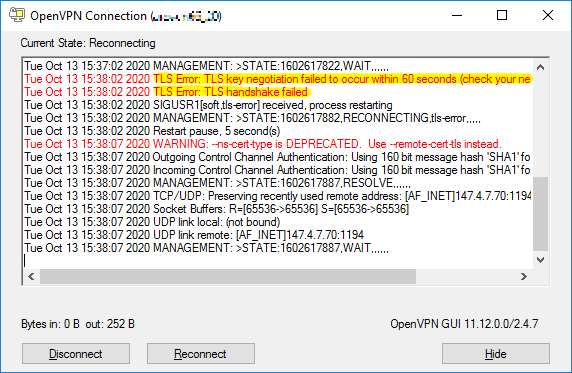
Even with careful setup, specific issues can prevent a successful connection. Understanding these error messages helps you resolve them quickly without restarting the entire process.
Resolve TLS Key Negotiation Failed
- Cause: Incompatible OpenVPN client version.
- Solution: Uninstall current client and install version 2.7.1 exactly.
Fix TUN/TAP Adapter Errors
- Cause: Interface name mismatch in Windows.
- Solution: Rename the adapter to
NETGEAR-VPNviancpa.cpl.
Address Authentication Failures
- Cause: Incorrect credentials or disabled user permissions.
- Solution: Verify the user has remote access enabled in router settings.
Solve Local Access Issues
- Cause: Firewall blocking internal routing.
- Solution: Enable “Allow Local LAN Access” in VPN Service settings.
Expert Note: If your ISP blocks UDP port 1194, try changing the server port to 443 in both router settings and the
.ovpnfile.
Maintain Security and Monitor Access
Regular maintenance ensures your Netgear router VPN setup remains secure against emerging threats. Keeping firmware updated prevents vulnerabilities from being exploited by attackers.
Update Firmware and Monitor Logs
- Check
routerlogin.netmonthly for firmware updates. - Review OpenVPN logs for unauthorized connection attempts.
- Use dedicated user accounts for VPN access instead of the main admin account.
Limiting user access and monitoring logs helps you detect anomalies early. Strong passwords and regular updates are your best defense.
Compatible Netgear Router Models
Not every Netgear router supports the built-in OpenVPN server feature. You must verify your specific model number before attempting this Netgear router VPN setup.
Supported Device List
- WiFi 5 Models: R6080, R7000, R7800, R8000, R9000 series
- VPN Routers: BR200, BR500
- Gaming Series: XR500, XR700, XRM570
Check the official Netgear support site if your model number is not listed here. Older or budget models may require third-party firmware to function as a VPN server.
Frequently Asked Questions About Netgear Router VPN Setup
Which OpenVPN version works best with Netgear routers?
You must use OpenVPN version 2.7.1 or earlier. Newer versions often fail due to TLS protocol changes that are incompatible with current Netgear firmware.
Why does my VPN connection fail immediately after starting?
The most likely cause is an incorrectly named TAP adapter. Ensure your Windows network adapter is renamed exactly to NETGEAR-VPN with correct capitalization.
Do I need a static IP address from my ISP for this setup?
No, you do not need a static IP. The Dynamic DNS (DDNS) feature handles changing IP addresses by mapping them to a constant domain name.
Can I access my entire home network through this VPN?
Yes, once connected, your device acts as if it is locally connected. You can access NAS drives, printers, and other local devices securely.
Is the built-in Netgear VPN safe for public Wi-Fi use?
Yes, the OpenVPN protocol encrypts all traffic between your device and router. This protects your data from interception on unsecured public networks.
Key Takeaways for Successful Netgear Router VPN Setup
Securing your remote access requires precise configuration of DDNS, server settings, and client software. By installing OpenVPN 2.7.1 and renaming your TAP adapter to NETGEAR-VPN, you avoid the most common connection failures. Always keep your configuration files private and update your router firmware regularly.
Start by enabling Dynamic DNS in your router admin panel today. Follow the steps above to create a secure, encrypted pathway to your home network from anywhere in the world.



