
You’ve just unboxed your new Arris modem and you’re eager to get online. Whether you’re replacing an outdated device or installing internet for the first time, the setup process can feel overwhelming. Cables, LED lights, ISP activation, and security settings all play a role in getting your network running smoothly. Most users complete the entire setup in under 30 minutes, and some models take less than 10.
This guide walks you through every step of how to connect to an Arris modem, from hardware setup to ISP activation and WiFi customization. You’ll learn how to interpret LED lights, access the admin panel, change default passwords, and troubleshoot common issues. We cover popular models like the Arris SB8200 and Surfboard SBG10 so you can follow along with confidence.
Unbox Your Arris Modem and Locate Key Details
Before you plug anything in, inspect your modem and gather critical information from the device label.
Find the Device Sticker
Flip the modem over and locate the label on the bottom. This sticker contains everything you need for setup:
• WiFi SSID (default network name)
• Default WiFi password
• MAC ID (required for ISP activation)
• Serial Number
• MAC Address (listed as “LAN MAC” on SB8200 models)
Pro Tip: Photograph the sticker or write down the MAC ID and serial number. You may need these again if you replace the modem later. Keep the quick-start guide included in the box for model-specific diagrams and troubleshooting tips.
Connect the Coaxial Cable to Your Arris Modem
A secure coaxial connection is the foundation of your internet signal. A loose or damaged cable leads to slow speeds or total outages.
Attach the Cable to the Correct Port
- Unplug your old modem from power and disconnect its coaxial cable
- Remove the coax cable from the wall outlet and screw it into the appropriate port on your Arris modem
• Standard models: Use the “Cable In” port
• SBG10: Use the blue coax port on the back
• SB8200: Use the “Cable In” port - Hand-tighten the connection only—skip the tools
• Over-tightening strips the threads and damages the port
• If the nut is stuck, use an adjustable wrench to loosen it first
Visual Cue: The center pin of the coax connector should align smoothly with the jack. If it doesn’t slide in easily, the cable may be bent or damaged.
Plug in Ethernet and Power Cables
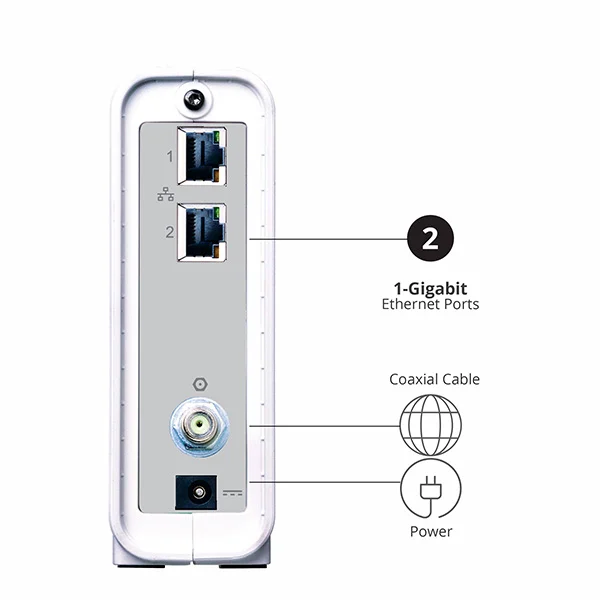
With the coax secure, finish the physical setup by connecting the remaining cables.
Link to Your Router or Computer
• Connect one end of the Ethernet cable to the LAN port on the Arris modem
• Plug the other end into your wireless router or directly into a computer
Model Note: The SB8200 has two Ethernet ports. Use Port 1 for the primary connection to your router.
Power On the Modem
- Use only the provided power cord (third-party cords can damage the device)
- Plug into a wall outlet and turn on the modem
- Wait for the boot sequence to complete:
• SBG10: 2–5 minutes
• SB8200: 3–4 minutes
• Standard Arris models: Up to 30 minutes for full sync
During this time, the LED lights flash as the modem downloads firmware and establishes a connection with your ISP.
Read LED Lights to Confirm Status
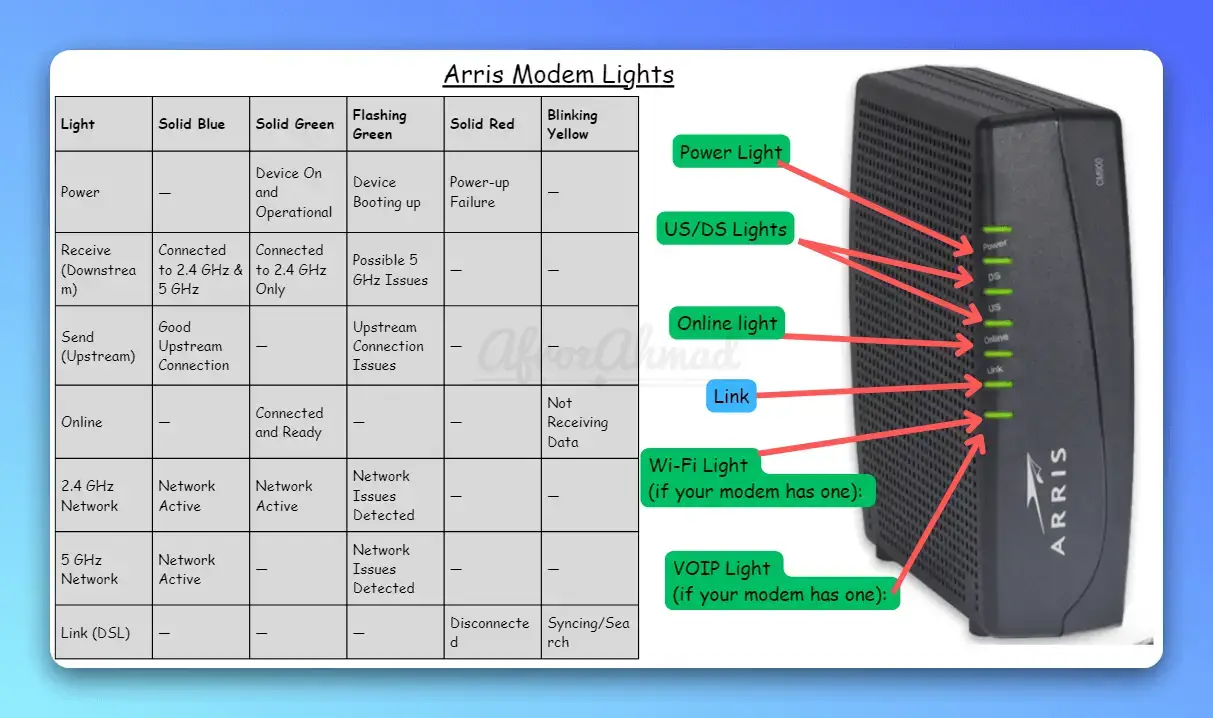
The LED indicators tell you whether your modem is syncing, activated, or ready to use.
SBG10 Light Behavior
• During startup: All green LEDs flash
• After boot (before activation): Most LEDs turn solid green, but the Data LED continues flashing
• After ISP activation: All LEDs turn solid green, including the Internet LED (third from top)
SB8200 Indicator Guide
• Power: Solid green
• Cable: Solid green (may flash briefly during sync)
• Internet: Solid green after activation
Warning: If lights remain off, blink red, or stay stuck on one color, the modem isn’t syncing properly. Check all coax connections and contact your ISP.
Activate Your Arris Modem With Your ISP
Even with perfect cable connections, your modem won’t deliver internet until your provider activates it.
Gather Required Information
Have these details ready before contacting your ISP:
• MAC ID
• Serial Number
• MAC Address (“LAN MAC” on SB8200)
Choose Your Activation Method
Call Your ISP (Most Reliable)
• Cox: Call customer support with your serial and MAC address
• Xfinity: Call or use the Xfinity app
• Spectrum: Use the Spectrum app or online account
• Great Plains Communications: Call 1-888-343-8014, Option One
Activation typically takes 5–10 minutes. The lights may flash during this process, which is normal.
Use a Self-Service Portal (If Available)
Many ISPs support online activation:
• Xfinity: My Account > Activate Equipment
• Spectrum: Account Dashboard > Setup Wizard
• Cox: Cox.com > Manage Devices
Pro Tip: Check your ISP’s support site before calling. Some providers require phone activation for new modems.
Access the Admin Panel at 192.168.0.1
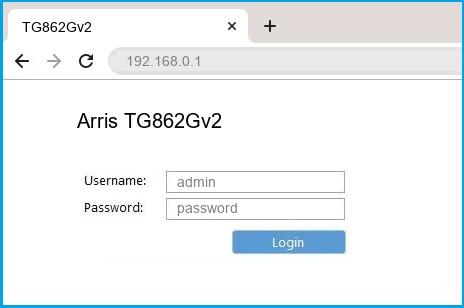
Once activated, log in to customize your network settings.
Connect to the Default WiFi Network
- Open your device’s WiFi settings
- Look for one of these networks:
• Arris-XXXX (2.4 GHz)
• Arris-XXXX-5G (5 GHz) - Connect using the default password from the sticker
Log Into the Admin Interface
- Open a browser and go to http://192.168.0.1
- Enter the default credentials:
• Username: admin
• Password: password (all lowercase) - Click Apply
Troubleshooting: If the page won’t load, confirm you’re connected to the Arris network rather than a different WiFi source.
Change the Default Admin Password
Leaving the default login active exposes your network to unauthorized access.
Update Your Login Credentials
- Navigate to Administration > Password
- Enter the current password: password
- Create a strong, unique new password
- Click Apply
Security Note: Combine uppercase letters, lowercase letters, numbers, and symbols. Store the password in a password manager. Avoid enabling remote management unless specifically required.
Customize Your WiFi Network Names and Passwords
Personalizing your WiFi makes it easier to identify and improves security.
Navigate to Wireless Settings
Go to Basic Setup > Wireless Settings
Set Custom SSIDs and Passwords
| Band | SSID (Network Name) | Password |
|---|---|---|
| 2.4 GHz | YourHomeWiFi | StrongUniquePass123 |
| 5 GHz | YourHomeWiFi-5G | StrongUniquePass123 |
Click Apply after each change.
Best Practice: Use the same password for both bands to simplify device switching.
Warning: The modem reboots and disconnects during this process. You’ll need to reconnect to the new network name afterward.
Reconnect Devices to Your New WiFi Network
After saving your changes, reconnect your devices and verify the setup.
Verify Your New Settings
- Open your device’s WiFi settings
- Select your new SSID (for example, YourHomeWiFi)
- Enter the new password
- Open a browser and visit 192.168.0.1
- Click Refresh to confirm the custom settings saved successfully
Update Firmware Regularly
Keeping firmware current improves performance and patches security vulnerabilities.
Check for Available Updates
- Go to Administration > Firmware Update
- If an update is available, click Download
- Wait for installation to complete—do not power off the modem during this process
Most Arris modems auto-update during the initial sync, but manual checks every few months keep your device secure.
Troubleshoot Common Arris Modem Issues
Even with careful setup, occasional problems occur. Here’s how to resolve them quickly.
No Internet After Activation
• Reboot the modem by unplugging it for 30 seconds
• Wait 3–5 minutes for full sync
• Confirm all LEDs are solid green
Can’t Access 192.168.0.1
• Verify you’re connected to the Arris network
• Try a wired Ethernet connection instead
• Clear your browser cache or switch browsers
Forgot the Admin Password
• Press and hold the reset button for 10 seconds
• This restores factory defaults
• You’ll need to reactivate with your ISP and reconfigure WiFi
Modem Won’t Sync
• Confirm the coaxial cable is tight
• Remove splitters or replace damaged cables
• Contact Great Plains Communications at 1-888-343-8014, Option One
Model-Specific Setup Tips

Different Arris models have unique features worth knowing.
Arris SBG10 (Modem-Router Combo)
• Built-in dual-band WiFi means no separate router is required
• Boot time: 2–5 minutes
• Activation: 5–10 minutes via phone or app
• Avoid the Surfboard Central app, which has known bugs
• Use the web browser setup instead
Arris SB8200 (DOCSIS 3.1 Modem)
• Maximum speed: Up to 1.2 Gbps downstream
• Requires an external router for WiFi
• Use Port 1 for Ethernet connection
• Ideal for gaming, streaming, and smart home networks
• Total setup time: Under 10 minutes
Final Setup Checklist
Confirm every step is complete before finishing.
• Coaxial cable securely connected
• Ethernet cable linked to router or computer
• Power LED solid green
• ISP activation completed
• All LEDs solid green after reboot
• Admin password changed
• Custom WiFi names and passwords set
• Devices connected to new network
• Firmware updated (if available)
Frequently Asked Questions About Connecting to an Arris Modem
What is the default IP address for an Arris modem?
The default IP address is 192.168.0.1. Type this into your browser after connecting to the Arris WiFi network to access the admin panel.
How long does Arris modem activation take?
Activation typically takes 5–10 minutes when done by phone. During this time, the LED lights may flash, which is normal. After activation, the modem reboots automatically.
Can I set up an Arris modem without calling my ISP?
Yes, many ISPs support self-service activation through their apps or websites. Xfinity, Spectrum, and Cox all offer online activation options for compatible modems.
What do I do if my Arris modem won’t sync?
Check that the coaxial cable is hand-tightened and undamaged. Remove any splitters in the line. If the modem still won’t sync, contact your ISP or call Great Plains Communications at 1-888-343-8014, Option One.
How do I reset my Arris modem to factory settings?
Press and hold the reset button on the back of the modem for 10 seconds. This restores factory defaults and erases all custom settings. You’ll need to reactivate the modem with your ISP afterward.
Why can’t I access 192.168.0.1 after setup?
Make sure you’re connected to the Arris network rather than a different WiFi source. Try a wired Ethernet connection, clear your browser cache, or test a different browser.
Key Takeaways for Connecting to an Arris Modem
Connecting to an Arris modem is straightforward when you follow the right sequence. Start by locating the MAC ID on the device sticker, then connect the coaxial, Ethernet, and power cables in the correct order. Wait for the boot sequence, activate the modem with your ISP, and confirm all LEDs turn solid green.
Once activated, log in at 192.168.0.1 using admin as the username and password as the password. Change the default admin password immediately, customize your WiFi names and passwords, and reconnect your devices to the new network.
Your next step is to run a speed test to confirm you’re getting the speeds your ISP promises. If anything feels off, revisit the troubleshooting section or contact your provider for activation support.



