Skip to content

Netgear router login

routerlogin.net | router login

  • Home
  • mywifiext local
  • Faqs
  • Disclaimer
  • About us
  • Blog
  • Contact US

Category: netgear router login

How to recover the username and password for the routerlogin.net?

March 31, 2021May 11, 2021routerLeave a comment


How to recover the username and password for the routerlogin.net?

A user cannot change the username of the routerlogin.net, only the login password of the Netgear Router login window can be changed. Every time a user login to the web interface of routerlogin.net, he has to specify “admin” as the username of the login window. You can only recover the password of the routerlogin.net, only in one condition that you must have enabled the Password Recover feature in the first place. You must have enabled the Password Recovery feature if you want to recover the login password of the routerlogin.net window.

Steps to enable the Password Recovery feature of the routerlogin.net

  1.  Open a browser on the computer or desktop connected to the local network.
  2. Go to the address bar of the browser and type www.routerlogin.net as the URL of your browser. You also can type the LAN IP address of your Netgear Router on the address bar of your browser to get to the default Netgear Router login window.
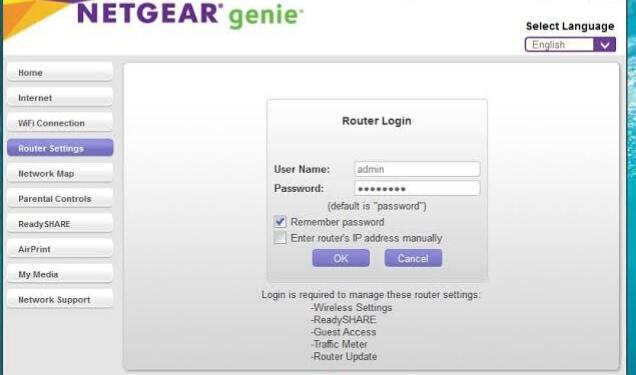
  3. Hit the enter button and you will be redirected to the default routerlogin.net window.
  4. Take your cursor to the username tab field and type “admin” on the username field and mention the password that you assigned during the Netgear Router setup process. Both the login name and password are case-sensitive.
  5. Click on the login button and you will be redirected to the routerlogin.net main window.
  6. Select the Advanced tab, click on the Administration tab then click on the Set Password tab and you will be redirected to the Set Password page.
  7. To enable the Password Recovery option, you need to select the “Enable Password Recovery” checkbox.
  8. Now, you need to select the two security questions you will assign as for security purposes. You also have to provide the answers to both the security questions that you will assign.
  9. Click on the Apply button and the settings you configured will get eventually saved.

Note: Make sure that the two security questions you will assign are related to you in some manner so that when you recover the login password of the routerlogin.net you can easily answer those two security questions. For your convenience, you can also note down the answers to those security questions so that you can easily answer them while recovering the login password of the Netgear Router login window.

Note: Users are recommended to enable the Password Recovery feature right after the setup process so that you don’t have to restore the default settings into the router in case you forget the login password of the Netgear Router login window.

Steps to recover the password for the routerlogin.net window

In the above steps, there are instructions to enable the Password Recovery feature after which you have to learn the steps to recover the login password of the routerlogin.net window. Without enabling the password recovery feature, you cannot recover the password of your Netgear Router.

  1. Open the browser on your desktop or computer connected to the Internet.
  2. Type www.routerlogin.net on the address bar of your browser. You also can type the LAN IP address of the Netgear Router as the URL of your browser to get to the default Netgear Router login window.
  3. Hit the enter button and you will be redirected to the default Netgear Router login window.
  4. Now, instead of typing the login credentials, you have to click on the Cancel button. You will be redirected to the next window if Password Recovery is enabled in the web interface of your Netgear Router.
  5. You will be prompted to enter the Serial Number of your Netgear Router. You can check the Serial number of your device on the label of your Netgear Router.
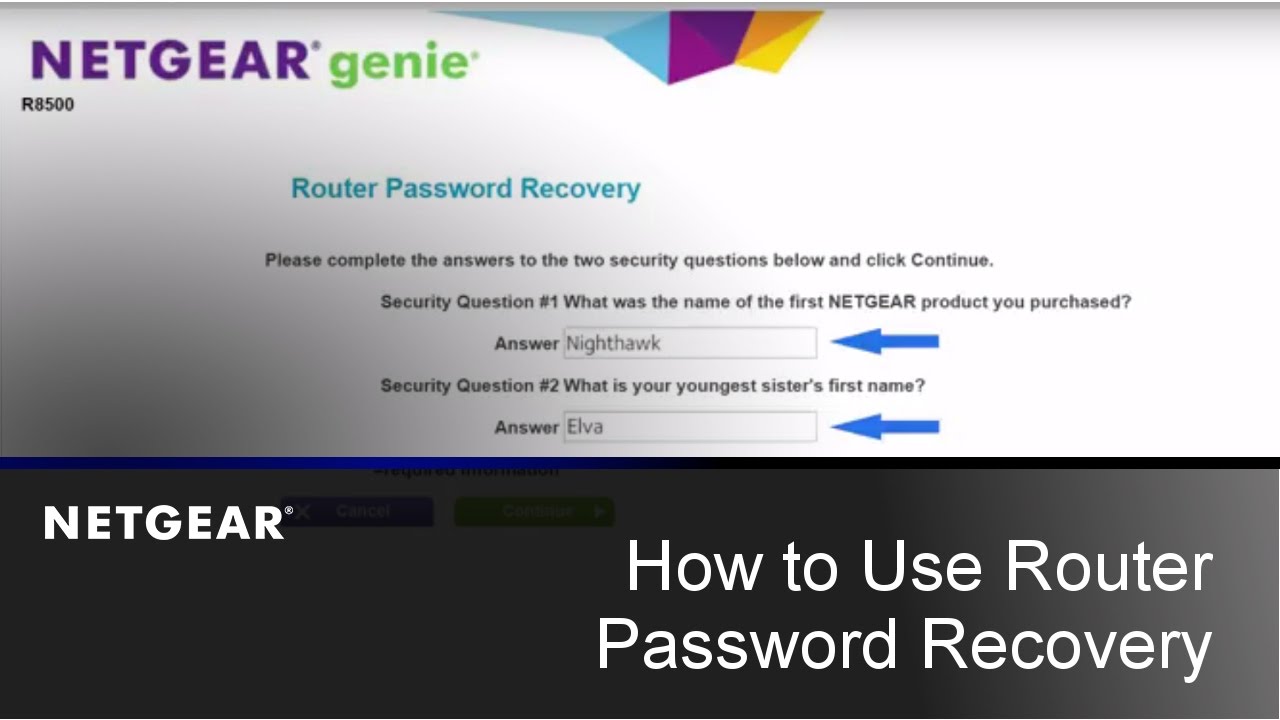
  6. Click on the Continue button and a window appears on the screen requesting the answer to those security questions that you assigned while enabling the Password Recovery feature of the routerlogin.net.
  7. Type the answers to those security questions that you saved.
  8. As soon as you are done answering those security questions, click on the Continue button. A window will appear displaying within the recovered login window.
  9. Click on the Login again option to reach the Netgear Router login window to again login to the routerlogin.net

What if I don’t change the default password for routerlogin.net?

The default password for the routerlogin.net login window is “password” that you can apply during the Netgear Router Setup process. After the Netgear Router setup process, a user can change the default password anytime and for any desired amount of time through the routerlogin.net window. If a user wants to change the default password but is unable to change it, you can erase all the current settings and get the default one that can resolve this issue.

Steps to erase the current configuration settings in a routerlogin.net window

  1. Launch a browser on your computer connected to the Wi-Fi network.
  2. Type either www.routerlogin.net or www.routerlogin.com on the web address of the browser you opened. You can also type the LAN IP address on the web address of your browser. The LAN IP address of a Netgear Router is 192.168.1.1
  3. Hit the enter button and the default Netgear Router login window appears on the screen.
  4. Type “admin” on the username tab and mention the password that you typed earlier while logging into the routerlogin.net window. If you haven’t changed the default password type “password” on the password field as a default password.
  5. Both the login credentials are case-sensitive, turn off the Caps lock for lowercase letters and turn it on while typing the uppercase letters.
  6. Go to the Advanced tab, select the Administration tab and then click on the Backup settings tab. As soon as you tap it the Backup settings page displays on the screen.
  7. Locate the Erase button and click on it. When you click on the Erase button, the router starts resetting the configuration settings to the default, and when the process gets completed your router automatically restarts. The process will take around 3 to 4 minutes.

WARNING: Do not interrupt the reset process to avoid the risk of corrupting the firmware. You can avoid the corruption of Firmware by avoiding these activities for example closing off the browser, clicking a link on the current browser, loading a new tab on the webpage, Turning off your router.

  • dlinkrouter.local refused to connect.
  • Amped wireless Router Setup through www.setup.ampedwireless.com

How to change the login password of the routerlogin.net of the Netgear Router?

March 19, 2021May 11, 2021routerLeave a comment

change the login password of the routerlogin.net of the Netgear Router

The admin password is one of the significant components of the Netgear Router login page. The password is one of the vital credentials which plays a significant role in keeping anonymous users and strangers away from accessing the routers. The router password can be of a minimum of 8 characters and can be of a maximum of 64 characters. The password of the Netgear Router login window can be of any combination of characters to strengthen the password. Users can change the login password anytime and anywhere by accessing the web interface of the routerlogin.net window.

change the login password of the routerlogin.net

Steps to change the login password of the routerlogin.net of the Netgear Wi-Fi router

  • Open up a browser in your Wi-Fi enabled desktop connected to the Wi-Fi network.
  • Type www.routerlogin.net on the web address of the browser. The user can also use 192.168.1.1 as the web link of the browser.
  • Netgear Router login page is going to appear on the screen.
  • Mention “admin” on the username field and type the default password on the password field. The default password of the Netgear Router login window is “password”. Both the login credential fields are case-sensitive. Make sure that you press Caps to lock when typing the Upper case letter and release the Caps lock when typing the lower case letter.
  • Click on the login button and you will be redirected to the home page of the routerlogin.net
  • Go to the Advanced tab, click on the Administration tab, and at last click on the Set password tab
  • As soon as you click on the Set Password tab, the password page is going to get displayed on the screen.
  • The password settings page is going to get displayed on the screen.
  • Locate the Old password field and mention your current password in the old password field.
  • Type your new password in the Set password field. The login password you will assign must be strong enough to keep the anonymous users from accessing the default routerlogin.net window.
  • Repeat your new password in the Confirm password field.
  • Click on the Apply button and all the settings will get eventually saved.

Note: The login password you will assign must have at least a lowercase letter, an uppercase letter, a number, and at least one symbol. The digits within the password should have an utmost 64 letters. If the login password consists of more than 64 and below than 8 letters, your assigned password will get discarded from becoming the login password of the Netgear Router login window.

What should I do if I get the message that “I am not connected to the Wi-Fi network of the router when I connect to the routerlogin.net?

The users having a wireless connection between the router and a computer faces the issue of not being connected to a Wi-Fi network while connecting to the routerlogin.net window. If a user is not connected to the Wi-Fi network then he won’t be able to visit any websites within the network. The above issue can occur because of not getting enough connection.

Here are the troubleshooting steps with the reasons that are responsible for the above issue

  • The most prominent thing that a user has to check is the Wi-Fi LED of the router. If the LED is on then hop on to the next step and if it is off, then check the Wi-Fi button whether it is turned on or not. If the Wi-fi button is on and even then the LED is not lit then check the availability of your SSID signal. Make sure that the broadcast of your SSID is enabled if it is not enabled then your Wi-Fi network hides and causes the problem to the user to identify your wireless network. You can enable the Broadcast of your Network through the web interface of the routerlogin.net window.4
  • Check that the Wi-Fi router in which you are using your network is even able to keep the security that you have kept in your network. You can check the documentation of your router that came along with the accessories or you can check it online from the official website of netgear.com. Change the security level of your router if your router doesn’t support the security that you have kept for your Netgear Router. You can change the Security of your network through the Wireless settings page of the routerlogin.net window.
  • Use a wired connection if you want to bring changes in the Wi-Fi network settings of your Netgear Router. Login to your Netgear Router through the Netgear Router login window. Go to the Basic tab then click on the Wireless settings tab. After bringing changes in the Wi-Fi settings of the network, make sure that you click on the Apply button to allow your interface to apply the changes.
  • If the signals shown in your router are weak then make sure that your router is not too far from the computer. If your Netgear Router is far from your computer then it creates difficulty in your router to allow the signals to get transmitted into your computer. IF you cannot bring your computer near then try to bring your router close to your desktop. Make sure that the minimum distance between your router and the computer should be at least 6 feet. Any distance greater than 6 feet can bring the Wi-Fi connectivity issue and could affect the amount of Wi-Fi signals that are being transmitted into your computer.
  • Check that no metallic objects, reflecting surfaces, electronic devices, cemented walls and any opaque object is present between your router and the computer. The obligations present between your router and the computer will block and weaken your Wi-Fi signals and won’t allow your router to implement the action that a user is commanding in his computer. Try to remove the objects that are weakening your signals and if you can’t change their place, switch the places between your router and computer device.
  • Go to the Wi-fi list and check that the Network key that you have typed is matching the password that you have assigned to your Network name. If you are entering the wrong password on the Network key field then also you will be denied to access routerlogin.net on your computer. You can check your actual Wi-Fi password through the Wireless setting of the routerlogin.net window.
  • If the number of devices connected to your network is more than the registered number of devices, your router can deny a user from accessing the www.routerlogin.net link. You can block the devices that you don’t want to get connected to your network with the help of the Access Control list feature in the routerlogin.net window. You can configure the Access Control list feature through the web interface of your Netgear Router.


  • why router.asus.com page is not working?
  • Brother printer offline


Netgear router login – How to login to routerlogin.net?

March 2, 2021May 11, 2021routerLeave a comment

The login procedure of connecting to the web interface of the routerlogin.net is efficient and important for users as it provides a platform for users to directly connect to the Netgear Router. A user can use a browser to get to the routerlogin.net default window and the connection of the Internet is a must while you are connecting to the routerlogin.net window of the Netgear Router. If it’s the first time a user performing the Netgear Router Setup process in your router. Type www.routerlogin.net on the web address of your browser, press the enter, and you automatically be redirected to the web interface of the Netgear Router.

How to login to routerlogin.net

Netgear router login – How to login to routerlogin.net?

  1. Visit the desktop screen of your computer and double click on the icon of your browser. Open a browser on the laptop or computer with which your Internet is connected.
  2. Go to the address bar and type www.routerlogin.net as the URL of the browser. You also can type the LAN IP address of the router on the address bar of your browser to get to the default Netgear Router login window. The LAN IP address of a Netgear Router is 192.168.1.1 or 192.168.0.1
  3. Type “admin” on the username tab and mention the password that you assigned during the Netgear Router setup process. If you haven’t changed the password type “password” as the default credential. Both the login fields are case-sensitive.
  4. Click on the login button and you will be redirected to the default routerlogin.net window. The Basic home page of the routerlogin.net displays on the screen.

Note: While mentioning the username and password in the Netgear Router login window, press the Caps lock key when you want to type the uppercase letter and release the Caps locks key when you want to type the lowercase letter. A login password of the routerlogin.net must carry a single uppercase letter, lowercase letter, number, or symbol. If any kind of rule is disobeyed and not followed then the password will get discarded and you will be denied from accessing the routerlogin.net window.

How to block Services from the Internet in the routerlogin.net window?

Services from the Internet can automatically be blocked through the web interface of the routerlogin.net window. Users can now block the Internet Service directly from the Internet through the Block Services feature of the routerlogin.net window. You can efficiently utilize the Block Services feature whenever you don’t require the service of an Internet for a long duration. The feature plays a vital role in saving the Internet bandwidth within the network and also secures your network from unauthorized users to access it.

Steps to block services from the Internet in the routerlogin.net

  1. Open a browser on your computer connected to the local Wi-Fi network.
  2. Take your cursor to the address bar of the browser and type www.routerlogin.net as the URL of the browser. In case, you encounter a 404 error, you also can type the LAN IP address of the Netgear Router.
  3. Press the enter button and the Netgear Router Login screen appears on the screen.
  4. Mention the credentials on their respective fields. Type “admin” on the username field and enter the password you assigned after the Netgear Router Setup process. If you haven’t changed the password type “password” as the default credential.
  5. After mentioning the credentials, click on the login button and you will be redirected to the routerlogin.net default screen.
  6. Select the Advanced tab, click on the Security tab then click on the Block Services tab. As soon as you click on the Block Services option, the page displays on the screen.
  7. Now, you need to specify when you want to block the services of the Internet. If you want to block the Internet according to a schedule then select the “Per Schedule” option.
  8. If you want to block the Internet Services all the time, select the “Always” radio button.
  9. Click on the Add button as soon as you are done specifying when to block the Internet Services.
  10. The Block Services Setup page displays on the screen.
  11. Select the type of application or service that you want to add to the Service Type menu. The settings of the service that you will choose automatically display in the required fields.
  12. Select the “User Defined” option to add an application or the service that is not in the menu.
  13. To add a “User Defined” application a user has to first choose an appropriate protocol it may be either the UDP or TCP, you also can select both of the protocols.
  14. You need to enter the starting and ending port numbers. A user can also contact the publisher of the service to ask which port number a particular service or an application uses. If a service uses only a single port number, you can enter that same port number in both fields.
  15. Now you have to select a Filtering option. If a user chooses the “Only This IP address” option then the Services of the Internet will only be blocked from the computer, the IP address of which you will mention in the required field.
  16. If a user chooses the “IP address Range” option, he has to specify the IP addresses of the number of devices that he wants to block from the network. The number of consecutive IP addresses you will specify in the Filtering option will be blocked to access your Internet from the network.
  17. While choosing a Filtering option, if a user chooses the “All IP Addresses” option then your router ultimately blocks all the services from the computers or mobile device connected to the network. No matter how close or far the device is within the network, the “All IP addresses” option will block all devices within the network.
  18. Click on the Add button and the settings will get eventually saved.

Disclaimer : This website is just for posting blogs and helping people through setup guides. we do not provide any kind of technical support. Visit Netgear for any kind of help.

Click here to chat with a Technician
© 2026 Netgear router loginTheme by Puro