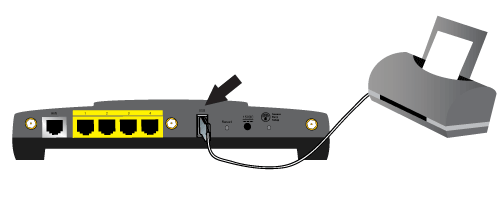
routerlogin.net : How to connect a Brother Printer to a Netgear Router?
Before connecting your Brother Printer to a Netgear Router, a user must find the wireless settings of his Netgear router. Note down the Network settings of a Netgear Router somewhere, so that while connecting Brother Printer to your router you could easily fetch those details to conveniently connect both of the devices. You can find the default Network Name and Wi-Fi password of your Netgear Router on the base or side of your router. You can also check the documentation provided along with the accessories of your wireless router.
After getting connected to the Internet, your Brother Pritner Machine automatically searches for the available Brother Printer Drivers. A user must know the correct printer Model Name along with the version number to install correct Brother Printer Drivers within the machine.
Steps to connect a Brother Printer to the Netgear Router.
- Take the Power Cable of your Brother Printer and connect it to the nearest electrical outlet. Make sure that the cable is not stretched and not loosened enough.
- Turn on the Power button and your Brother Machine will get immediately switched on.
- Now, locate the Menu button on the control panel of your Brother Printer Machine. As soon as you find it, Press it.
- A user can also utilize the Up or Down arrow keys to select the available network then need to press the OK button.
- You also can use the same Up or Down arrow keys to select the WLAN type of network. After selecting this type of network then press the OK button.
- Now, select the Setup Wizard for your Brother Printer Machine then Press on the OK button.
- When WLAN gets enabled within the network, select the Yes tab to enable the network. After clicking on the Yes tab, it will automatically start the Setup Wizard for your Brother Printer.
- Your machine will search for the available network. It will display the list of the available networks along with its Network Name. Choose the Network Name of your Netgear Router and click on it.
- Type down the Wi-Fi password that you noted down before the Brother Printer Setup process. You need to use Up and down arrow keys to select the Network Name of your Brother Printer.
- If you want to apply an authentication process that will require a password to enter the network. Enter down the Network Key and press on the OK tab to apply the settings.
- If you want to create an Open System in which the nearby users could access the network without typing down the network key, you can choose the None tab and click on the Next tab to hop on to the next step.
- Your Brother Printer Machine will start connecting to the selected Wireless network that you have selected.
- If the Brother Printer will get successfully connected, the LCD screen of your Brother Printer Machine displays the Connection status.
- If unfortunately the connection gets failed, your machine will show the failed status along with the error code on the screen. You can also see the Printer report to check the error code.
Note: If the error code of Network Failure is not resolving even after entering down the correct Wi-Fi password or resetting it, you need to contact the support team of Brohter Printer Drivers to resolve the issue. Without the connection of Internet, a user also cannot be able to perform Brother Printer Drivers update.
- Why brother printer is offline?
- why routerlogin.net is not working?