
A spinning router bit moves fast enough to cause serious injury if you do not know how to operate a router properly. The loud noise and powerful motor can intimidate new users, yet this tool creates the cleanest edges in woodworking when handled with respect.
You will learn to select the right base, install bits securely, and feed the tool against rotation for perfect results. This guide covers every safety step and technique needed to master your router today.
Choose Between Fixed and Plunge Router Bases

Selecting the correct router type determines your success with different woodworking tasks. You must understand the specific strengths of each configuration before starting your project.
Fixed-Base vs Plunge-Base Capabilities
Fixed-base routers lock the bit depth in place before you start cutting. These tools offer exceptional stability for edge profiling and joinery where you begin at the material edge.
Plunge routers allow you to lower the spinning bit directly into the wood mid-cut. This feature is essential for cutting mortises, pocket holes, and leveling surfaces without a pre-drilled hole.
Recommended Setup for New Users
A combo kit provides both fixed and plunge bases to maximize your versatility without buying two separate tools. Look for models with variable speed control like the DeWalt DW618 or Bosch 1617EVSP.
These units deliver reliable power and precise control for under $200. Compact trim routers from Makita work well for light edging tasks.
Match Router Bits to Your Collet Size
Using the wrong bit shank size creates dangerous vibration and potential equipment failure. You must verify compatibility between your router collet and the bit shank before installation.
Understanding Shank and Collet Compatibility
Routers utilize either 1/4-inch or 1/2-inch collets to grip the bit shank securely. Larger 1/2-inch shanks reduce vibration significantly and handle heavy cuts much better than smaller options.
Most 1/2-inch collets accept 1/4-inch bits using an adapter sleeve. Never force a 1/2-inch bit into a 1/4-inch collet because it will not hold and could eject dangerously.
Essential Bits for Your Starter Kit
Build a core collection of carbide-tipped bits from trusted manufacturers like Whiteside. A solid starter set costs around $100 and includes these critical profiles:
- Straight bits for dados and slots
- Roundover bits for softening edges
- Chamfer bits for beveled finishes
- Flush trim bits for template work
- Rabbeting bits for stepped joints
- Cove bits for concave profiles
Always inspect bits for damage before use since dull cutters cause burn marks and kickback.
Install Router Bits with Precision
Improper bit installation leads to slipping, poor cuts, and severe safety hazards. Follow this exact procedure to ensure your bit stays locked in place during operation.
Step-by-Step Bit Installation Process
- Unplug the router or remove the battery pack completely.
- Clean all dust and resin from the collet and shaft area.
- Insert the bit shank into the collet without pushing it all the way in.
- Leave 1/8 inch to 1/4 inch of the machined shank exposed below the collet.
- Tighten the nut finger-tight first to seat the bit properly.
- Use both wrenches close together to apply even pressure and secure the nut.
- Pull gently on the bit to confirm it does not slip before powering on.
Bottoming out the bit shank weakens the grip and risks ejection at high speeds.
Set Depth and Speed for Clean Cuts
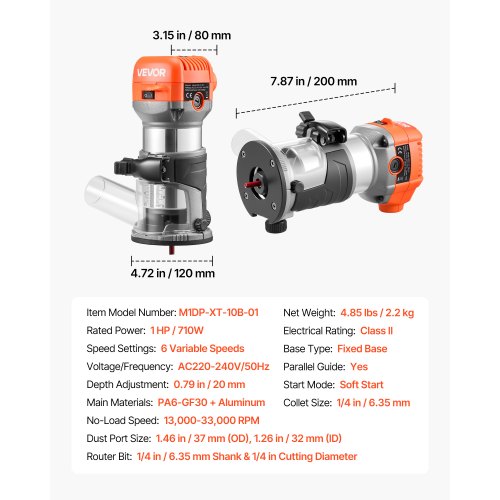
Incorrect depth settings create flat ledges on profiled edges while wrong speeds cause burning. You must adjust these settings based on your specific bit and material.
Adjusting Bit Depth Accurately
Fixed-base routers require you to turn a depth ring until the bit aligns with your workpiece edge. Lock the mechanism firmly before starting the motor to prevent shifting.
Plunge routers use a depth dial where each quarter turn often equals 1/4 inch of travel. Set your final depth using the fine-tuning screw for exact measurements.
Ensure the bit extends only far enough to make the cut. If the bit protrudes too far, it leaves an unsightly flat ledge on your profiled edge.
Matching RPM to Bit Diameter
Larger bits spin faster at the rim which increases heat and stress on the motor. Use lower speeds for big-diameter cutters to maintain safety and cut quality.
- Small bits under 1 inch need 20,000 to 27,000 RPM
- Large bits over 1 inch require 10,000 to 16,000 RPM
Always utilize variable speed control if your model has it. Start at a lower speed and increase gradually as needed for your specific cut.
Master the Correct Feed Direction
Feeding the router in the wrong direction causes immediate loss of control and potential injury. You must understand the rotation physics to operate safely.
Executing the Safe Push Cut
Router bits spin clockwise when viewed from above which creates a pulling force to the right. Feed the router against this rotation to maintain full control during the cut.
Move the router left to right when working on outside edges. This counter-clockwise path around the workpiece lets the bit pull itself forward while you resist with steady pressure.
Reverse your direction for inside cutouts by moving right to left. This technique ensures smooth, tear-free cuts on all your projects.
Avoiding Dangerous Climb Cuts
Climb cutting means feeding the router with the rotation rather than against it. The bit grabs the wood and yanks the tool forward uncontrollably which causes dangerous kickback.
Only experienced users should attempt light climb cuts on tricky grain to reduce tear-out. Use extreme caution, a firm two-handed grip, and very shallow depth if you must try this.
Execute Cuts with Safety and Precision
Proper execution combines secure workholding with steady hand movement. Follow these steps to achieve professional results on every project.
Step-by-Step Routing Procedure
- Secure the workpiece firmly with clamps before starting.
- Wear safety glasses and hearing protection at all times.
- Start at the end grain when routing edges to minimize tear-out.
- Place the router base flat on the workpiece surface.
- Squeeze the trigger and let the bit reach full speed.
- Feed steadily against the rotation without forcing the tool.
- Slow down at corners to prevent chipping and pivot smoothly.
- Release the trigger only after clearing the workpiece completely.
Using Shallow Passes for Quality
Trying to cut too deep in one pass overloads the motor and risks burning the wood. Make multiple light passes instead of one aggressive cut.
Increase depth gradually by 1/8 inch to 1/4 inch per pass depending on wood hardness. This approach reduces strain on the motor and produces a much smoother finish.
Use Accessories for Enhanced Precision

Accessories transform your router from a basic tool into a precision joinery machine. These additions improve accuracy and safety significantly.
Attaching an Edge Guide
An edge guide ensures straight, parallel cuts at a consistent distance from the workpiece edge. This accessory is essential for cutting dados, rabbets, and repeatable profiles.
Most routers accept a guide rod that locks into pre-drilled holes on the base. Always test the alignment on scrap wood before cutting your final piece.
Benefits of a Router Table
Mounting your router in a table flips the workflow so you push the wood past the bit. This setup offers greater control over small pieces and keeps hands farther from the bit.
- Safer operation with reduced kickback risk
- Repeatable cuts using stop blocks
- Better dust collection capabilities
- Easier template routing tasks
Use push sticks and a fence to keep fingers safe while maintaining accurate cuts.
Follow Critical Safety Rules
Ignoring safety protocols leads to permanent injury or damaged equipment. You must adhere to these rules every time you operate your router.
Mandatory Protective Gear
Safety glasses protect your eyes from flying chips and debris. Hearing protection is required because routers exceed 100 dB and can cause permanent hearing damage.
Skip these items and you risk serious personal harm. Never operate the tool without proper personal protective equipment.
Securing Work and Maintaining Control
Clamp every workpiece securely without exception. Keep both hands on the router at all times and stand to the side of the bit path in case of kickback.
Never route with loose clothing, gloves, or unsecured long hair. Use push sticks on narrow stock or when working with a router table.
Common Mistakes to Avoid
- Forcing the router instead of letting the bit cut at its own pace
- Running with a dull bit which increases kickback risk
- Skipping test runs on scrap wood
- Ignoring dust buildup in vents and collets
Clean your tool regularly to prevent overheating and ensure safe operation.
Troubleshoot Common Routing Problems
Even experienced users encounter issues like tear-out or burn marks. Use this guide to diagnose and fix common problems quickly.
| Problem | Cause | Solution |
|---|---|---|
| Tear-out | Routing against grain or dull bit | Start at end grain or sharpen bit |
| Burn marks | Feed too slow or RPM too high | Increase feed rate or lower speed |
| Rough cuts | Deep pass or loose bit | Use shallow passes and tighten collet |
| Kickback | Climb cutting or loose grip | Switch to push cut and clamp work |
| Flat ledge | Bit extends past bearing | Adjust depth so only cutting edge shows |
Maintain Your Router for Longevity
Regular maintenance extends the life of your tool and ensures consistent performance. Clean your router after every use to prevent dust buildup.
Blow out dust from the base, vents, and collet area. Wipe down the housing and store the tool in a dry place.
Inspect the collet for wear or cracks and replace if damaged. Keep bits sharp because dull bits strain motors and increase safety risks. Quality routers last for years with proper care.
Frequently Asked Questions About Router Operation
What speed should I set my router for large bits?
Set large diameter bits to lower speeds between 10,000 and 16,000 RPM. Larger bits spin faster at the rim so reducing RPM prevents overheating and unsafe operation.
Can I use a 1/4-inch bit in a 1/2-inch collet?
Yes, most 1/2-inch collets accept 1/4-inch bits using an adapter sleeve. Never force a 1/2-inch bit into a 1/4-inch collet as it will not hold securely.
How do I prevent tear-out when routing across grain?
Start your cut at the end grain first to minimize tear-out on the visible face. You can also try a very light climb cut with extreme caution if the grain is difficult.
Why does my router leave burn marks on the wood?
Burn marks usually mean you are feeding too slowly or the RPM is too high for that bit. Increase your feed rate or lower the speed setting to fix this issue.
Do I need a plunge router if I already have a fixed base?
A plunge router is necessary if you need to start cuts in the middle of a board for mortises or inlays. Fixed bases work well for edge work but cannot plunge into material safely.
Key Takeaways for Operating Your Router Successfully
Mastering how to operate a router requires respecting the tool’s power and following strict safety protocols. Always feed against the bit rotation, secure your workpiece, and wear proper protective gear.
Select the right bit and speed for your material while making shallow passes for clean results. Practice these techniques on scrap wood before tackling your final project to build confidence and skill.



