

Is your home network exposed while you browse, stream, or work remotely? Setting up WireGuard on a GL.iNet router encrypts all traffic from every connected device instantly without installing individual apps on phones or laptops.
This guide details exactly how to configure WireGuard clients for top providers like NordVPN and Mullvad or manually upload custom configs for total privacy. You will learn to establish secure tunnels, manage server lists, and troubleshoot connection issues directly from your router dashboard.
Access the WireGuard Client Interface on GL.iNet
Your GL.iNet router features a dedicated section for VPN management that simplifies the entire encryption process. Navigate to VPN then WireGuard Client in the web admin panel to begin.
Navigate to VPN Settings
Log in to your router at the default address, usually http://192.168.8.1. The interface is clean and mobile-friendly, allowing setup from any browser. Ensure your firmware is current, as some providers require version 4.11 or later for full compatibility.
Choose Your Setup Method
You have three primary ways to establish a connection based on your service provider.
* Select a pre-integrated provider like NordVPN or Mullvad for automatic configuration.
* Upload a configuration file provided by your VPN service.
* Manually enter configuration details for full control.
Most premium services offer downloadable files, while GL-supported providers allow direct login for instant profile generation.
Configure NordVPN Using an Access Token
NordVPN requires a specific access token rather than a standard username and password for WireGuard connections. This method enhances security by avoiding credential storage on the device.
Generate Your Unique Token
Log in to your Nord account dashboard and locate the Access Token section under NordVPN settings. Click Generate new token, select an expiration date, and confirm the action.
Critical: The system displays this token only once. You must copy it immediately before closing the window, or you will need to generate a new one.
Enter Token in Router Admin
Return to your GL.iNet admin panel and select NordVPN under the WireGuard Client menu. Paste your copied token into the designated field and click Save and Continue.
The router contacts NordVPN servers to fetch available locations and generates configuration profiles automatically. Wait 10 to 30 seconds for the server list to populate before proceeding.
Connect to Mullvad With Account Number

Mullvad prioritizes anonymity by using a 16-digit account number instead of email addresses or passwords. This integrates seamlessly with GL.iNet routers for quick setup.
Input Your 16-Digit ID
Select Mullvad from the provider list in the WireGuard Client section. Enter your full 16-digit account number without spaces and click Save and Continue.
The router communicates with the Mullvad API to download all available server configurations instantly. No personal data is required beyond this unique identifier.
Select and Apply Servers
Browse the generated list of countries and cities to find your preferred location. Select specific servers and click Apply to download their configurations.
This step reduces clutter by only storing servers you intend to use. Once applied, each server appears as a separate profile ready for immediate connection via the three-dot menu.
Use AzireVPN, PIA, or Surfshark With Login
Providers like AzireVPN, PIA, Surfshark, Hide.me, IPVanish, PureVPN, and Windscribe use standard login credentials. This method is familiar and straightforward for most users.
Enter Username and Password
Navigate to your specific provider tab under WireGuard Client. Input the same username and password you use to log in to their website.
Click Save and Continue to let the router generate per-server config files automatically. These services support WireGuard natively, ensuring fast and reliable profile creation.
Refresh Keys if Connection Fails
Occasional handshake failures occur if public keys become outdated on the server side. If a connection drops unexpectedly, look for the Refresh button available on Windscribe and Surfshark tabs.
Clicking this regenerates your public keys and syncs the router with the provider current state. This process takes under 10 seconds and often resolves sudden disconnection issues.
Set Up Manual WireGuard Connection
![GL.iNet WireGuard manual config interface with [Interface] and [Peer] sections](https://static.gl-inet.com/docs/router/en/3/tutorials/wireguard_client/add_a_new_wireguard_config.png)
If your provider is not on the pre-integrated list, you can still use WireGuard with manual configuration. This gives you flexibility to use any compatible service.
Add Config File or Paste Text
Click Add Manually in the WireGuard Client section to create a new group. Name the group descriptively, such as “MyCustomVPN,” to keep your profiles organized.
You have two options for inputting data:
* Upload a .conf, .zip, .txt, or compressed config file.
* Paste the configuration text directly into the provided box.
Ensure your file contains standard [Interface] and [Peer] sections for compatibility.
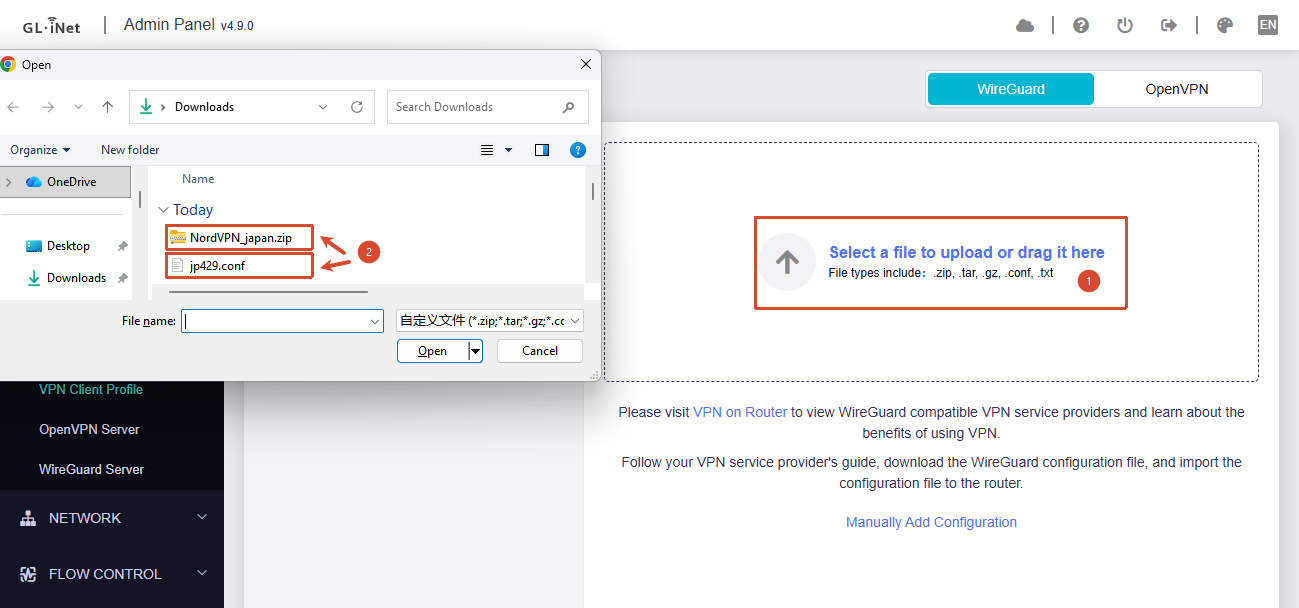
Upload Configuration File
Click the upload area and select your .conf file from your computer. If the file is zipped, ensure it only contains valid configuration or text files.
After selection, click Apply. The router auto-parses keys, endpoints, and allowed IPs. If errors appear, double-check the file syntax or switch to manual text entry.
Manually Enter Config Details
Click Manually Add Configuration below the upload area to input data field by field. Switch to Item Mode to fill in specific parameters individually.
- Name: A descriptive label like “US-FREE-WG”.
- Private Key: Found in the
[Interface]section of your config. - Public Key: Often auto-generated from the private key.
- DNS: Optional entries like
1.1.1.1or9.9.9.9. - Endpoint: Server address and port (e.g.,
us-server.example.com:51820). - Allowed IPs: Use
0.0.0.0/0for a full tunnel. - Persistent Keepalive: Recommended value is
25.
Click Apply after entering all required data to save the profile.
Start and Manage WireGuard Connections
Once your profiles are created, managing connections is simple and intuitive. The interface provides clear visual indicators for active tunnels.
Connect to Selected Server
Locate your desired server in the list on the left sidebar. Click the three-dot icon next to the profile name and select Connect.
A green dot appears next to the file when the tunnel is active. Connection typically takes 5 to 15 seconds depending on network latency.
Monitor via VPN Dashboard
Navigate to the VPN Dashboard to view real-time connection statistics. You can see active tunnel duration, data transferred, current server location, and your new public IP address.
This confirmation ensures your traffic is routed securely and your real IP remains hidden from websites.
Disconnect or Switch Servers
To stop the connection, click the three-dot menu again and choose Disconnect. Switching servers is instant; simply connect to a different profile without rebooting.
Only one WireGuard client runs at a time unless you configure advanced multi-profile routing rules.
Update or Delete Configurations
Keeping your server lists current ensures optimal speed and reliability. You can also remove old configurations to free up space or reset credentials.
Refresh Server Lists
Click Update Servers periodically to sync the latest list from your provider. This avoids failed connections caused by decommissioned or overloaded servers.
Run this update monthly or whenever you notice connectivity issues. It ensures you always have access to the fastest available geographic locations.
Remove All Configurations
Select Delete All to wipe all generated files for a specific provider. The system prompts you to decide whether to delete private and public keys as well.
Choose Yes for a full reset or No to retain keys for faster re-authentication. Note that deleting keys requires re-entering your token or password later.
Edit or Renew Provider Credentials
Your subscription status and login details may change over time. The router interface allows easy updates without re-uploading entire configuration files.
Modify Login Information
Click the gear icon next to your provider name to access account settings. Here you can change your username, password, or access token.
This feature is useful if you have reset your credentials or switched to a different account entirely.
Renew Subscription
Some providers like NordVPN, Mullvad, and X-VPN include a Go Renew button. This redirects you to their billing page to extend your service without leaving the router interface.
Use this shortcut to maintain uninterrupted access to secure servers.
Set Up X-VPN with Login Token
X-VPN uses a unique token system similar to NordVPN but requires navigation to a specific menu section. It also relies on time-limited tokens for security.
Generate 15-Minute Token
Log in to your X-VPN account and go to Settings then Login Token. Click Generate to create a token valid for only 15 minutes.
Copy this token immediately before the popup closes, as it cannot be retrieved again. You must use it quickly before it expires.
Save and Apply in Router
Navigate to VPN then VPN Client Profile and select X-VPN. This is a separate menu from the standard WireGuard Client section.
Paste the token and click Save and Continue. Select your desired servers and click Apply to generate profiles.
Manage via Gear Menu
Use the gear icon to modify authentication information or delete configurations. Selecting Logout removes all credentials and keys, so use this option carefully.
Set Up WireGuard Server for Remote Access
For advanced users, turning a GL.iNet router into a WireGuard server allows secure remote access to your home network. This eliminates the need for third-party subscriptions.
Use Two GL.iNet Routers
This setup requires two routers: one as a server at home and one as a client elsewhere. It is ideal if your home ISP provides a public IP address.
You gain full control over your data without monthly fees. This configuration secures all traffic from your remote device back to your home network.
Configure Server Router
On your home router, go to VPN then WireGuard Server and enable the feature. Set the Server IP (e.g., 10.8.0.1/24) and note the Port (default 51820).
Click Generate to create server keys. Record the Public Key and Endpoint (your public IP plus port) for client configuration.
Add Server as Client on Remote Router
On your travel router, go to WireGuard Client and select Add Manually. Enter the server public key, your home public IP, and the port number.
Set Allowed IPs to 0.0.0.0/0 for a full tunnel or your home subnet for local access only. Click Apply and connect to secure your connection.
Port Forwarding Requirement
Ensure port 51820 UDP is forwarded to your server router LAN IP in your home modem settings. If your IP changes frequently, consider setting up Dynamic DNS (DDNS).
Verify connectivity using an online port checker tool to ensure remote access works.
Troubleshoot Common Issues
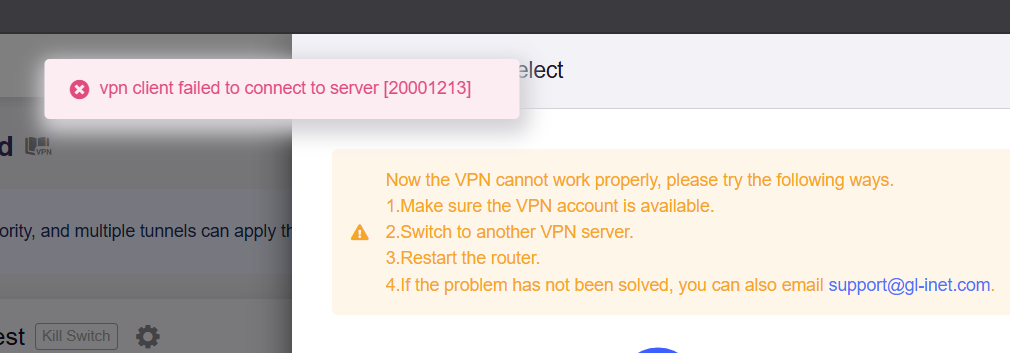
Even with simple setup, occasional hiccups can occur. Understanding common problems helps you resolve them quickly.
No Internet After Connecting
This usually indicates misconfigured Allowed IPs or DNS settings. Set Allowed IPs to 0.0.0.0/0 for a full tunnel and add a reliable DNS like 1.1.1.1.
Disable conflicting services like DNSCrypt if they interfere with the tunnel. Test connectivity using the ping tool in the router command interface.
Connection Stuck or Fails
Check for an outdated server list, expired token, or blocked UDP port. Click Update Servers or regenerate your credentials to refresh the connection.
Confirm that your endpoint port is open and not blocked by a firewall. Re-uploading the config file can also resolve syntax errors.
Slow Speeds
WireGuard is designed for speed, so slowdowns often stem from server distance. Switch to a geographically closer server to reduce latency.
Ensure your internet plan supports the desired speed and check for local network congestion. Avoid double tunneling by disabling VPNs on individual devices.
Can’t Access Home Network Remotely
If using the server setup, verify Allowed IPs includes your home subnet. Disable any firewall rules blocking internal traffic on the server router.
Ensure the client uses the correct private key matching the server configuration. Test with a ping command to your home gateway IP.
Frequently Asked Questions About WireGuard on GL.iNet
How do I find my WireGuard config file?
Log in to your VPN provider website and look for manual setup or WireGuard downloads. Most providers offer a direct download link for .conf files which you can upload to your GL.iNet router.
Can I run WireGuard and OpenVPN simultaneously?
You can install both, but typically only one VPN tunnel can be active for outgoing traffic at a time. You may configure specific routing rules to direct certain devices through different protocols.
Does setting up WireGuard slow down my internet?
WireGuard is designed to be faster and lighter than OpenVPN, often resulting in minimal speed loss. However, encryption overhead and server distance can slightly reduce maximum throughput.
What firmware version do I need for X-VPN?
X-VPN integration requires GL.iNet firmware version 4.11 or later. Check your firmware status in the system settings before attempting setup to ensure compatibility.
How do I reset my WireGuard keys?
Navigate to the provider tab in the WireGuard Client section and click the gear icon. Select the option to delete configurations and choose to remove private and public keys to force a reset.
Key Takeaways for Setting Up WireGuard on GL.iNet
Securing your network with WireGuard on a GL.iNet router provides robust encryption for all devices without complex individual setups. Whether you use a pre-integrated provider like NordVPN or manually configure a custom server, the process remains streamlined and efficient.
Regularly update your server lists and monitor your connection status via the dashboard to maintain optimal performance. Start by logging into your admin panel today to protect your digital privacy with just a few clicks.



