Skip to content

Netgear router login

routerlogin.net | router login

  • Home
  • mywifiext local
  • Faqs
  • Disclaimer
  • About us
  • Blog
  • Contact US

Tag: www.routerlogin.net

routerlogin.net : Netgear AX6000 Router Setup Guide

January 5, 2021January 5, 2021routerLeave a comment
Netgear AX6000 Wi-Fi Router

How to change the admin password for your Netgear AX6000 Wi-Fi Router?

Admin Password of the Netgear Router is a security password that allows users to interact to the web interface of www. routerlogin.net and make changes in the configurations of your router. This password is different from the one applied to the Wi-Fi password as this password is utilized to allow nearby users to connect to the network. The Router password is considered more vital than the Wi-Fi one as the access of the Wi-Fi password will only give access to your internet but the access of the Router password will give the user access to control the whole web interface of the router.

Steps to change the router password of your Netgear AX6000 Wi-Fi  Router

  1. Open a browser on your Wi-Fi enabled computer or laptop connected to the home network.
  2. Type www.routerlogin.net or the IP address of your router on the web address of your browser. Press Enter and default Netgear Router login screen appears on the screen. The IP address of  Netgear Router is  either 192.168.0.1 or 192.168.1.1
  3. Press Enter and Netgear Router login screen will appear on your screen.
  4. Type “admin” on the username field and mention the password you applied during Netgear Router setup for logging in to the web interface of routerlogin.net. Both the credential fields are case-sensitive.
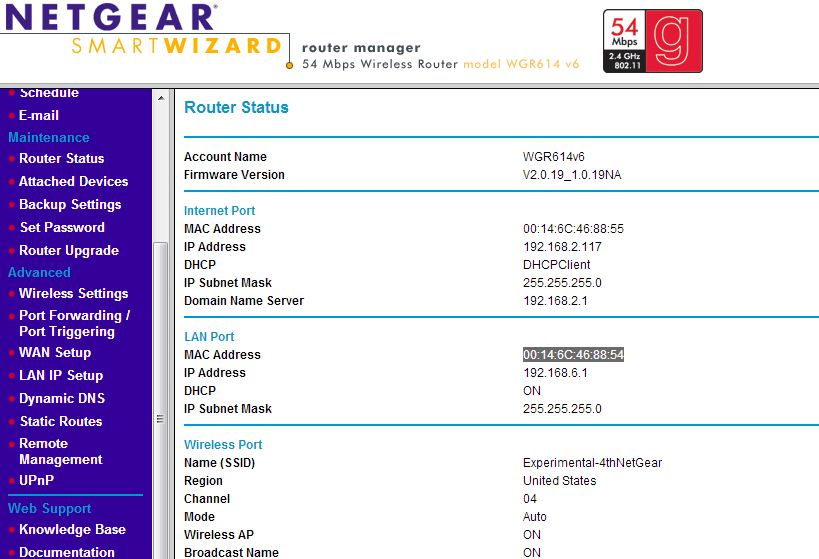
  5. Click on the Advanced tab, then select the Administration tab and now click on Set Password option to set a password for your Netgear router.
  6. As soon as you click on the Set Password tab, you will be redirected onto the Set Password page.
  7. Now, type the current password in the old password field and mention the password you want to apply, within the Set Password field. Repeat the credential in Repeat New Password fields.
  8. Click on the Apply button and the settings you applied wiil get saved.

How to set up Security Event mail notifications on the Netgear AX6000 Wi-Fi router?

Security Event Mail notification in your Netgear AX6000 Wi-Fi router is the feature that allows users to keep track of the ongoing activities or operations particulating within the web interface of  www.routerlogin.net device. By enabling this feature, the user can record the activities of their device and also receives notification regarding the attempts of accessing the blocked websites. The moment anyone tries to open the blocked websites, a notification is sent through email that you will receive on a registered mail. By default, the Event mail notification is disabled and it can be enabled by the web interface of www.routerlogin.net interface.

Steps to setup Security Event mail notification on Netgear AX6000 Wi-Fi router

  1. Open a browser on your Wi-Fi enabled computer connected to the local network.
  2. Type www.routerlogin.net or the IP address of Netgear Router on the web address of your browser. Press Enter and Netgear Router login screen appears on the screen. The IP address of the Netgear Router is 192.168.0.1 or 192.168.1.1
  3. Press Enter and Netgear Router login screen appears on your screen.
  4. Type “admin” on the username tab and mention the password you applied on the Netgear Router login page for logging in to the web interface of routerlogin.net. Both the credentials are case-sensitive.
  5. Select the Advanced tab located on the main screen, go to the Security option then click on the Email tab. The moment you tap on it, the Email page displays.
  6. To turn on the Security Event mail notification bar, select the turn on the E-mail notification checkbox.
  7. Go to Send to the Email address field, mention the mail address in which you want alerts and logs should be sent. This email field can also be used from the address field. If the field is left blank, unfortunately, no logs and emails are to be sent.
  8. Now, go to the Outgoing Mail Server field, and enter the name of the SMTP mail server in this field. If you are unable to find the information, you can search it in the configuration window of the mail program.
  9. Enter a portal number in the Outgoing Port Number and if you are not aware of the port number, leave the default as the port number.
  10. If you want to activate the authentication in the Outgoing mail server, select My Mail server authentication checkbox.
  11. For authentication, you need to mention the username in the username field and type the password in the password field. If you also want to get notified when someone attempts to visit a blocked website, select the “Send Alerts Immediately checkbox”. By selecting this checkbox, the Wi-Fi router will immediately send alerts when someone tries to visit the blocked websites.
  12. To receive notifications and logs on a schedule, you need to mention a schedule menu.
  13. First, Select the day menu from the day list, select the time from the time menu. At last select the am or pm radio button.
  14. Click on the Apply button and the settings will get saved.
  15. Logs will be sent according to the schedule set by you. The logs sent to the user will be cleared from the memory of your device.

Routerlogin.net- AC1750 Dual-Band WI-Fi 5 Router Setup

March 4, 2019May 11, 2021routerLeave a comment

How to install the NETGEAR – AC1750 Dual-Band WI-Fi 5 Router routerlogin net?

Netgear ac1750 dual bandNetgear AC 1750 boosts up the network speed of our home by providing the combined speed of 1750 with both of the frequency bands. One frequency band of 2.4 GHz provides the speed of 400 Mbps and other of 5GHz provides 1350 of Mbps speed giving you the ultra fast and reliable connections. Any adjustments within the Administrative protocols and Network settings of the device are being done through the web interface of the router. The web setup page of the device traditionally interacts with the help of 192.168.1.1 but now has replaced by www.routerlogin.net.The router is programmed with an easy configuration to be set up through the Nighthawk App. It also avoids the trouble of logging into Netgear Router login and also saves the time of the user.

If in any case, before the Netgear Router Setup, the user is not connected to the Internet, he also can take the help of ISP to connect to the Internet by mentioning the login username and password of the ISP whenever asked. On the absence of internet on your system, the interface will automatically ask the login and password of your ISP to allow you to perform the setup of your Netgear router. The user should take the details regarding the ISP from his Internet Service Provider in order to complete the setup.

Manual Setup of the Netgear AC1750 Dual-band router

  1. Connect the cable of Ethernet on the LAN port of the router with the other end of the router.
  2. Connect the Ethernet Cable on the WAN port of the router to the other end connected to the system.
  3. Connect the power adapter to the power outlet of your home.
  4. Note: Check the power LED of your router and make sure that the LED is lit.
  5. If you have connected the system wirelessly, then make sure that both the devices are in enough range.
  6. Now, open up the browser and type www.routerlogin.net on the address bar. Type 192.168.1.1 as the URL of the browser. If in any case, you get encountered with the connection error then reload the page or remove the cached data from the browser.
  7. The moment you hit enter, your system begins to identify the internet connection.
  8. If your device will be connected to the internet the interface will directly take you to the configuration window. If not, then the system will show an ISP page where you need to type ISP login and ISP password in order to perform the Netgear Router Setup.
  9. The configuration page will give you the option of configuring the Internet yourself or you want to allow Netgear Genie to do that for you.
  10. If you are aware of configuring the Internet yourself click on No radio button else click on Yes radio button.
  11. Now, follow the onscreen instructions to get connected to the Internet.
  12. When you will successfully get connected to the network, the dialogue box of Netgear Router login will appear on the screen prompting you to enter the username as well as the password on the browser.
  13. Go to Basic tab then visit the Internet tab.
  14. Setup your Network Settings.
  15. When you are done with it, click on the Apply button and the settings will get applied in your system.
  16. Now, go to the Wireless tab. set your region, SSID name, Wi-Fi password, Broadcasting channel, security to the device and click on the Apply button to update the settings when you are done.
  17. Go to Advanced and tap on reboot button to successfully reboot your router.
  18. When the process is done then clicks on the home button to check the status of your router.

Netegear router setup through Genie smart wizard | routerlogin.net

October 5, 2018May 11, 2021routerLeave a comment

Netegear router setup through Genie smart wizard | routerlogin.net

Netgear router is required by the user to initially access the admin login page using www.routerlogin.net web domain. There, the user will be prompted to enter the default credentials regarding the router to access the Netgear Genie page to further configure the router. It is highly recommended that the user initially logs in to their router in order to secure their network. The login process is very easy and it only takes a couple of minutes of the user’s time. The user can simply go to any internet browser and type the default address i.e. www.routerlogin.net or the default IP address as well i.e. 192.168.1.1. By logging in to the router, the user will gain access to the configuration page of the router and the advanced features as well. With the help of the configuration settings, the user can secure their network and by changing the advanced features, the user can personalize their network that is most suitable to their needs.
Netegear router setup
The user can find the security settings on the configuration page of the router. The configuration page is called the Netgear Genie which helps the users setup their routers initially and further provides the user a dashboard with the configuration settings regarding their Netgear router. It is highly recommended that the user changes the default username and password for their router as the default information is provided online for ease of access regarding the initial login for all the users. Any unauthorized user can access the user’s network without their permission using the default credentials. After that, the user must update the firmware for their router if there are any updates available. The Netgear Genie notifies the user regarding the updates. The firmware is basically the Operating Software of the router. It helps orchestrates all the functions within the hardware of the router. The firmware update also rolls out various new features as well as enhances overall speed of the user’s network.
Here, we will help the users understand the configurations of their Netgear routers using the Netgear Genie. Here are the steps to setup and login to the Netgear router using Netgear Genie:

  • Connect the Ethernet cable from the modem to the WAN port located at the rear end of the Netgear router.
  • Now, using another Ethernet cable, connect the desktop computer to any of the four internet ports located at the rear end of the Netgear router besides the WAN port.
  • Reboot the modem, the router and the desktop computer and wait for the devices to finish rebooting.
  • Open any internet browser and type www.routerlogin.net in the address bar to access the Netgear Genie page.
  • The user can even access the admin login page using the default IP address as well. The default IP address is 192.168.1.1 for most of the Netgear routers.
  • Once the user has the admin login page on the screen, the user will be required to enter the default credentials regarding their router. The default username is “admin” and the default password is “password” for most of the Netgear routers. The username and password will be case sensitive.
  • Once the user has successfully logged in to the router, the Setup Wizard will appear. The Setup Wizard will try to detect the type of internet connection that the user has.
  • For all the wired connections, the Setup Wizard will detect the connection as Dynamic IP. Click Next to proceed.
  • Now, the user will have setup and logged in to their network without any problems. The user can now change the configurations of their router and access the advanced features as well from the Netgear Genie page.

The user’s Netgear router will now be configured properly. The user can start using their router as they desire.

Disclaimer : This website is just for posting blogs and helping people through setup guides. we do not provide any kind of technical support. Visit Netgear for any kind of help.

Click here to chat with a Technician
© 2026 Netgear router loginTheme by Puro