Your remote server or game connection fails because AT&T router port forwarding is likely blocked by default firewall settings. Unsolicited internet traffic cannot reach your devices without specific rules to guide it through the gateway.
This guide explains exactly how to configure, troubleshoot, and verify port forwarding on AT&T BGW320 and BGW210 gateways. You will learn to fix Double NAT issues, set up Roon ARC or WireGuard, and ensure your remote connections remain stable.
Access Your AT&T Gateway Interface
You must log into the router administration panel before creating any forwarding rules. Most AT&T residential gateways share a standard login process and interface layout.
Locate Gateway IP and Credentials
Open a web browser on a connected device and enter http://192.168.1.254 in the address bar. This default IP address works for nearly all AT&T modems including the BGW320 and BGW210 series.
If the default address does not load, check your network settings for the Default Gateway.
* Windows: Open Command Prompt and type ipconfig.
* Mac: Go to System Settings, select Network, and view router details.
Use the following credentials to log in:
* Username: admin
* Password: Your Wi-Fi password or the unique code on the modem label
Note: Some firmware versions require a unique device access code. Contact AT&T support if standard credentials fail.
Navigate to Port Forwarding Settings
Once logged into the dashboard, locate the main navigation menu. Click the Networking tab to reveal sub-options. Select Port forwarding from the list to access the rule configuration page.
This section allows you to define exactly where incoming internet traffic should go. You will tell the router to send specific port requests to a designated device on your local network.
Create a Custom Port Forwarding Rule
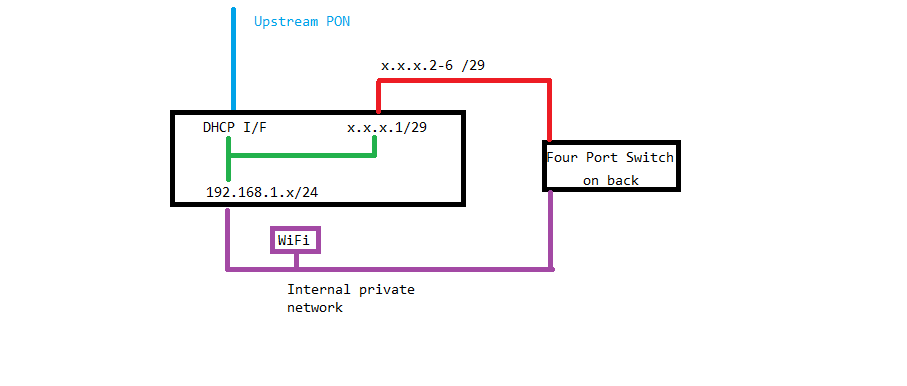
Setting up a rule requires precise information about the service you want to expose. Follow these steps to configure ports for Roon, WireGuard, gaming servers, or web hosting.
Define Rule Name and Protocol
Start by giving your rule a clear identifier. Enter a descriptive name like “RoonCore” or “MinecraftServer” in the Name field. This helps you manage multiple rules later without confusion.
Select the correct protocol from the dropdown menu based on your application needs:
* TCP: Required for web servers, SSH, and most remote desktop tools.
* UDP: Essential for WireGuard VPNs, VoIP, and real-time gaming.
* TCP/UDP: Choose this if your application requires both protocols simultaneously.
Pro Tip: WireGuard strictly requires UDP. Selecting TCP will prevent the VPN from connecting.
Configure External and Internal Ports
Enter the port numbers to map external requests to your internal device. The External Ports field defines what the internet sees. Use a single number like 51820 or a range like 5000-5100.
The Internal Port usually matches the external port unless you are redirecting traffic. For example, you might map external port 8080 to internal port 80 for a web server.
Example configuration for WireGuard:
* External Port: 51820
* Internal Port: 51820
* Protocol: UDP
Assign Target Device IP Address
Input the local IP address of the device hosting the service in the Internal IP field. This tells the router exactly which machine receives the traffic. Common addresses look like 192.168.1.105.
Critical: The target device must have a static IP address. If the IP changes after a reboot, your forwarding rule will break immediately.
How to Set a Static IP
You can reserve an IP address directly in the AT&T interface to prevent changes.
1. Navigate to Connected Devices in the router menu.
2. Find your target device in the list.
3. Click Reserve IP Address or Assign Static IP.
4. Save the settings to lock the IP permanently.
Alternatively, you can manually configure a static IP within the operating system of the device itself.
Save and Apply Configuration
Review all entered data for accuracy before finalizing. Click the ADD button to create the rule entry in the list.
Scroll to the bottom of the page and click SAVE & APPLY. The router may reboot automatically to apply changes. Wait one to two minutes before testing your connection.
Resolve Double NAT in Dual-Router Setups
Using a secondary router like Eero or Asus behind your AT&T gateway creates a Double NAT situation. This blocks incoming connections unless you configure cascading rules or change the network topology.
Configure Cascaded Port Forwarding
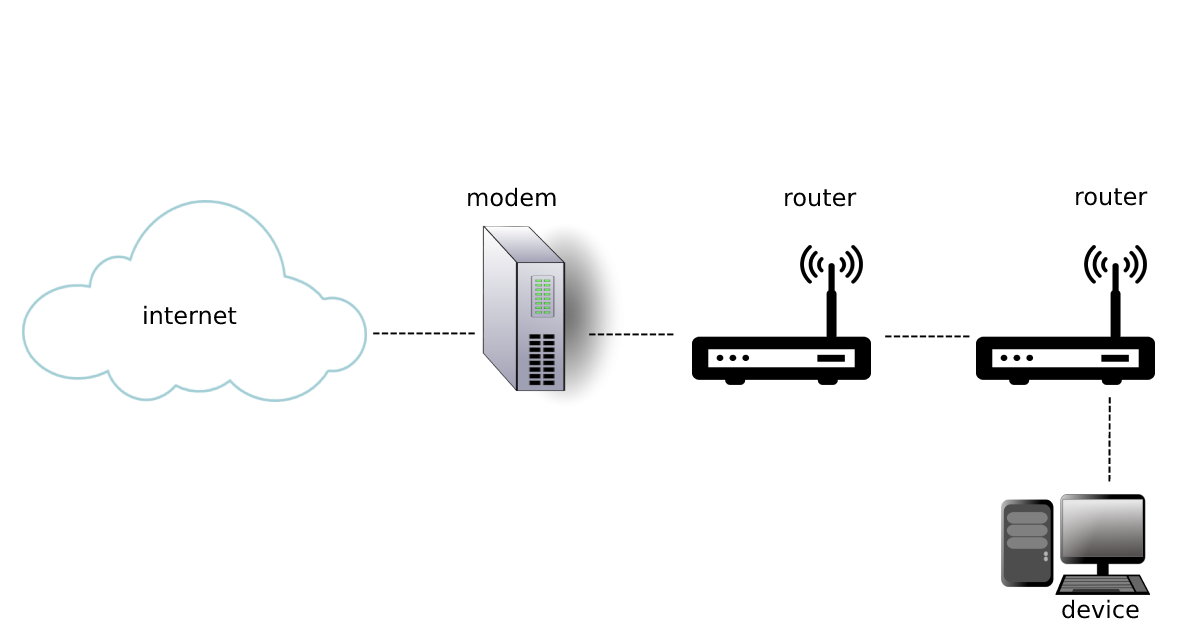
In a dual-router setup, traffic must pass through two layers of translation. You must create matching rules on both devices to allow data through.
Step 1: Configure AT&T Gateway
Create a port forwarding rule on the AT&T modem. Set the internal IP to the WAN IP address of your secondary router. Forward the required port to this address.
Step 2: Configure Secondary Router
Log into your secondary router interface. Create a second port forwarding rule. Route the same port to the local IP of the final destination device.
Example: Traffic flows from Internet to AT&T, then to Eero, and finally to your laptop. Both routers need specific rules.
Enable Bridge Mode for Single NAT
A cleaner solution eliminates the double translation layer entirely. Enabling Bridge Mode turns your AT&T gateway into a simple modem.
Steps to Enable Bridge Mode
- Log into
192.168.1.254. - Navigate to Firewall or Advanced Settings.
- Select IP Passthrough or Bridge Mode.
- Choose Bridge Mode and reboot the gateway.
Your secondary router will now receive the public IP address directly. Configure all port forwarding rules on this primary router instead of the AT&T unit.
Use IP Passthrough Alternative
If Bridge Mode is unavailable, use IP Passthrough. Enter the MAC address of the specific device you want to expose. The AT&T gateway assigns the public IP directly to that single device.
Warning: Only one device can use IP Passthrough. Other devices on your network will remain behind the AT&T NAT layer.
Fix Roon ARC Remote Access Issues
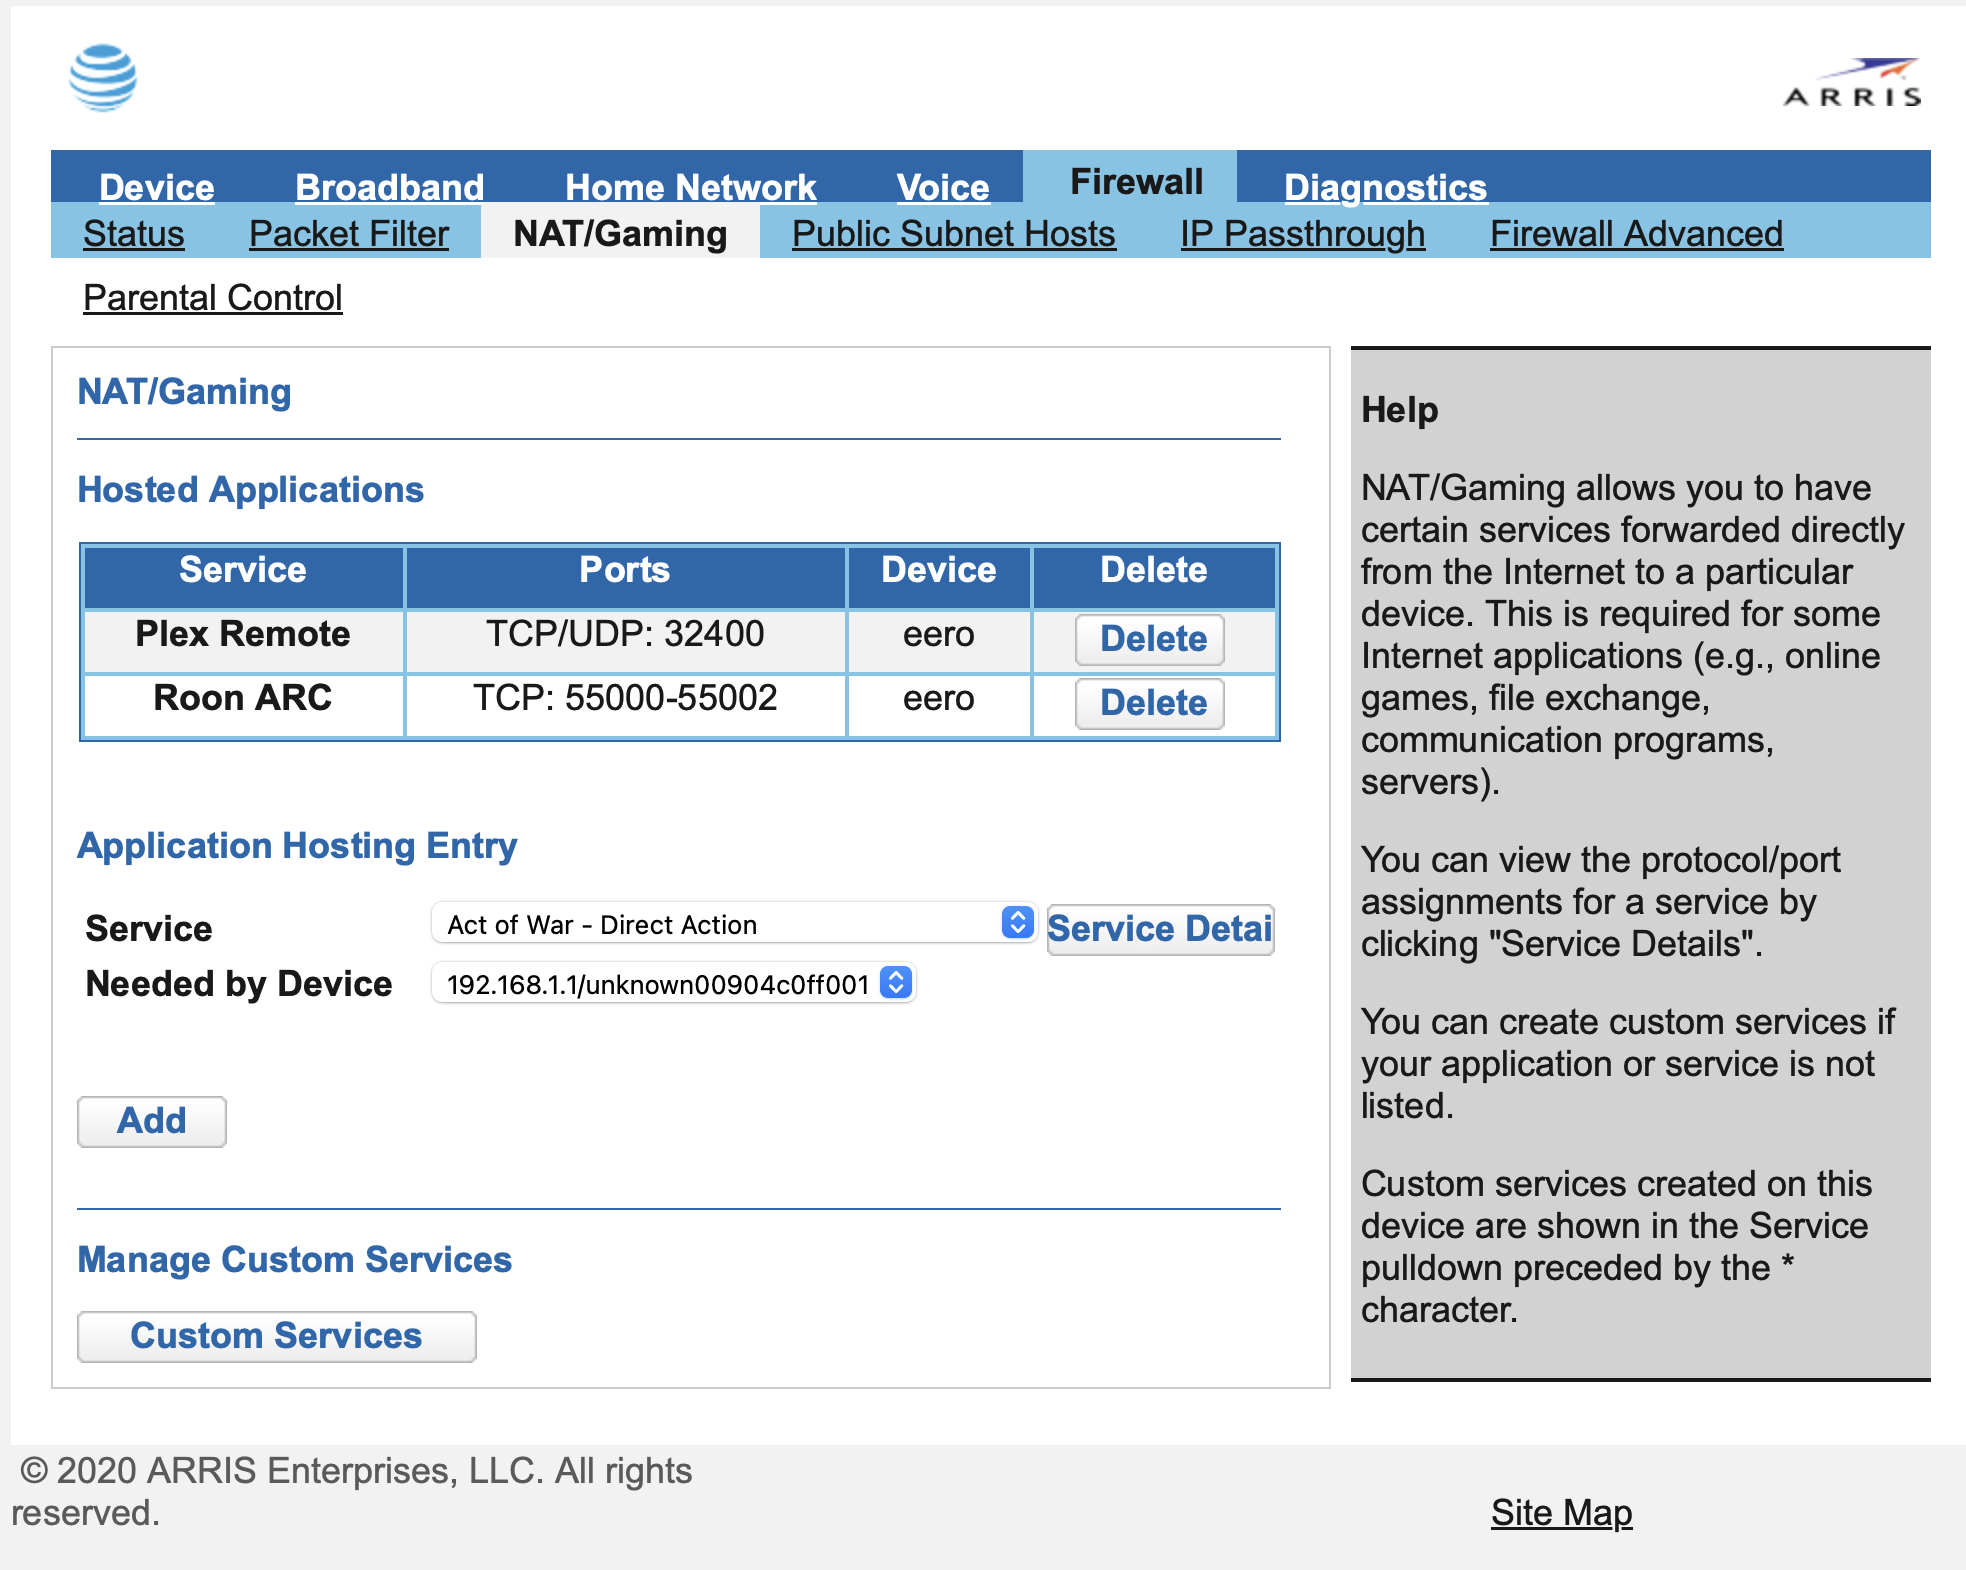
Roon ARC users frequently encounter connection errors when port forwarding is misconfigured. These steps resolve common “Poor Connection” or diagnostic failures.
Diagnose Connection Failures
Identify the specific symptom affecting your setup. Common signs include zero diagnostic data or error messages stating the Core is offline.
Typical error messages include:
* “Poor Connection. Try Again.”
* “Make sure your Roon Core is turned on…”
* Diagnostic screen shows no data
These errors indicate the port is blocked or the Core cannot be reached from outside your network.
Forward the Correct Roon Port
Locate the specific port number required by your Roon installation. Open Roon Settings and select the Roon ARC tab to find the remote access port.
Create a new port forwarding rule on your AT&T router with these parameters:
* Port: The number listed in Roon Settings
* Protocol: TCP
* Internal IP: The IP of your Roon Core machine
Apply Connection Resets
Restarting services often clears stuck connection states. Perform these actions if the rule is correct but connection fails.
Reset Roon ARC State
Open the Roon mobile app settings. Tap Reset Connection under the Roon ARC section. Wait thirty seconds before retrying.
Reboot Core Machine
Restart the computer or server running Roon Core. This forces the software to re-establish its network identity and accept new incoming connections.
Adjust Playback Quality
Change the playback quality setting in the Roon ARC app. Switch from “Auto” to Original to resolve handshake issues with certain ISP configurations.
Configure WireGuard VPN on AT&T
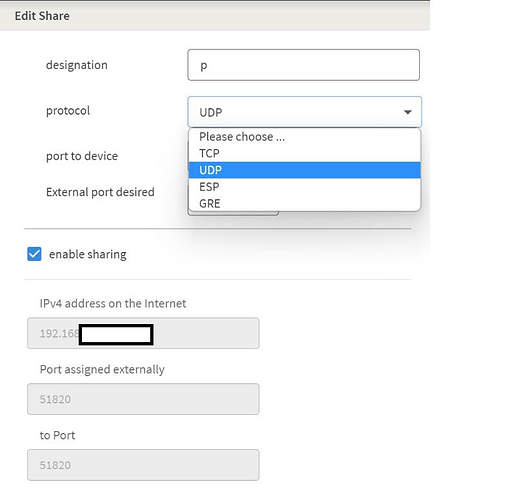
Running a WireGuard server behind an AT&T gateway requires precise UDP configuration. Follow these settings for GL-iNet Flint 2 or similar routers.
Set Required Parameters
Use the Custom Service option in the AT&T port forwarding menu for advanced configurations. Enter the following values exactly:
- Global Port Range: 51820
- Base Host Port: 51820
- Protocol: UDP
- Base Host IP: Internal IP of your WireGuard router
Ensure the Base Host IP matches the local address assigned to your secondary router by the AT&T gateway.
Verify WAN IP Assignment
Confirm your secondary router has a valid local IP address. Check the admin panel of your Flint 2 or similar device to verify connectivity.
Reserve this IP address in the AT&T DHCP settings. This prevents the internal IP from changing and breaking the forwarding rule.
Test Remote Connection
Verify the setup using a device outside your home network. Connect via cellular data or a public hotspot.
Open the WireGuard app and attempt a connection using your home public IP. Success means your internet traffic is routing securely through your home network.
Tip: Visit
https://ip.mefrom inside your network to find your current public IP address.
Troubleshoot Common Port Forwarding Errors
Even correct configurations can fail due to environmental factors. Use these solutions to fix persistent connection issues.
Resolve Poor Connection Errors
This error often stems from incorrect port mapping or Double NAT conflicts.
Potential Causes:
* Wrong protocol selected
* Double NAT blocking return packets
* Core device not rebooted
Recommended Fixes:
* Reset the Roon ARC application state
* Change playback quality to Original
* Verify rules on both AT&T and secondary routers
* Reboot the Core machine completely
Fix Core Unreachable Messages
The “Make sure your Roon Core is turned on” error appears when the port is open but the service is unreachable.
Check the firewall settings on your Core device. Ensure Windows or macOS allows incoming connections for the Roon application. Confirm the internal IP address has not changed since you created the rule.
Address Zero Diagnostic Data
No data in diagnostics usually indicates IP Passthrough misconfiguration. Confirm the Passthrough feature uses the correct MAC address of your Core device.
Switch to Bridge Mode if Passthrough continues to fail. Reboot all networking equipment after making topology changes.
Recover Dropped TV or Streamer Connections
Enabling Bridge Mode can sometimes disrupt IPTV boxes or streaming devices. These devices may lose their DHCP lease or multicast traffic.
Reboot all set-top boxes and smart TVs. Ensure they remain on the same subnet as your router. Contact AT&T if IPTV services fail to recover after a reboot.
Verify Port Forwarding Functionality
Never assume your configuration works without testing. External verification confirms traffic is passing through the firewall correctly.
Perform External Connection Test
Use a device that is not connected to your home Wi-Fi. A smartphone on cellular data is ideal for this test.
Attempt to connect to your service remotely:
* Open Roon ARC on mobile data
* Access your web server via public IP
* Connect your WireGuard client
Successful connection confirms your port forwarding rules are active.
Use Online Port Checking Tools
Websites like canyouseeme.org or portchecker.co can scan your public IP. Enter your port number to see if it appears open to the internet.
Note: If the port shows as closed, double-check your rule spelling, IP address, and protocol selection.
Monitor Application Diagnostics
Check the status screen within your specific application. Roon ARC displays upload and download speeds when connected.
Look for an “Established” status indicator. Absence of data suggests a rule failure or blocked traffic path.
Maintain Stable Port Forwarding Rules
Long-term stability requires proactive maintenance. Dynamic IP addresses and ISP updates can break your configuration over time.
Enforce Static IP Addresses
Never rely on dynamic IP assignment for servers. Always reserve an IP address in the router or configure it manually on the device.
Without a static IP, a simple reboot can change the device address and silently break your forwarding rule.
Reboot After Configuration Changes
Always restart the target device after saving new rules. This clears stale network connections and forces the device to reload its network stack.
Rebooting the router itself may also be necessary to apply deep-level firewall changes.
Monitor for ISP Updates
AT&T may push firmware updates or reset gateways during outages. These events can occasionally revert custom settings to default.
Verify your rules remain intact after any power outage or maintenance window. Reapply configurations if they disappear.
Frequently Asked Questions About AT&T Router Port Forwarding
What is the default IP address for AT&T routers?
The default IP address for most AT&T gateways is 192.168.1.254. Enter this into your web browser address bar to access the login page. Some older models may use 192.168.0.1.
Why is my port forwarding rule not working?
Common causes include incorrect internal IP addresses, wrong protocol selection, or Double NAT issues. Ensure your target device has a static IP and that you are testing from an external network.
How do I fix Double NAT with AT&T and Eero?
You can enable Bridge Mode on the AT&T gateway to let Eero handle all routing. Alternatively, configure cascaded port forwarding rules on both the AT&T modem and the Eero router.
Does WireGuard require TCP or UDP on AT&T?
WireGuard strictly requires the UDP protocol. Selecting TCP or TCP/UDP will prevent the VPN tunnel from establishing a connection.
Can I forward ports without a static IP?
No, port forwarding requires a consistent internal IP address. If the device IP changes, the rule points to the wrong location. Use DHCP reservation to keep the IP static.
Key Takeaways for AT&T Router Port Forwarding Success
Configuring AT&T router port forwarding enables reliable remote access for servers, gaming, and media applications. Success depends on setting static IPs, selecting the correct protocol, and verifying rules from outside your network.
For complex setups involving mesh systems or multiple routers, enabling Bridge Mode is often the most effective solution. This eliminates Double NAT issues and simplifies management by letting your primary router handle all traffic.
Take action today by logging into your gateway and verifying your current rules. A few minutes of configuration ensures your services remain accessible and secure.