Slow internet or strange website errors often point to a hidden culprit rather than your connection speed. Learning how to find DNS server on router settings helps you identify if outdated addresses are slowing down your browsing experience.
This guide reveals exact steps to locate these critical numbers using your computer or phone without needing advanced technical skills. You will discover how to access your router dashboard, interpret the data you see, and decide if switching to a faster provider is right for your home network.
Access Your Router Admin Panel Directly

The most reliable method to see exactly which DNS server your network uses involves logging into the router itself. This central hub controls traffic for every device connected to your Wi-Fi, making it the single source of truth for your configuration.
Locate Your Default Gateway IP Address
You cannot enter the admin panel without the specific address of your router on the local network. This number acts as the digital doorway to your settings.
- Windows Users: Press
Windows + R, typecmd, and hit Enter. Typeipconfigand look for the Default Gateway number. - Mac Users: Open System Settings, select Network, click your active connection, and find the Router address under the TCP/IP tab.
- Mobile Users: On iPhone, tap the i icon next to your Wi-Fi name in Settings. On Android, tap your network name and select Advanced to see the Gateway IP.
Common addresses include 192.168.1.1 or 192.168.0.1, but your specific gateway number is unique to your setup.
Log Into the Dashboard Interface
Open a web browser like Chrome, Safari, or Firefox on a connected device. Type the gateway IP address into the address bar and press Enter to load the login screen.
Enter your administrator username and password when prompted. If you never changed these, check the sticker on the bottom of your router for the default credentials, which are often admin and password.
Navigate to WAN or Internet Settings
Once logged in, the interface may look complex, but the DNS information lives in specific sections. Look for tabs labeled Internet, WAN, Broadband, or Network Settings.
Search for fields marked Primary DNS and Secondary DNS. If these fields contain numbers like 8.8.8.8, you have custom settings active. If they show 0.0.0.0 or say “Obtain Automatically,” your ISP is currently assigning the servers.
Check DNS Configuration on Connected Devices
You can often determine the DNS server in use by inspecting the network settings on your phone or computer. This method is faster than logging into the router but only shows what that specific device sees.
Inspect DNS Settings on iPhone
Open the Settings app and tap Wi-Fi. Find your connected network and tap the blue i icon next to it. Scroll down to the Configure DNS section.
If the setting is Automatic, your phone is using whatever the router provides. If it is set to Manual, the listed servers are the specific DNS addresses your phone is using right now.
View DNS Details on Android Phones
Go to Settings and select Network & Internet. Tap Wi-Fi and then select your current network name. Choose Advanced to expand the menu options.
Look for IP Settings and switch the view from DHCP to Static temporarily. This reveals the DNS 1 and DNS 2 fields without requiring you to save any changes. Note the numbers and switch back to DHCP to avoid connection issues.
Use Command Prompt on Windows
Press the Start button and type Command Prompt to open the terminal. Type ipconfig /all and press Enter to generate a detailed network report.
Scroll through the text until you find your active adapter, such as Wi-Fi or Ethernet. Locate the line labeled DNS Servers. If the number matches your router IP, your device is relying on the router to handle DNS resolution.
Check Network Details on macOS
Click the Apple logo in the top left corner and select System Settings. Go to Network and choose your active connection. Click the Details button and select the DNS tab.
The list displayed here shows the exact DNS resolvers your Mac is using. If you only see your router’s IP address, the actual upstream DNS is configured within the router itself.
Identify Automatic Versus Manual DNS Modes
Understanding how your router obtains DNS addresses helps you decide if you need to make changes. The configuration mode dictates whether you have control over your internet routing or if your ISP does.
Recognize Automatic DHCP Assignment
When your router is set to automatic, it requests DNS server addresses from your Internet Service Provider every time it connects. This is the default state for most home networks.
- Pros: Requires zero setup and works immediately.
- Cons: ISPs may log your browsing history and resolution can be slower.
You can spot this mode if the DNS fields in your router are blank or display unfamiliar IP addresses belonging to your ISP.
Utilize Manual DNS Configuration
Manual configuration allows you to type in specific addresses from providers like Google or Cloudflare. This overrides the ISP defaults and applies the change to your entire network.
- Pros: Faster browsing speeds and enhanced privacy features.
- Cons: Requires initial setup and occasional verification.
Always enter both a primary and secondary address to ensure your internet keeps working if one server fails.
Detect Device-Level Overrides
Sometimes a specific laptop or phone has its own DNS settings that ignore the router. This creates a hybrid situation where most devices use ISP DNS while one uses a custom provider.
Check individual devices if you suspect inconsistent performance. To fix this, set the device back to automatic DNS so it inherits the network-wide settings you configured on the router.
Locate DNS Menus by Router Brand
Router manufacturers organize their menus differently, which can make finding DNS settings confusing. Knowing where to look based on your brand saves significant time and frustration.
Netgear Router Navigation
Log in to routerlogin.net or your router IP. Navigate to Advanced and then Internet or WAN Setup. The DNS fields are usually visible in the main Internet Setup window.
Some models require you to click a View Settings button to reveal the primary and secondary DNS entries.
TP-Link Interface Path
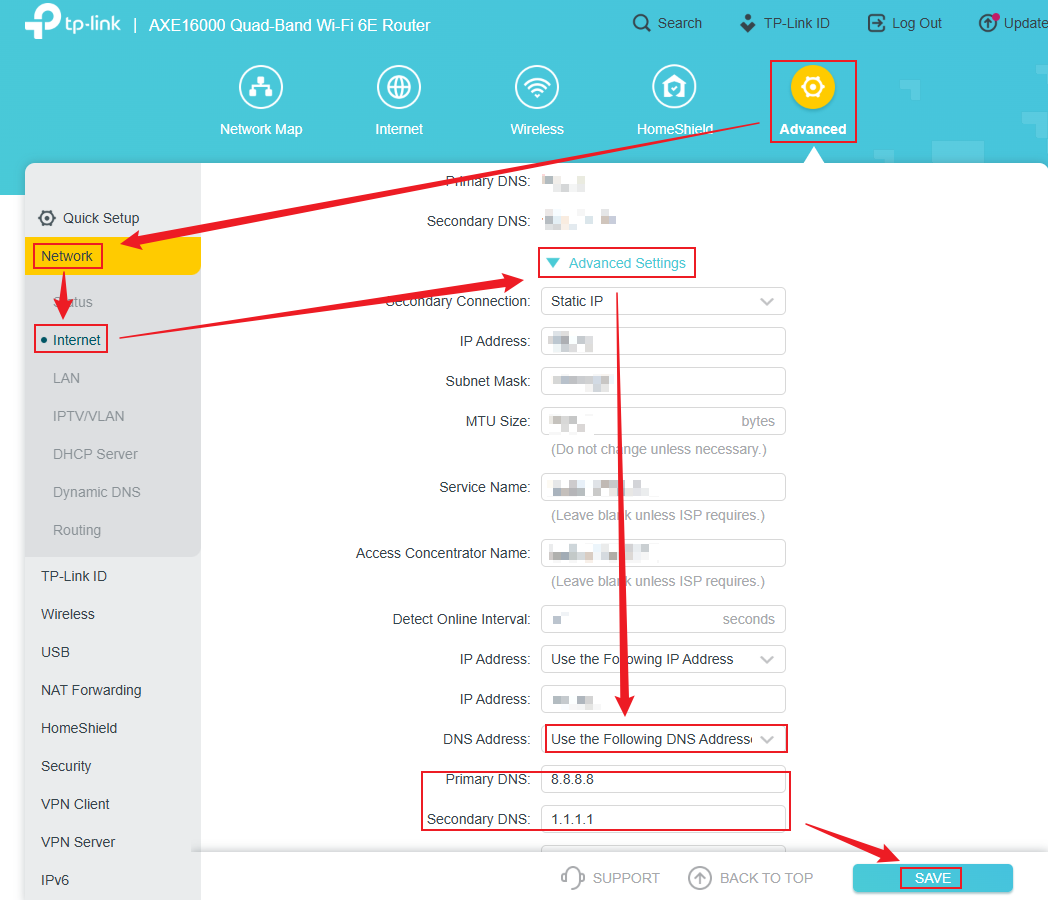
Access your router via tplinklogin.net. Go to Advanced > Network > Internet. If your connection type is Dynamic IP, you may need to click an Advanced button within that page.
The DNS settings appear clearly labeled near the bottom of the connection details.
ASUS Router Settings
Open router.asus.com in your browser. Click WAN in the left sidebar and look under the Internet Connection tab. The DNS Server fields are prominently displayed here.
If the option says Obtain via DHCP, the router is using automatic settings from your provider.
AT&T Fiber Gateway Steps
Visit 192.168.1.254 in your browser. Log in with your device access code found on the side of the gateway. Select the Broadband tab and click DNS Servers.
Be aware that some AT&T gateways restrict manual changes unless the device is in bridge mode.
Reasons to Find and Change Your DNS

Knowing how to find DNS server on router settings is the first step toward a better internet experience. Changing these numbers can solve problems you might not realize are DNS related.
Accelerate Browsing Speeds
DNS acts like a phonebook for the internet, translating website names into IP addresses. Faster DNS servers respond quicker to these requests, making pages load noticeably faster.
Switching from a slow ISP server to a dedicated provider can reduce latency significantly.
Enhance Privacy and Security
Many ISPs track the websites you visit through DNS queries. Using a privacy-focused DNS provider prevents this logging and adds a layer of anonymity to your browsing.
Secure DNS services also block known malware and phishing sites before they reach your device.
Resolve Connection Errors
If you can connect to Wi-Fi but websites fail to load, bad DNS settings are often the cause. Identifying the current server allows you to test alternatives quickly.
Try switching to a public DNS like 1.1.1.1 to see if your connectivity issues disappear immediately.
Steps to Update Your DNS Settings
Once you know how to find DNS server on router interfaces, updating them is a simple process. Follow these steps to apply faster or more secure servers to your whole network.
Execute the Configuration Change
- Log into your router admin panel using your gateway IP.
- Navigate to the Internet or WAN settings section.
- Select Manual or Custom for DNS settings.
- Enter
1.1.1.1as Primary and1.0.0.1as Secondary for Cloudflare, or use Google’s8.8.8.8and8.8.4.4. - Save the settings and allow the router to reboot.
This process usually takes less than three minutes and requires no special tools.
Select Reliable DNS Providers
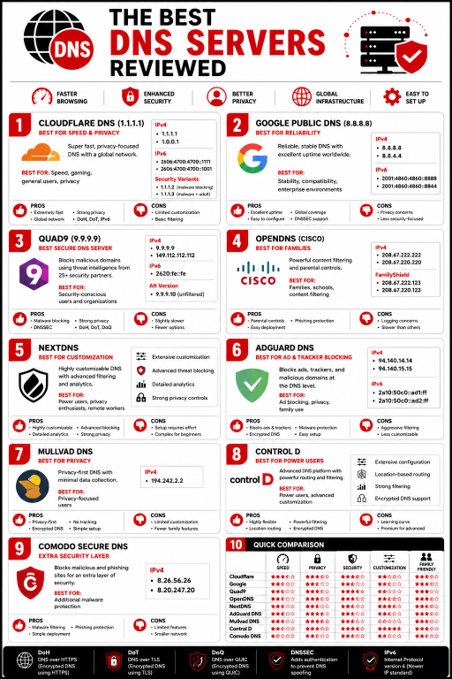
| Provider | Primary Address | Secondary Address | Best Feature |
|---|---|---|---|
| Cloudflare | 1.1.1.1 | 1.0.0.1 | Speed and Privacy |
| 8.8.8.8 | 8.8.4.4 | Reliability | |
| OpenDNS | 208.67.222.222 | 208.67.220.220 | Security Filtering |
| AdGuard | 94.140.14.14 | 94.140.15.15 | Ad Blocking |
Choose a provider that matches your specific needs for speed or content filtering.
Troubleshoot Missing DNS Options
Some users cannot find the option to change DNS settings despite following the correct steps. This usually happens due to restrictions imposed by the equipment provider or firmware limitations.
Deal with ISP-Locked Routers
Renting equipment from companies like Xfinity or Spectrum often means the DNS settings are locked. The provider manages these remotely to maintain their network standards.
To bypass this, you can purchase your own router and put the ISP modem into bridge mode. This gives you full control over DNS configuration.
Update Router Firmware
Older routers might hide DNS options or lack the feature entirely. Check the manufacturer’s website for firmware updates that might add this functionality.
If your router is very old, upgrading to a modern model with better security features is a wise investment for your home network.
Frequently Asked Questions About Router DNS
What is the default DNS server on most routers?
Most routers are set to obtain DNS automatically from your Internet Service Provider by default. This means you are using whatever servers your ISP assigns without realizing it.
Can changing DNS improve my gaming ping?
Yes, switching to a faster DNS provider can reduce the time it takes to resolve game server addresses. While it does not increase bandwidth, it can make connections feel snappier.
Is it safe to use Google or Cloudflare DNS?
Yes, these are reputable providers known for reliability and security. They often offer better privacy protections than standard ISP-assigned DNS servers.
Will changing DNS affect my internet speed?
It can improve perceived speed by reducing the time it takes to locate websites. Actual download speeds remain the same, but pages may start loading faster.
Do I need to restart my router after changing DNS?
Yes, restarting ensures all devices disconnect and reconnect with the new settings. This step guarantees that every device on your network uses the updated DNS servers.
Key Takeaways for Finding DNS Server on Router
Mastering how to find DNS server on router settings gives you control over your network performance and privacy. By accessing your admin panel or checking device settings, you can identify slow or insecure configurations instantly.
Take action today by logging into your router and verifying your current DNS addresses. Switching to a reputable provider is a quick fix that delivers immediate improvements for every device in your home.