
Noticing strange devices on your network or preparing to sell your router? You need to know how to delete router history to protect your privacy and clear sensitive connection data. Unlike browser history, your router logs device names, IP addresses, and timestamps that reveal who accessed your network.
This guide shows you exactly how to find your router IP, log in securely, and wipe logs on Netgear, TP-Link, and ASUS models. You will learn to navigate admin panels, clear all activity records, and secure your network against future tracking attempts.
Find Your Router IP Address Quickly
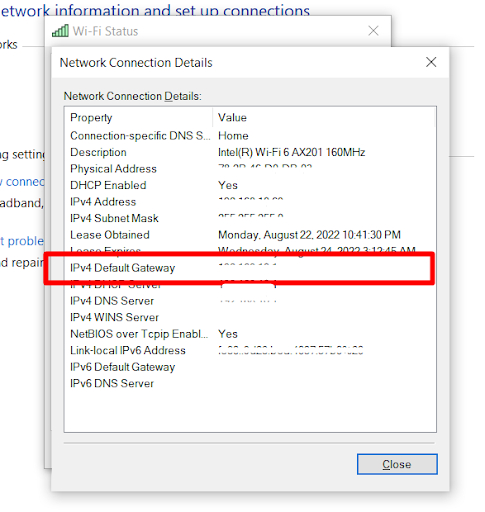
You cannot access logs without the correct gateway address. This number acts as the digital doorway to your router’s internal settings. Most routers use standard addresses like 192.168.1.1 or 192.168.0.1, but yours might differ.
Check Network Settings on Your Device
Your phone or computer already knows the router address. You just need to look in the right spot within your settings menu.
* Mobile Devices: Go to Wi-Fi settings, tap your current network, and find the Router or Gateway field.
* Windows/Mac: Open network preferences or status details to see the gateway IP listed under your active connection.
* Physical Label: Check the sticker on the bottom of your router for the default IP address.
Use Command Prompt on Windows
This method provides the most accurate result for Windows users. It bypasses graphical menus to show raw network data.
1. Press Start, type cmd, right-click Command Prompt, and select Run as Administrator.
2. Type ipconfig in the black window and press Enter.
3. Locate the Default Gateway line under your active network adapter.
Write down this number immediately. You will type it into your browser next to access the admin panel.
Access the Router Admin Panel Securely
Now that you have the IP address, you must log in to the firmware interface. This panel controls your entire network, so handle it with care.
Enter IP in Your Web Browser
Open any modern browser like Chrome, Firefox, or Edge. Type the IP address directly into the address bar where you usually type website URLs. Do not add “www” or “.com” to the number. Press Enter to load the login page.
Input Your Admin Credentials
The router will ask for a username and password before showing any settings.
* Default Logins: Look at the router sticker for defaults like admin/admin or admin/password.
* Custom Logins: If you changed these previously, enter your unique credentials.
* Security Warning: Never share these details with others as they grant full control over your internet connection.
If the default credentials do not work and you have not changed them, you may need to reset the router physically.
Locate Logs Section by Router Brand
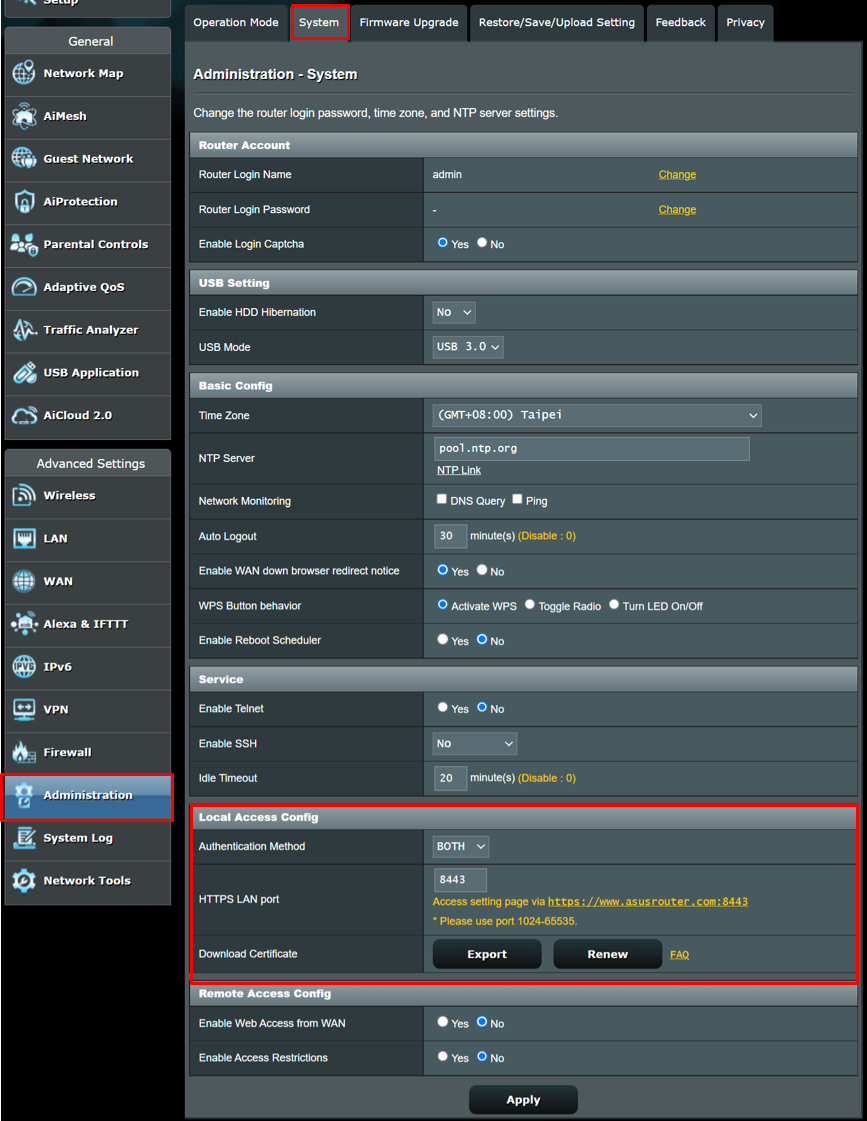
Menu structures vary wildly between manufacturers. Knowing your specific brand saves time and frustration. Use the paths below to find the System Log or Logs section quickly.
Netgear Navigation Path
Netgear places logs deep within the advanced settings menu.
1. Log in to the dashboard.
2. Click the Advanced tab at the top of the screen.
3. Select Administration from the sidebar.
4. Click on Logs or System Log.
TP-Link Navigation Path
TP-Link groups system tools under the advanced category as well.
1. Navigate to the Advanced tab after logging in.
2. Click on System in the left-hand menu.
3. Look for System Log or Log Management.
ASUS Navigation Path
ASUS keeps system records under the administration umbrella.
1. Find and click Administration in the main menu.
2. Select the System Log tab within that section.
3. View the list of recorded events.
Generic or ISP Provided Routers
Routers from providers like Xfinity or AT&T often hide these features. Check under Status, Tools, or Maintenance. Some ISP units disable log access entirely for customers. If you see no option for logs, your specific model may not support user-accessible history.
Clear Router History Step by Step
You have found the logs. Now you must execute the deletion properly. This process removes timestamps, device IDs, and connection events permanently.
Select All Log Types
Some routers let you filter logs by category. To ensure a complete wipe, set the Log Type dropdown to All. This captures firewall blocks, DHCP leases, UPnP events, and security alerts. Viewing the full list confirms what data exists before you erase it.
Execute the Clear Command
Look for a button labeled Clear Log, Clear All Logs, or Reset Logs. Click this button to initiate the deletion. A warning pop-up will appear stating the action cannot be undone. Confirm your choice by clicking Yes or OK.
Verify Deletion Success
Refresh the page immediately after clearing. The table should now be empty or show only a single new entry stating the logs were cleared. If old entries remain, repeat the process or check if your router requires a reboot to finalize the action.
Backup Logs Before Deletion Optional
You might want a record of past activity before wiping it clean. This is useful if you are troubleshooting a recurring issue or investigating a security breach.
Download or Email Records
Many routers offer utility buttons near the log table.
* Download Logs: Saves a text file to your computer for offline review.
* Email Logs: Sends the current log data to a specified email address.
Use these features if you need to analyze traffic patterns later. Once you delete the logs from the router, this data is gone forever unless you saved a copy.
Fix Common Access and Clearing Issues
Not every router behaves perfectly. You might encounter locked menus or unresponsive buttons. Here is how to handle common roadblocks.
ISP Router Restrictions
Many Internet Service Providers lock down their equipment.
* Missing Menus: The logs section may be completely absent.
* Grayed Out Buttons: You can view logs but not delete them.
* Solution: Check your ISP’s mobile app. Some providers move these features to their proprietary apps rather than the web interface. Note that apps often show current devices but rarely allow full log deletion.
Third-Party Router Troubleshooting
If your personal router is acting up, try these steps.
* Restart the Device: Unplug the router for 30 seconds and plug it back in.
* Use Ethernet: Connect your computer directly to the router with a cable for a stable connection.
* Change Browsers: Try incognito mode or a different browser to rule out cache issues.
Why You Should Delete Router History
Clearing logs is more than just housekeeping. It directly impacts your network performance and security posture.
Improve Router Performance
Routers have limited memory capacity. Old logs accumulate over time and consume this valuable space.
* Slower admin interface loading times.
* Delays in processing new connection requests.
* Potential interference with firmware updates.
Clearing logs every few months keeps the system running smoothly.
Enhance Network Security
Logs reveal who connected to your network and when. Deleting them removes traces of past intruders. This prevents anyone with physical access to your router from seeing your network history. It complements other security measures like changing your Wi-Fi password.
Post Clearance Security Steps
Wiping history is only the first step. You must secure your network to prevent future unauthorized access.
Change Your Wi-Fi Password
Clearing logs does not disconnect devices currently on your network.
1. Go to Wireless Settings in your admin panel.
2. Enter a new, strong Wi-Fi network password.
3. Save changes and reconnect your trusted devices.
This forces all devices to re-authenticate, kicking off any unwanted guests.
Upgrade to WPA3 Encryption
Check if your router supports newer security protocols.
* Navigate to Wireless Security settings.
* Select WPA3-Personal or WPA2/WPA3 Mixed Mode.
* Save your settings.
WPA3 offers superior protection against password cracking attempts compared to older standards.
What Router History Actually Includes
Understanding what you are deleting helps manage expectations. Routers track metadata, not content.
Data That Gets Cleared
- Device names and MAC addresses.
- Connection and disconnection timestamps.
- IP address assignments via DHCP.
- Firewall blocks and security alerts.
- NAT and UPnP activity logs.
Data Not Stored on Routers
- Specific web pages visited.
- Content of messages or emails.
- Files downloaded or uploaded.
Home routers generally do not log the actual content of your internet traffic. They only record the fact that a connection occurred.
Factory Reset Vs Clear Logs
Do not confuse clearing logs with a factory reset. These are very different actions with different consequences.
| Feature | Clear Logs | Factory Reset |
|---|---|---|
| What It Deletes | Only system and connection logs | All settings, passwords, and logs |
| Access Required | Admin login only | Admin login or physical button |
| Recovery | Logs rebuild automatically | Must reconfigure entire network |
| Best Use Case | Routine privacy cleanup | Selling router or major repairs |
Use Clear Logs for regular maintenance. Use Factory Reset only when necessary, such as when selling the device.
Prevent Future Tracking Issues
You can stop logs from piling up again by adjusting your settings. Some routers allow you to control how logging behaves.
Disable Logging Entirely
If privacy is your top priority, look for logging options in Administration or System Settings. You may be able to disable the system log or set it to overwrite old data immediately. Be aware that this removes your ability to troubleshoot network issues later.
Monitor Connected Devices
Make it a habit to check your network monthly.
* Log in to your router admin panel.
* Review the Attached Devices or Client List.
* Remove any unknown devices immediately.
Regular monitoring keeps your network secure without needing constant log deletion.
Frequently Asked Questions About Deleting Router History
Does deleting router history erase browsing history?
No, routers do not store the specific websites you visit. They only log connection metadata like device names, timestamps, and IP addresses. Your browser history remains on your individual devices.
Can I recover router logs after clearing them?
No, the deletion process is permanent. Once you click the clear button and confirm, the data is wiped from the router’s memory and cannot be recovered through standard means.
Why can’t I find the logs section on my router?
Many ISP-provided routers hide or disable log access for customers. If you cannot find the menu, check your provider’s mobile app or consult your specific model manual for limitations.
How often should I clear my router history?
For optimal performance and privacy, clear your logs every one to three months. If you suspect a security breach, clear them immediately after securing your network password.
Will clearing logs disconnect my devices?
No, clearing the logs only removes the record of events. Your connected devices will stay online. To disconnect devices, you must change your Wi-Fi password.
Key Takeaways for Deleting Router History
Deleting router history is a vital step for maintaining network privacy and performance. You now know how to locate your IP, access admin panels across major brands, and permanently wipe connection logs. Remember that this action does not remove browsing history from your devices, only the connection records from the router itself.
Take action today by checking your router settings and clearing any accumulated logs. Combine this habit with strong passwords and regular security checks to keep your home network safe.



