
Your Starlink internet suddenly drops, speeds crawl, or you simply forgot the Wi-Fi password. A reset might be the fix you need. Resetting your Starlink modem wipes all custom settings and returns the router to factory defaults, just like the day you unboxed it. This solution works for stubborn connectivity issues, lost passwords, and preparing the device for a new location. In this guide, you’ll learn the exact reset steps for Gen 1, Gen 2, and Gen 3 routers, plus how to reconfigure your network once the reset completes.
Identify Your Router Generation First
Each Starlink router generation uses a different reset method. Picking the wrong procedure wastes time and frustrates users, especially Gen 2 owners who search for a button that doesn’t exist. Always confirm your model before starting.
Gen 1 Router
The original rectangular router with a single bottom-facing LED. Features a small pinhole reset button on the bottom panel.
Gen 2 Router
A taller, upright router with no visible reset button anywhere on the device. Requires a unique power-cycling method.
Gen 3 Router
The latest rectangular router with a rubber cover on the back, hiding the reset button between the Ethernet ports.
Reset Gen 1 Starlink Modem
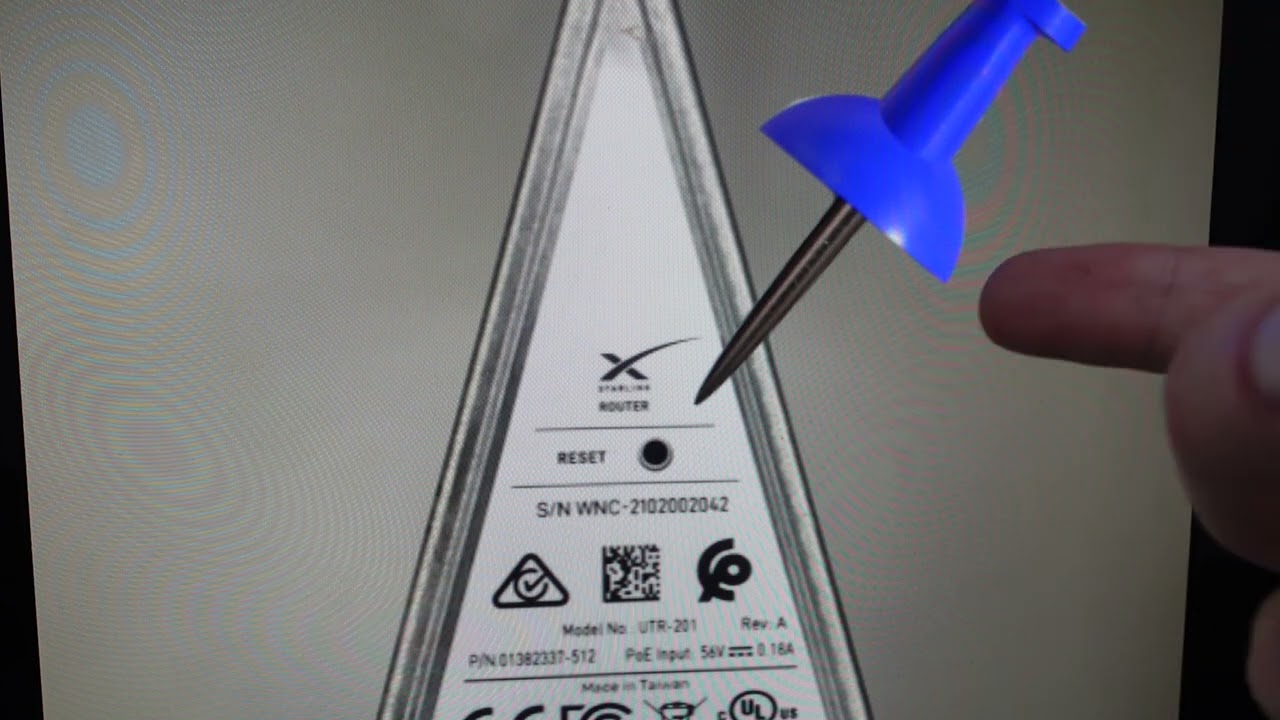
The Gen 1 router offers the simplest reset process through a dedicated physical button.
Locate the Reset Button
Flip the router upside down on a flat surface. Look for a tiny pinhole labeled “reset” near the center of the bottom panel. You’ll need a paperclip or safety pin to reach inside.
Press and Hold for 3–5 Seconds
Insert your tool and press the button firmly. Hold for 3 to 5 seconds until you feel a slight click. This tactile feedback confirms the reset triggered.
Watch the LED Indicator
The single LED on the bottom of the unit will start blinking during the reset. Once it stabilizes and turns solid white or blue, the router has reconnected to your dish. The reset is complete.
Reset Gen 2 Starlink Modem
The Gen 2 router has no physical reset button. Instead, you must perform a precise power-cycling sequence that triggers an internal reset.
Unplug and Replug Six Times
Follow this exact cycle without stopping:
- Unplug the router from the power outlet
- Wait 1–2 seconds
- Plug it back in
- Repeat the unplug, wait, and plug sequence six times total
The reset only triggers after the sixth complete cycle. Stopping early means starting over.
Ensure Stable Power Throughout
Use a reliable wall outlet and avoid surge protectors during this process. Any power interruption breaks the sequence. Complete all six cycles in quick succession without delays.
Confirm Reset Success
Gen 2 has no front LED, so visual feedback is limited. Check the back for a solid white power light confirming the unit is on. After reset, scan your device’s Wi-Fi list for a new unsecured network named STARLINK. Its appearance confirms success.
Reset Gen 3 Starlink Modem

The Gen 3 router returns to a physical button, but it’s hidden beneath a protective rubber cover.
Remove the Rubber Cover
Flip the router over and locate the rubber flap between the Ethernet ports on the back. Peel it back gently to expose the reset button.
Press the Button for 5 Seconds
Use a paperclip or safety pin to press and hold the factory reset button. Hold for 5 full seconds until you feel a click. This confirms the reset initiated.
Check the Status LED
The status LED in the bottom left corner blinks rapidly during reset. The blinking slows to a steady flash as the router reconnects. When the light turns solid, the reset is complete.
What Happens After a Factory Reset
A reset permanently erases all custom settings. Your router returns to its original out-of-box state and waits for new configuration.
Wi-Fi Network Returns to Default
After reset, the broadcast network changes to STARLINK in all capital letters with no lock icon. For Gen 2 routers specifically, the default SSID appears as Starlink-XXXX, using the last four characters of the router’s MAC address.
All Custom Settings Are Lost
The reset wipes the following:
- Wi-Fi name (SSID)
- Wi-Fi password
- Advanced network preferences
- Any custom configurations
You cannot recover these settings. Reconfiguration through the Starlink app is mandatory.
Reconfigure Your Network After Reset
Every generation follows the same setup process after a reset. The Starlink app handles all configuration tasks.
Connect to the STARLINK Network
On your phone, tablet, or laptop, open Wi-Fi settings. Find the network named STARLINK and tap to connect. No password is required for this initial unsecured network. If it doesn’t appear immediately, wait 1–2 minutes and refresh the list.
Open the Starlink App
Launch the Starlink app on iOS or Android. Your device must remain connected to the STARLINK network for the app to detect the unconfigured router.
Follow the Setup Prompt
The app displays a message reading “Router not configured.” Tap this prompt to begin the setup process.
Enter Your New Network Details
You’ll be prompted to create:
- A new Wi-Fi name (SSID)
- A new Wi-Fi password
Choose a strong, unique password to keep your network secure.
Submit and Wait for Confirmation
Tap Submit. A loading wheel appears while the router applies your new settings. This typically takes 30–60 seconds.
Final Reconnection Steps
Once settings are applied, complete these final actions:
- Disconnect from the
STARLINKnetwork - Reconnect to your new custom Wi-Fi network
- Enter the password you just created
Your devices now connect normally. You can close the app. Setup is complete.
Status Indicators by Generation
Use the lights to verify your reset worked correctly.
Gen 1 LED Behavior
- Blinking: Reset in progress
- Solid white or blue: Successfully connected to dish
Gen 2 Light Indicators
- White power light on back: Router is powered on
- No front LED exists, so rely on the STARLINK network appearing as confirmation
Gen 3 Status LED Patterns
- Rapid blink: Reset actively running
- Slow flash: Reconnecting to the dish
- Solid light: Fully operational and ready
Common Mistakes to Avoid
Avoid these frequent errors that prevent successful resets.
Stopping Gen 2 Power Cycles Early
The most common Gen 2 mistake is finishing fewer than six cycles. You must complete exactly six unplug-and-replug sequences. Any fewer won’t trigger the reset.
Using the Wrong Tools for Gen 1 and Gen 3
Fingertips can’t reach the recessed buttons. Always use a paperclip or safety pin. Don’t force a thicker object into the pinhole.
Skipping the Starlink App
You cannot configure Wi-Fi through a browser or manual setup. The Starlink app is required for all post-reset configuration. Download it before starting if you haven’t already.
Expecting Instant Wi-Fi
The STARLINK network takes 1–2 minutes to broadcast after a reset. Don’t repeat the reset process too quickly. Patience prevents unnecessary complications.
When to Reset Your Starlink Modem
Use a factory reset only when other troubleshooting fails. It’s a powerful tool, not a routine fix.
Fix Persistent Connectivity Issues
If your router won’t connect to the dish or internet, and standard reboots haven’t helped, a reset clears corrupted settings that may be blocking the connection.
Recover a Forgotten Wi-Fi Password
When you’ve lost access to your network because the password is forgotten, a reset lets you create new credentials.
Prepare for a New Location or User
Moving to a new home or transferring the router to someone else? Reset first to remove all personal settings and data.
Undo Bad Configurations
If custom settings caused instability or slow speeds, a reset wipes the slate clean and restores reliable defaults.
Pro Tips for a Smooth Reset
Maximize your chances of success with these expert recommendations.
Charge Your Device First
The setup process takes 5–10 minutes. Ensure your phone or tablet has sufficient battery to complete the entire reconfiguration without interruption.
Stay Close to the Router
Connect to the STARLINK network from within 10 feet of the router. Weak signals can disrupt communication between your device and the Starlink app.
Write Down New Credentials
After setting a new password, save it somewhere secure. Avoid getting locked out again.
Use the 2.4 GHz Band for Setup
The STARLINK network broadcasts on 2.4 GHz. Make sure your device supports this band. Some tablets and laptops default to 5 GHz only.
Troubleshooting Reset Issues
If something goes wrong, try these fixes before repeating the reset.
No STARLINK Network Appears
Wait 2 full minutes for the network to broadcast. If it still doesn’t appear:
- Confirm the router has power
- Check for overheating or physical damage
- Restart the entire reset process
App Doesn’t Show the Setup Prompt
Verify the following:
- You’re connected to STARLINK, not your old network
- The Starlink app is updated to the latest version
- Location services are enabled (the app requires this for function)
Router Won’t Power On
Check these basics:
- Power cable and outlet function
- Bypass any surge protector during testing
- Inspect the wall adapter for damage
Key Differences at a Glance
| Feature | Gen 1 | Gen 2 | Gen 3 |
|---|---|---|---|
| Reset Method | Button press | 6x power cycle | Button press |
| Tools Needed | Paperclip | None | Paperclip |
| Hold Time | 3–5 sec | N/A | 5 sec |
| Button Location | Bottom | None | Under rubber cover |
| Visual Feedback | Bottom LED | Back power light | Status LED |
Frequently Asked Questions About Resetting Starlink Modems
Does resetting Starlink delete my account?
No. A factory reset only clears settings stored on the router itself. Your Starlink account, subscription, and dish alignment remain unchanged.
How long does a Starlink factory reset take?
The reset itself completes within a few minutes. Reconfiguring Wi-Fi through the Starlink app adds another 5–10 minutes to the total process.
Can I reset Starlink without the app?
You can perform the physical reset, but you cannot reconfigure Wi-Fi without the app. Browser-based setup is not supported on any generation.
Will I lose my dish alignment after a reset?
No. The reset only affects router settings, not the dish position or alignment. Your physical setup remains untouched.
Why does Gen 2 have no reset button?
Starlink designed Gen 2 without a reset button for aesthetic and hardware reasons. The power-cycling method accomplishes the same result through firmware.
How do I know if my reset was successful?
The appearance of the unsecured STARLINK network in your Wi-Fi list confirms the reset worked. Generation-specific LED patterns provide additional confirmation.
Final Takeaways for Resetting Your Starlink Modem
Resetting your Starlink modem solves persistent connectivity problems, recovers lost passwords, and prepares your equipment for new users or locations. Gen 1 and Gen 3 routers use a straightforward button press with a paperclip, while Gen 2 requires a precise six-time power cycle with no shortcuts. Always reconfigure your network through the Starlink app afterward, since browser setup isn’t an option. Save this guide for future reference. Whether you’re troubleshooting connection drops or relocating to a new home, the right reset method puts your Starlink network back online in minutes.



