
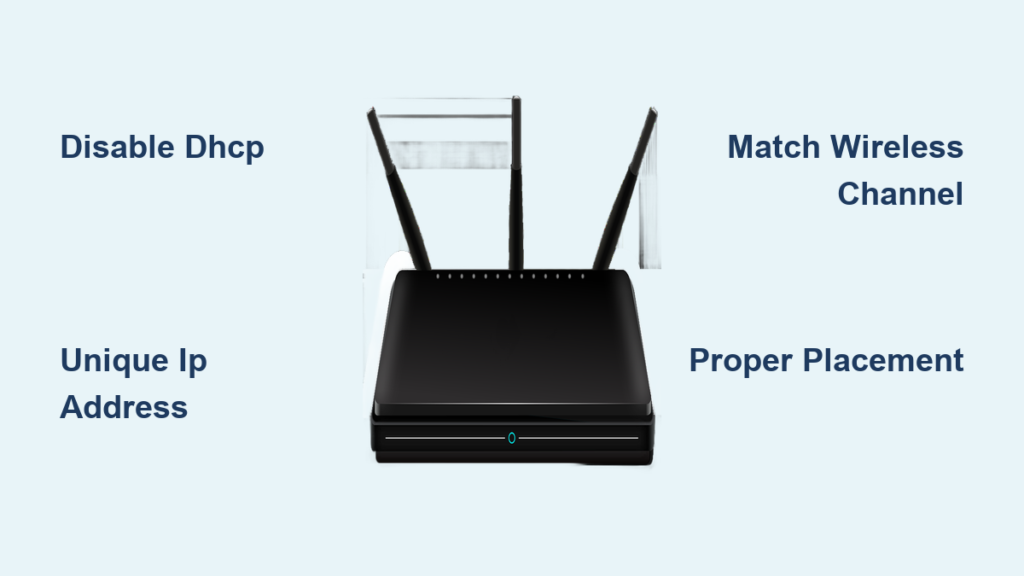
Is your WiFi signal weak in the back bedroom, basement, or garage? You do not need to buy new hardware if you have an old router sitting in a drawer. With the right configuration, you can use a WiFi router as a range extender to eliminate dead zones and boost coverage without spending money. This guide walks you through every step from choosing the right mode to troubleshooting common connection issues.
Using a spare router as a repeater works by receiving your main network signal and rebroadcasting it further. While dedicated extenders are plug-and-play, repurposing a router gives you more power and flexibility if configured correctly. The key is avoiding IP conflicts, disabling DHCP, and ensuring stable wireless bridging. Whether your router supports WDS, Repeater Mode, or a guided setup, we will show you how to make it work.
Choose the Right Configuration Mode for Your Router

Not all routers can extend WiFi out of the box. The method you use depends entirely on your specific model firmware and available features. You must check your router admin page to see which option exists before proceeding with physical setup.
Match Your Router Capabilities
- Range Extender Mode: Found on modern units like the TP-Link Archer A54 V1, this offers a simplified wizard.
- WDS Bridging: Common in older or advanced models, this allows wireless bridging with manual settings.
- Repeater Mode: A generic term used by many brands for standard wireless repeating functions.
- No Native Support: Some units may require third-party firmware like DD-WRT to function as extenders.
If your router has a dedicated “Range Extender” mode, you should use it first. If not, WDS or Repeater Mode will work with careful manual configuration.
Reset and Prepare the Secondary Router Properly
You must reset the secondary router before starting any configuration. This step wipes old settings and ensures you are working with known credentials.
Perform a Factory Reset
Locate the small Reset button on the back or bottom of the device. Press and hold it for 8 to 10 seconds until all LEDs flash simultaneously. Wait for the router to reboot completely before connecting. Default login details are usually admin for both username and password.
Connect and Access Admin Panel
Power on the router and place it within 20 to 30 feet of your main router. Connect your laptop via Wi-Fi using the default SSID or an Ethernet cable. Open a browser and enter 192.168.0.1 or 192.168.1.1. Log in with the default credentials found on the device label.
Set a Unique LAN IP Address to Prevent Conflicts
Both routers must exist on the same subnet but require unique IP addresses to function together. Failure to change this setting will cause network crashes and loss of internet access.
Configure LAN Settings
Navigate to Network then LAN Settings in the admin menu. If your main router IP is 192.168.0.1, set the extender to 192.168.0.2. Save the changes and reboot the device. You will now access the admin page at the new IP address.
Why this matters: Two devices with the same IP address cause severe network conflicts.
Configure Wireless Repeating Using WDS Bridging
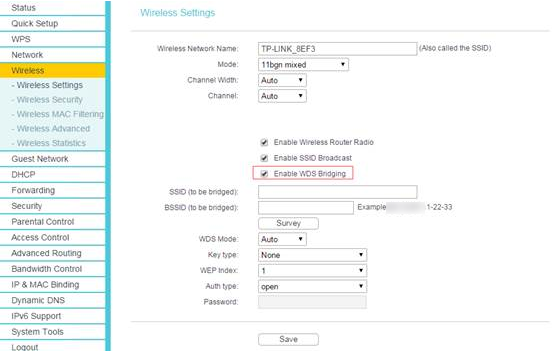
This manual method works best for older TP-Link models and compatible devices without guided modes. It requires precise matching of channels and security settings.
Match Wireless Channel and SSID
Go to Wireless then Wireless Settings. Set the Channel to match your main router exactly, such as Channel 6. Do not use Auto. Set the SSID to the same name for seamless roaming or a different name like “Home_Ext” to distinguish networks. Use channels 1 through 11 for maximum compatibility.
Enable WDS and Connect to Main Network
Navigate to Wireless then WDS Bridging and enable the feature. Click Survey, find your main router SSID, and click Connect. Enter the main WiFi password and select the correct security type like WPA2-Personal.
Set Extended Network Security
Go to Wireless Security to set a password for the extended network. Use the same password as your main network for consistency if you matched the SSID.
Enable Range Extender Mode for Guided Setup
Modern routers often include a built-in extender functionality that simplifies the entire process. This method is ideal for users who want a foolproof setup without manual IP management.
Switch to Extender Mode
In the admin panel, go to Operation Mode and select Range Extender. Confirm that features like Guest Network and Port Forwarding will be disabled during this process.
Follow On-Screen Setup Instructions
The router scans for nearby networks automatically. Select your main SSID from the list and enter the password. The system auto-configures IP, DHCP, and wireless settings for you. Save and reboot to let the router act solely as an extender.
Activate Generic Repeater Mode on Older Models
Some routers offer a basic repeater function that sits between full WDS bridging and guided modes. This option is suitable for devices with limited firmware features.
Turn On Repeater Function
Navigate to Wireless then Repeater Mode or Advanced Settings. Enable Wireless Repeater or Range Extender from the available options.
Connect to Main Network and Finalize
The router scans for networks so you can select your main SSID and enter the correct password. Set a unique SSID if desired and ensure DHCP is disabled. Confirm the LAN IP does not conflict with the main router before saving.
Disable DHCP on the Extender to Stop Conflicts
This step is critical because only the main router should assign IP addresses to devices. If the extender also assigns IPs, devices may lose internet access entirely.
Stop IP Conflicts Immediately
Go to DHCP then DHCP Settings in the menu. Select Disable for the DHCP server function. Save the settings and reboot the extender to apply changes.
If DHCP stays on, devices may get IPs from the wrong source. This results in no internet access even if the WiFi signal appears strong.
Optimize Placement and Performance for Best Results
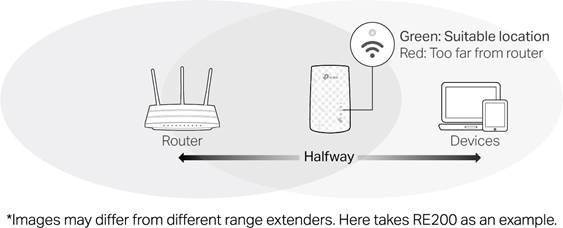
Place the extender halfway between the main router and the dead zone for optimal performance. Placing it too close provides no added coverage while placing it too far creates a weak backhaul signal.
Pick the Right Frequency Band
- 2.4 GHz: Offers better range and wall penetration, making it best for distant rooms.
- 5 GHz: Provides faster speeds but shorter range, ideal if the extender is close to the main router.
For dual-band routers, use 5 GHz to connect to the main router and broadcast both bands to clients. Note that wireless repeating cuts bandwidth in half because each packet is sent twice.
Choose Your SSID Strategy
Using the Same SSID allows devices to see one network and switch automatically, though devices may stick to weak signals. Using a Different SSID like “Home_Ext” gives you control over which network to connect to and makes troubleshooting easier.
Test and Verify the Setup Successfully
Connect a device to the extended network and open a browser to visit a website. Perform a speed test to ensure you get 40 to 60 percent of your original speed due to repeating overhead.
Confirm IP Assignment and Signal
Check the IP address on a connected device. It should be assigned by the main router such as 192.168.0.100 if the main is 192.168.0.1. If the IP comes from the extender, DHCP was not disabled correctly.
Use LED Indicators for Diagnosis
A solid green WPS or signal light indicates a good connection. A blinking or red light means the signal is weak, so move the extender closer to the main router.
Troubleshoot Common Connection Issues
Many users face issues like no internet access or inability to reach the admin page. These problems usually stem from IP conflicts or incorrect passwords.
Fix No Internet Access
Ensure DHCP is disabled on the extender and verify the LAN IP is unique like 192.168.0.2. Confirm the main WiFi password is correct and matches the security type exactly.
Resolve Admin Page Access Problems
Try accessing 192.168.0.2 or 192.168.1.2 if the default fails. Reset the router and reconfigure the LAN IP if you cannot reach the interface.
Improve Weak or Dropped Connections
Manually set the same channel on both routers using 1, 6, or 11. Move the extender closer to the main router and avoid interference from microwaves or thick walls.
Optimize for Long-Term Use and Stability
Visit the manufacturer website to download and install the latest firmware regularly. Updates fix bugs, improve security, and boost overall stability for your extended network.
Maintain Hardware Health
Reboot the extender monthly to prevent memory leaks and performance drops. Unplug the device for 10 seconds once a month to clear the cache.
Ensure Proper Ventilation
Routers run hotter when acting as extenders due to constant receive and transmit cycles. Place the unit in a well-ventilated area and avoid closets or spots behind furniture.
Real-World Use Cases for Extended Coverage
Extending to a basement works best by placing the extender on the floor above near the stairs. Use 2.4 GHz for better penetration through concrete floors.
Covering a detached garage is ideal for workshops or smart tools. Ensure the extender is within range of the house and protect it from moisture if needed.
Boosting outdoor signal allows you to extend coverage to the backyard for cameras or speakers. Keep the extender indoors near a window or door for protection.
Final Recommendations for WiFi Extension Success
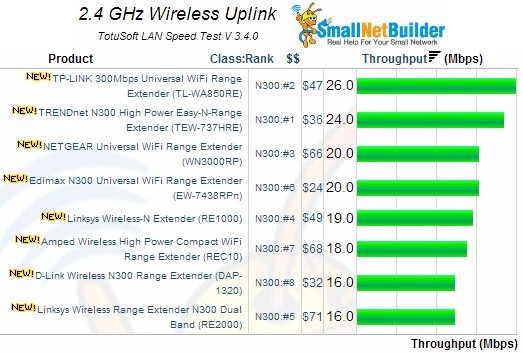
Tech-savvy users should use WDS Bridging for full control over channels and security settings. Beginners should use Range Extender Mode if available since it avoids configuration errors.
- Dual-band routers reduce speed loss significantly compared to single-band units.
- Old but powerful models like the TP-Link TL-WR841N work better than cheap plastic extenders.
- Avoid using routers with weak antennas or outdated WiFi standards like 802.11g.
Using a WiFi router as a range extender is a smart way to expand your network without extra cost. Remember to disable DHCP, set a unique IP, match channels, and place it wisely. Once configured, your old router becomes a powerful tool for eliminating dead zones.
Frequently Asked Questions About Using WiFi Router as Range Extender
Can any router be used as a range extender?
Not all routers support wireless repeating capabilities natively. You must check if your model supports Range Extender Mode, WDS Bridging, or Repeater Mode in its firmware settings.
Does using a router as an extender reduce internet speed?
Yes, wireless repeating typically cuts available bandwidth in half because the radio must receive and retransmit every data packet twice. Dual-band routers minimize this speed loss.
What is the difference between WDS and Repeater Mode?
WDS Bridging requires manual channel matching and IP configuration for stability. Repeater Mode is often a generic or guided function that automates much of the setup process.
Why can’t I access the internet after setup?
This usually happens if DHCP is not disabled on the extender. Only the main router should assign IP addresses to prevent network conflicts.
Where should I place my WiFi extender for best results?
Place the extender halfway between your main router and the dead zone. It must still receive a strong signal from the main router to rebroadcast it effectively.
Do I need to change the SSID on my extender?
You can use the same SSID for seamless roaming or a different one for manual control. Using a different name helps you identify which network you are connected to during testing.
Key Takeaways for Using WiFi Router as Range Extender
Repurposing an old router is a cost-effective solution for eliminating WiFi dead zones in your home. The most critical steps involve disabling DHCP on the secondary unit and ensuring unique IP addresses to prevent network crashes.
Proper placement halfway between your main router and the weak spot ensures the best performance. Whether you choose manual WDS bridging or a guided Range Extender Mode, following these steps will give you reliable coverage.
Start by resetting your secondary router and checking its available modes today. With a little configuration time, you can boost your WiFi signal without buying new hardware.



