

Your new wood router sits ready, yet fear of ruining expensive lumber keeps you from starting. This powerful tool spins bits at 27,000 RPM to shape edges and cut joints, but incorrect handling risks injury or damaged materials.
You will learn exactly how to select the right router type, install bits securely, and feed the tool against rotation for total control. Follow these steps to transform raw wood into professional cabinetry with confidence.
Choose Between Fixed-Base and Plunge Routers
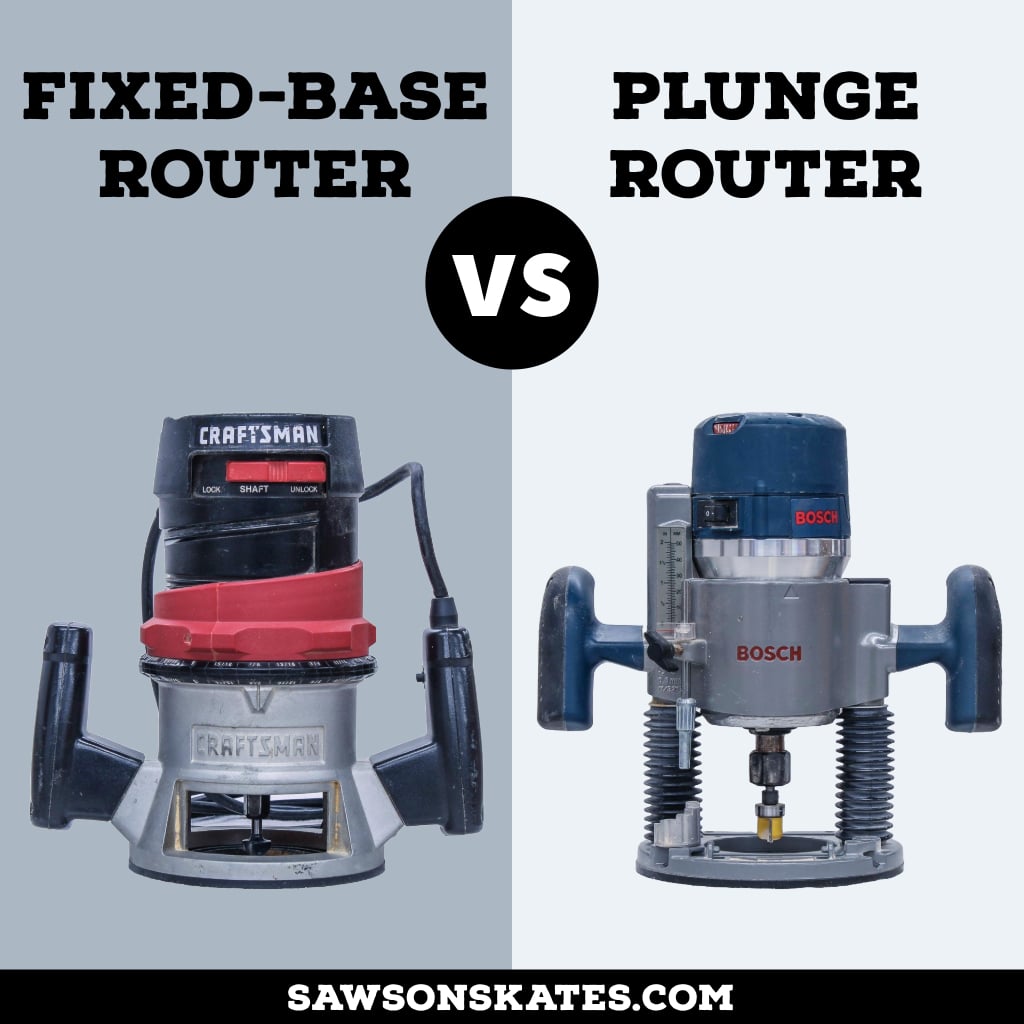
Selecting the correct base type determines your success on specific woodworking tasks. Using the wrong configuration leads to poor control or inaccurate cuts that ruin your project.
Fixed-Base Router Advantages
Fixed-base models lock the motor height before operation. This stability makes them perfect for edge profiling and repeating identical cuts along a straight fence.
Plunge Router Capabilities
Plunge routers feature spring-loaded columns that lower the spinning bit into the material. Use this mechanism for starting cuts in the middle of a board or cutting mortises.
Combo Kit Flexibility
Many manufacturers sell a single motor unit compatible with both base types. This approach offers maximum versatility without requiring two separate tool purchases.
Match Bit Shanks to Your Collet Size
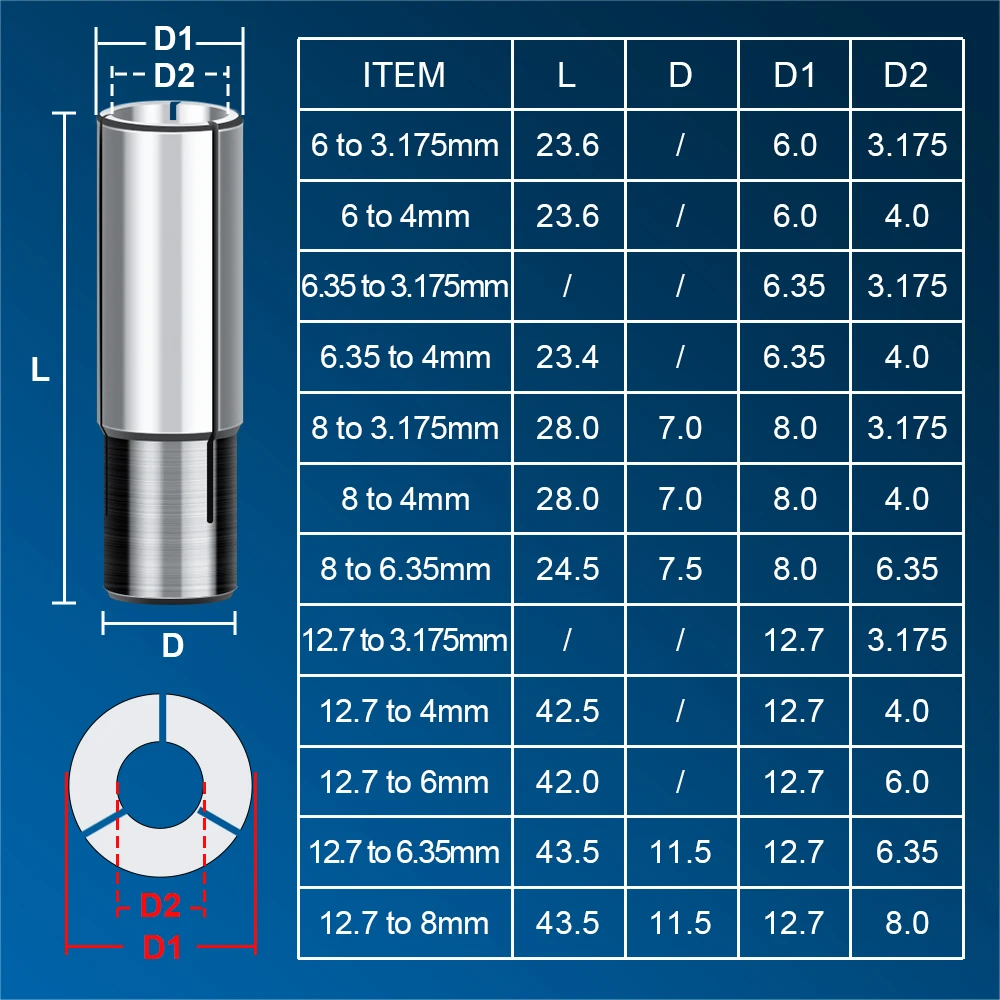
The collet grips the bit shank, and mismatched sizes cause dangerous vibration or bit ejection. Always verify compatibility before tightening the nut.
Understanding 1/4-Inch Shanks
Compact trim routers typically accept 1/4-inch shanks. These affordable bits work well for light edging but vibrate significantly under heavy loads or with large diameters.
Benefits of 1/2-Inch Shanks
L routers accept 1/2-inch shanks for superior rigidity. The added mass reduces chatter and extends bit life during aggressive cutting or when using large profile bits.
Secure Bit Installation Steps
- Unplug the router or remove the battery pack immediately.
- Clean the collet and shaft with a brush to remove resin buildup.
- Insert the bit leaving 1/8 inch of the machined shank visible.
- Tighten the nut finger-tight then use two wrenches to secure it.
- Squeeze the wrenches together for maximum torque rather than pulling apart.
- Pull gently on the bit to confirm it is seated and not bottomed out.
Select Essential Router Bits for Your Projects

A core set of six profiles handles eighty percent of common woodworking tasks efficiently. Start with these essential shapes to build your inventory wisely.
Straight Bits for Grooves
Straight bits cut clean square channels for dados and mortises. Use them with a fence to create precise slots for shelf supports or box joints.
Roundover and Chamfer Profiles
Roundover bits soften sharp edges with a curved profile ranging from subtle to bold. Chamfer bits cut a flat 45-degree bevel for modern trim details or safety.
Flush-Trim and Rabbeting Functions
Flush-trim bits use a bearing guide to copy templates or trim laminate perfectly flush. Rabbeting bits cut a stepped recess along the edge for joining cabinet backs.
Set Cutting Depth Using Multiple Passes

Taking too deep of a cut in one pass overloads the motor and burns the wood. Remove material gradually to ensure a smooth finish and maintain tool control.
Incremental Depth Removal
Remove no more than 1/16 inch of material per pass for deep cuts. This strategy reduces strain on the motor and prevents tear-out on difficult grain.
Adjusting Fixed-Base Depth
- Place the router base flat on the workpiece surface.
- Lower the bit until it just touches the wood.
- Adjust the depth collar to extend the bit to the desired height.
- Lock the depth mechanism securely before powering on.
Adjusting Plunge Router Depth
- Set the maximum depth dial to your target measurement.
- Use the fine-tuning screw for precise adjustments.
- Lock the side pin to prevent accidental plunging during setup.
- Test the depth on scrap wood before cutting your final piece.
Feed the Router Against Bit Rotation
Router bits spin clockwise, creating a force that pulls the tool. Feeding against this rotation keeps the cut smooth and prevents the router from jumping.
Conventional Push Cutting Method
Feed the router against the direction of the spinning bit. Move counterclockwise around outside edges and clockwise around inside holes for maximum stability.
Dangers of Climb Cutting
Feeding with the rotation causes the bit to grab and pull the tool forward uncontrollably. Only experienced users should attempt this technique to prevent tear-out on tricky grain.
Maintaining Control During Cuts
Keep both hands firmly on the handles at all times. Let the bearing guide the cut without forcing the tool through the material.
Use an Edge Guide for Straight Lines
Freehand routing rarely produces consistent results for parallel cuts. An edge guide attaches to the base to ensure uniform distance from the wood edge.
Installing the Edge Guide
- Attach the guide rods to the router base securely.
- Slide the fence onto the rods and lock it in place.
- Measure from the inside edge of the bit to the fence face.
- Adjust the fence until the gap matches your desired offset.
Applications for Edge Guides
Use this accessory for cutting parallel dados or shelf slots. It ensures consistent edge profiling across multiple boards for uniform furniture construction.
Execute Safe and Clean Routing Techniques
Proper workflow minimizes risks and maximizes the quality of your finished project. Follow this sequence for every routing operation you perform.
Step-by-Step Routing Workflow
- Clamp the workpiece firmly to the bench before starting.
- Start on end grain if possible to reduce initial tear-out.
- Power up the router and let it reach full speed before contact.
- Lay the base flat against the workpiece with full contact.
- Feed the tool slowly and steadily without forcing the cut.
- Slow down significantly when turning corners to avoid chipping.
- Keep both hands on the handles throughout the entire process.
- Lift the router only after releasing the trigger and stopping the bit.
Time Estimates for Common Tasks
A simple edge roundover on a 24-inch board takes about 30 seconds once set up. Complex joinery may require multiple passes and careful measurement time.
Upgrade Precision With a Router Table

Mounting your router upside down in a table transforms it into a stationary powerhouse. This setup improves safety and repeatability for small or awkward pieces.
Advantages of Table Mounting
Hands stay behind the bit using push sticks for safety. Stop blocks allow you to cut identical parts with perfect consistency every time.
Setting Up Your Router Table
- Mount the router securely upside down in the table opening.
- Adjust bit height from above using a height gauge or ruler.
- Install a fence to guide the workpiece parallel to the bit.
- Use featherboards to hold material flat and prevent kickback.
Follow Critical Safety Rules Strictly
A router operates at dangerous speeds where mistakes cause serious injury. Adhere to these protocols to protect yourself and your workspace.
Mandatory Safety Practices
- Wear safety glasses to stop flying chips from blinding you.
- Use hearing protection since routers exceed 100 decibels.
- Clamp the workpiece never holding it by hand during operation.
- Check bit security by double-checking the collet before every use.
- Let the router reach full speed before contacting the wood.
- Unplug the tool when changing bits even if battery-powered.
Troubleshooting Common Problems
- Burning: Caused by slow feed rates or dull bits requiring faster movement.
- Tear-out: Results from cutting against grain or taking too deep of a pass.
- Vibration: Indicates a dirty collet or an overloaded 1/4-inch shank bit.
Optimize Speed and Feed Rate Settings
Variable speed control allows you to match RPM to bit size and material density. Running large bits too fast causes burning and potential safety hazards.
Adjusting Speed for Bit Size
Run small bits under one inch at higher speeds up to 23,000 RPM. Reduce speed to 10,000 RPM for large bits over one inch to prevent burning.
Finding the Correct Feed Rate
Feed too slowly and you burn the wood surface. Feed too fast and you leave a rough chattered finish requiring extensive sanding.
Maintain Your Router for Longevity
Regular cleaning prevents slippage and ensures accurate cuts for years. Neglecting maintenance leads to poor performance and potential safety risks.
Routine Maintenance Checklist
- Clean the collet monthly with denatured alcohol and a small brush.
- Inspect bits regularly and replace them when they become dull.
- Check base alignment to ensure it remains flat and parallel.
- Store the router with the bit removed to prevent collet wear.
Frequently Asked Questions About Wood Routers
What router size should a beginner buy?
A 2.5 HP variable-speed combo kit offers the best balance of power and versatility. It handles both light trimming and heavy joinery tasks effectively.
Why does my router burn the wood?
Burning usually happens when you feed the tool too slowly or use a dull bit. Increase your feed rate or sharpen the bit to solve this issue.
Can I use a 1/4-inch bit in a 1/2-inch collet?
No, you must use a collet that matches the bit shank size exactly. Most routers include both collet sizes or an adapter for flexibility.
How deep should I cut in one pass?
Limit each pass to 1/16 inch depth for deep cuts to protect the motor. Shallow passes produce cleaner results and reduce tear-out risks.
Which direction do I move the router?
Move counterclockwise around outside edges and clockwise around inside holes. This pushes against the bit rotation for total control.
Key Takeaways for Learning How to Use a Wood Router
Mastering how to use a wood router requires matching the right tool to your task and respecting safety protocols. Always feed against the bit rotation, use shallow passes for deep cuts, and secure your workpiece firmly.
Start with a versatile combo kit and a core set of carbide bits to build your skills safely. Practice on scrap wood to perfect your feed rate before tackling your main project.
Now you have the knowledge to operate your router with confidence. Plug it in, follow these steps, and begin creating professional-quality woodwork today.



