Your Netgear router power light blinking endlessly means your device is stuck in a boot loop. This frustrating amber or white flash signals that your router cannot load its firmware or complete its startup sequence. You are left with no internet and no clear path forward without specific technical steps.
This guide provides the exact solutions to stop the blinking and restore your connection. You will learn how to diagnose LED patterns, verify power stability, and perform deep resets. We also cover advanced TFTP firmware recovery for corrupted systems to get your network running again.
Decode the Blinking Power Light Patterns
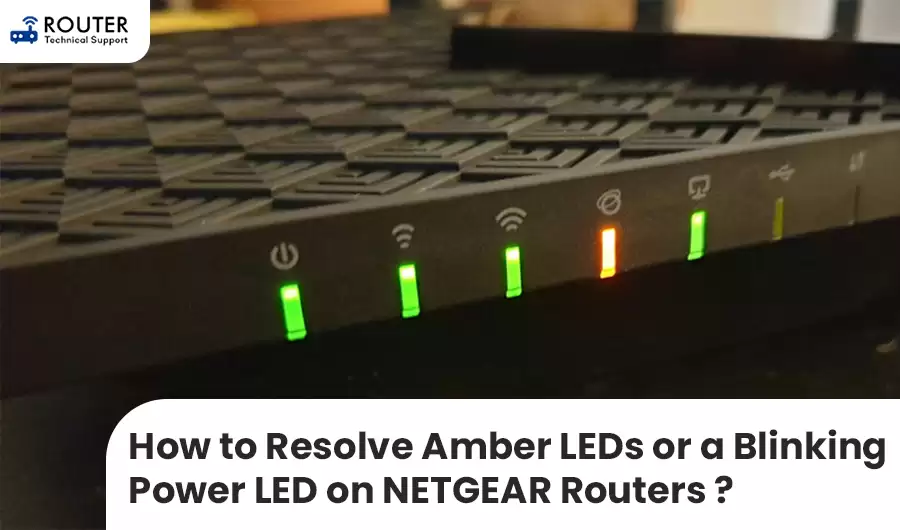
The color and speed of your blinking light tell you exactly what is wrong. Netgear uses these signals to indicate specific stages of failure during the boot process. Understanding these cues helps you choose the right fix immediately.
Amber Versus White Blinking Signals
Different colors point to different stages of the boot failure.
- Blinking Amber: Normal only during the first two minutes of startup. If it continues longer, the router is stuck.
- Blinking White: A critical error on Nighthawk and RAX models. This indicates a persistent boot loop where the system restarts repeatedly.
- Fast Versus Slow Blink: A slow blink often means firmware is loading. A rapid blink usually signals a reset attempt or recovery mode.
If the light never turns solid, your router fails to reach full operation. Common causes include corrupted firmware or insufficient power delivery.
What Continuous Blinking Indicates
A never-ending blink means the router cannot complete its boot sequence. It acts like a car engine turning over but never starting. The most frequent culprits include:
- Corrupted firmware from a failed update
- Insufficient power supply voltage
- Network loops or configuration errors
- Hardware conflicts with connected devices
Do not attempt complex fixes until you rule out simple hardware issues first.
Verify Power Supply and Hardware Connections
Many blinking light issues stem from unstable power or bad cables. You must confirm your hardware is functioning correctly before trying software fixes.
Use the Correct Power Adapter
Your Netgear router requires 12V and 1.5A or higher to operate safely. Using a lower-amp adapter might seem to work initially but fails during the high-load startup phase.
- Use only the original power adapter included with your router.
- Avoid generic third-party adapters that lack stable voltage output.
- Check the label to ensure it reads 12V, 1.5A or higher.
Replace any missing original adapters with Netgear-certified replacements only.
Test the Outlet and Cable Integrity
Even a perfect adapter fails if the outlet or cable is faulty. You need a clean power source for stable operation.
- Plug the router directly into a wall outlet.
- Bypass surge protectors and power strips temporarily.
- Ensure the power cable is fully seated at both ends.
Pro Tip: Use a multimeter to test adapter output. A reading below 11V under load indicates a failing adapter.
Eliminate Network Conflicts
Faulty Ethernet cables or network loops can prevent the router from booting properly.
- Disconnect all Ethernet cables from LAN ports.
- Power on the router and observe the light.
- Reconnect cables one by one to find the culprit.
Critical: Never connect two LAN ports together. This creates a broadcast storm that halts the boot process entirely.
Perform a Complete Power Cycle Reset
:max_bytes(150000):strip_icc()/how-to-properly-restart-a-router-modem-2624570-8ef8d3ea41a14c928947e58c32fa3646.png)
A full power cycle clears temporary memory errors and discharges internal capacitors. This simple step resolves many transient boot issues.
Standard Power Reset Procedure
Follow these steps to ensure a complete discharge of the system.
- Unplug the router from the power source.
- Wait exactly 60 seconds to discharge internal capacitors.
- Plug the power adapter back in.
- Watch the power light for changes.
Waiting the full 60 seconds is crucial. Shorter waits may leave residual charge that preserves the error state. If the light turns solid, your issue is resolved. If blinking continues, proceed to a factory reset.
Execute a Factory Reset on Your Router
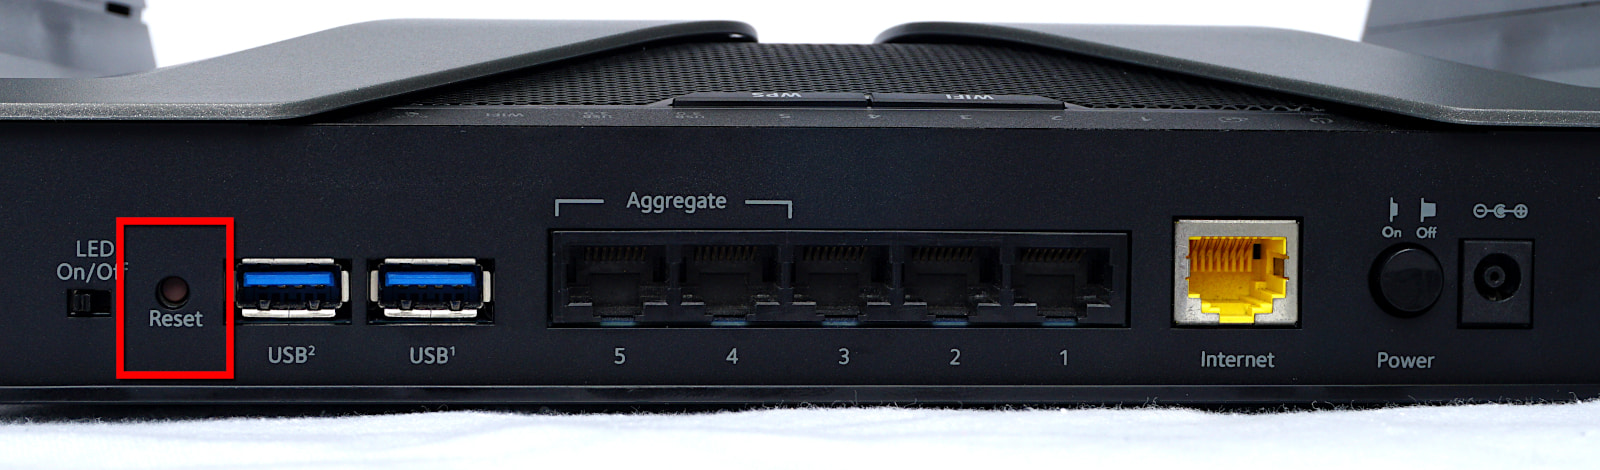
A factory reset clears corrupted settings that may be blocking the startup sequence. This step restores default configurations.
Standard Reset Procedure
Use this method for general configuration errors.
- Locate the Reset button on the back of the router.
- Press and hold the button for 10 to 15 seconds while powered on.
- Release when the LEDs blink rapidly.
- Wait two minutes for the reboot process.
If the power light stabilizes, reconfigure your network settings. If blinking persists, the problem is likely deeper firmware corruption.
Use the 30-30-30 Deep Reset Method
Perform this deep hard reset for stubborn boot loops, especially with blinking white lights.
- With power on, press and hold Reset for 30 seconds.
- Keep holding, unplug power, and wait 30 seconds.
- Keep holding, plug power back in, and wait 30 seconds.
- Release the button carefully.
Success sign: The power light turns solid orange, indicating recovery mode. If it stays blinking white, your firmware is corrupted and needs manual re-flashing.
Prepare for TFTP Firmware Recovery
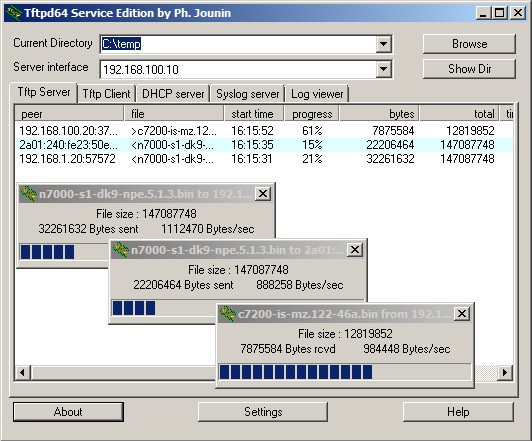
When resets fail, you must manually re-flash the firmware using TFTP. This process bypasses the normal boot loader to inject a fresh operating system.
Gather Required Tools and Files
You need specific tools to perform this recovery safely.
- Computer with an Ethernet port (Wi-Fi must be off)
- Ethernet cable for direct connection
- Correct firmware file (.bin format)
- TFTP client software like Tftpd64
Warning: Interrupting this process can permanently brick your router. Do not power off or disconnect during the transfer.
Download the Correct Firmware File
Getting the right file is critical for success.
- Go to the official Netgear support website.
- Enter your exact model number.
- Navigate to Downloads and select Firmware.
- Download the latest .bin file available.
- Extract the file if it is in a .zip archive.
- Choose the largest file if multiple options exist.
Save the file to a simple path like C:\firmware\yourfile.bin for easy access.
Configure Your Computer for TFTP Transfer
Your computer must communicate directly with the router on a specific network subnet. You need to set a static IP address manually.
Set a Static IP Address
Follow these steps to configure your network adapter.
- Connect your computer to the router via Ethernet.
- Disable Wi-Fi on your PC to avoid conflicts.
- Open Network Settings and select Change Adapter Options.
- Right-click your Ethernet adapter and select Properties.
- Choose Internet Protocol Version 4 (TCP/IPv4) and click Properties.
Try Option A first:
* IP Address: 192.168.1.100
* Subnet Mask: 255.255.255.0
* Default Gateway: 192.168.1.1
If that fails, try Option B:
* IP Address: 192.168.0.100
* Subnet Mask: 255.255.255.0
* Default Gateway: 192.168.0.1
Flash Firmware via TFTP Client
Now you will transfer the firmware directly to the router to fix the Netgear router power light blinking issue.
Method 1: Use Tftpd64 Graphical Interface
This method is recommended for users who prefer a visual interface.
- Download and install Tftpd64 from a trusted source.
- Run the application as Administrator.
- Enter your static IP in the Server Interface field.
- Click the TFTP Client tab.
- Set Remote Server to 192.168.1.1 or 192.168.0.1.
- Browse to select your .bin file.
- Click Upload or Put.
Wait three to five minutes for the transfer to complete. The router LED will blink during this process.
Method 2: Use Command Line Interface
Advanced users can use the command line for this transfer.
- Open Command Prompt as Administrator.
- Navigate to your firmware folder using
cd. - Type
tftp -i 192.168.1.1 put filename.bin. - Press Enter to start the transfer.
Wait for the “Transfer successful” message before proceeding.
Complete the Recovery Process
After a successful flash, your router needs to finish booting properly. Do not interrupt this final stage.
What Happens Next
The router will reboot automatically after the transfer. You will see the LED sequence change from blinking to solid orange, then to solid white or green. Wait at least five minutes for the system to fully initialize.
Final Configuration Steps
Complete these steps to restore your network.
- Power cycle the router once more.
- Connect via Wi-Fi or Ethernet.
- Access the web interface at 192.168.1.1.
- Log in with default credentials.
- Reconfigure your settings if necessary.
Some models retain old settings while others reset to factory defaults.
Know the Limitations of TFTP Recovery
Not every router responds to TFTP recovery methods. Be aware of these constraints before proceeding.
Devices That May Not Support TFTP
Certain models have restrictions that prevent this fix.
- Older Nighthawk models with locked bootloaders.
- Business-grade Netgear units requiring proprietary tools.
- Units with physical hardware damage like failed flash memory.
If TFTP Fails Completely
Try these steps if the initial attempt does not work.
- Re-download the firmware file to ensure it is not corrupted.
- Try a different TFTP client software.
- Test both IP subnets (192.168.1.x and 192.168.0.x).
- Consider professional repair if all methods fail.
Prevent Future Blinking Light Issues
Avoid repeating this nightmare by following smart maintenance habits. Prevention is key to long-term stability.
Best Practices for Router Health
Adopt these habits to keep your router running smoothly.
- Always use the original power adapter.
- Back up settings before performing firmware updates.
- Never interrupt updates once they start.
- Use a UPS during power outages to prevent corruption.
Safe Firmware Update Steps
Follow this protocol for safe updates.
- Connect via Ethernet cable.
- Ensure stable power supply.
- Download firmware from the official site.
- Upload via the router interface.
- Wait five to ten minutes without touching the router.
Frequently Asked Questions About Netgear Router Power Light Blinking
How long should I wait for the power light to stop blinking?
Normal booting takes under two minutes. If your Netgear router power light blinking continues beyond this window, the device is likely stuck in a boot loop or has corrupted firmware.
Can a bad power adapter cause the power light to blink?
Yes. Using an adapter with less than 1.5A output often causes boot loops. The router cannot draw enough power during startup, leading to continuous blinking.
What does a blinking white light mean on Nighthawk routers?
A blinking white light indicates a persistent boot loop. This usually means the firmware is corrupted and the system cannot complete its startup routine without intervention.
Will a factory reset fix the blinking power light?
It depends on the cause. A reset fixes configuration errors but not corrupted firmware. If the light keeps blinking after a reset, you likely need TFTP recovery.
Is it safe to use third-party firmware on Netgear routers?
No. Using unofficial firmware can void your warranty and cause permanent damage. Always use official files from the Netgear support website for recovery.
What happens if I interrupt the TFTP firmware update?
Interrupting the transfer can permanently brick your router. The device may become unusable and require hardware-level repair via UART or JTAG interfaces.
Key Takeaways for Fixing Netgear Router Power Light Blinking
A blinking power light on your Netgear router is fixable with the right approach. Start by checking your power adapter and performing a deep 30-30-30 reset. If those fail, TFTP firmware recovery is your best option for corrupted systems.
Take action now by verifying your power source and attempting a standard reset. These simple steps resolve most issues without needing advanced tools. Your network connection can be restored quickly with these proven methods.