
Setting up your Netgear Nighthawk router does not need to be a frustrating technical challenge. Whether you are upgrading for faster gaming speeds or better whole-home coverage, a proper installation ensures your network runs smoothly from the very first day.
The easiest method involves the NETGEAR Nighthawk app, which guides you through every step without requiring technical skills. This guide covers both the mobile app process and the traditional computer browser method so you can connect all your devices quickly and securely.
Use the Nighthawk App for Quick Setup
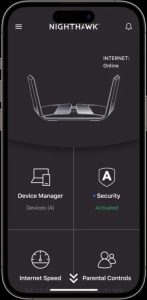
The Nighthawk app provides the fastest path to installing and managing your Netgear router. It supports most modern Nighthawk models and walks you through the entire configuration with simple on-screen prompts.
Download the App First
You must install the application on your smartphone before connecting any hardware. This ensures the software is ready to detect your new device immediately.
- Open the Google Play Store on Android devices.
- Open the Apple App Store on iPhones.
- Search specifically for “NETGEAR Nighthawk”.
- Tap Install and wait for the download to finish.
Open the app once the installation is complete but do not start the setup yet.
Connect Hardware Correctly
Physical connection is the foundation of a successful Netgear Nighthawk router setup. Follow these steps precisely to ensure power and data flow correctly.
- Attach antennas by screwing them securely into the ports on the back or sides if your model includes them.
- Connect to modem using the included Ethernet cable to link your modem LAN port to the yellow Internet (WAN) port on the router.
- Power on the device by plugging the adapter into an outlet and pressing the power button if one exists.
Wait one to two minutes for the LED lights to stabilize. A solid white or blue light usually indicates the unit is ready for configuration.
Scan QR Code to Start Setup
Your router comes with default Wi-Fi credentials printed on a label. You will need these details to begin the digital handshake between your phone and the router.
Locate the label on the bottom or back of the unit to find:
* WiFi Name (SSID) such as NETGEARXXXX
* Network Key (Password) which is the long string next to “Key”
Launch the Nighthawk app and tap Set up a new device. Allow camera permissions when prompted and scan the QR code directly from the label. The app will automatically connect your phone to the router default network.
Follow In-App Installation Steps
The application now guides you through the final configuration stages. It automates many complex tasks to simplify the process for you.
- Create a new Wi-Fi network name that is easy to recognize like “HomeWiFi” or “SmithFamily”.
- Set a strong password using at least 8 characters with a mix of letters and numbers.
- Update firmware as the app checks for the latest software and installs it automatically.
- Name your router optionally to help identify it later in large networks.
- Reboot when prompted so the router restarts with your new custom settings.
Your phone will reconnect to the new network automatically after the reboot. You are now online.
Pro Tip: Enable Smart Parental Controls and Guest Network features during this initial setup phase for immediate security benefits.
Set Up via Web Interface (Computer Method)

You can also configure your Nighthawk router using a web browser if you prefer a computer or if your specific model lacks app support. This method works on both Windows PCs and Macs.
Connect Router to Computer
Ensure the router is powered on using the hardware steps outlined previously. You must establish a direct link between your computer and the router before proceeding.
- Wired Connection: Use an Ethernet cable to connect your PC LAN port to any yellow LAN port on the router.
- Wireless Connection: Join the default Wi-Fi network using the SSID and password found on the device label.
Verify your computer shows an active connection before opening any browser windows.
Access Router Admin Page
Open your preferred web browser such as Chrome, Firefox, Safari, or Edge. Type the following address exactly into the address bar at the top of the window.
routerlogin.net
Press Enter to load the login page.
Try http://192.168.1.1 if the domain name does not resolve. Ensure your device is connected to the router network or this page will not load.
Log In with Default Credentials
A login window will appear requesting a username and password. These credentials are case-sensitive and specific to your device.
- Username: admin
- Password: password
These defaults are printed on your router label for verification.
⚠️ Warning: Do not use
admin/adminoradmin/1234as these combinations do not work on Nighthawk routers.
The browser redirects to the main setup wizard after successful authentication.
Run Setup Wizard
The Setup Wizard automates the configuration process through a series of simple screens.
- Click Next to begin the process.
- Select your local time zone from the dropdown menu.
- Create your wireless settings by choosing a unique Network Name (SSID) and a secure WPA2/WPA3 password.
- Review all settings carefully and click Apply.
- Wait for the router to restart automatically.
Reconnect your computer to the new Wi-Fi network using the credentials you just created.
Note: Always update firmware manually via Advanced > Administration > Router Update if the wizard does not prompt you.
Fix Common Setup Issues
Even with clear instructions, you might encounter hurdles during your Netgear Nighthawk router setup. Here are solutions to the most frequent problems users face.
No Internet After Setup
Your devices may connect to Wi-Fi but fail to access the web. This often indicates a communication break between the modem and router.
- Restart both devices by powering off the modem and router completely.
- Wait 30 seconds before turning the modem on first.
- Wait for modem lights to stabilize then power on the router.
- Check the WAN (Internet) port connection to ensure the Ethernet cable is firm.
Contact your Internet Service Provider if the issue persists after these steps.
Can’t Access routerlogin.net
This error typically means your device cannot communicate with the router interface.
Try these specific fixes:
* Confirm you are connected to the Nighthawk Wi-Fi or wired network.
* Try the IP address 192.168.1.1 instead of the domain name.
* Clear your browser cache or switch to a different browser entirely.
* Disable any active VPNs or firewalls temporarily during setup.
Perform a factory reset if you still cannot access the admin page.
App Can’t Detect Router
The Nighthawk app may fail to find your router if certain permissions are missing on your phone.
- Ensure Bluetooth is ON as some models require it for discovery.
- Enable Location Services on Android devices for network scanning.
- Hold your phone close to the router during the search.
- Restart the app completely and attempt detection again.
- Manually connect to the default Wi-Fi network listed on the label.
Switch to the web setup method if the app continues to fail.
Optimize Your Wi-Fi Network

Successful installation is just the beginning. You should take extra steps to maximize speed, coverage, and security for your home network.
Place Router Strategically
Physical location dramatically impacts wireless performance and range.
- Place the unit in a central location and elevate it on a shelf.
- Avoid corners, basements, or enclosed cabinets that block signals.
- Keep the device away from thick walls, microwaves, and large metal objects.
- Leave ample space around vents for proper cooling.
Pro Tip: Run a speed test in various rooms to identify dead zones and consider a Wi-Fi extender if needed.
Enable Guest Network
Allow visitors to use your internet without exposing your primary network password.
Access the Nighthawk app or web interface and go to Advanced > Guest Network. Turn on Guest Access and set a specific name and time limit. Guests can browse the web but cannot access your personal devices like printers or NAS drives.
Use Parental Controls
Keep children safe online by managing their access directly from your router.
- Open the Nighthawk app and select Parental Controls.
- Choose a specific device such as a child tablet or laptop.
- Set bedtime schedules or pause internet access instantly.
- Block inappropriate websites or content categories.
Schedule internet downtime during homework hours or late at night.
Update Firmware Regularly
Keeping your router software current improves speed, fixes bugs, and closes critical security gaps.
Check for Updates (App)
- Open the Nighthawk app on your mobile device.
- Tap More > Device Management > Router Update.
- Select Check for Updates to scan for new versions.
- Tap Download and Install if an update is available.
Do not turn off the router during this process as it takes 3 to 5 minutes.
Update via Web Interface
- Log in to
routerlogin.netusing your browser. - Navigate to Advanced > Administration > Router Update.
- Click Check to search for the latest firmware.
- Click Download and Install if a newer version is found.
Wait for the system to reboot fully before using the network again.
🔒 Security Note: Outdated firmware can expose your network to hackers. Check for updates monthly.
Reset Router When Needed
Use the reset functions only if settings are lost, login fails, or performance drops drastically.
Soft Reset (Restart)
This reboots the router without deleting any custom settings.
- Press and release the power button if available.
- Unplug the power cord for 10 seconds then plug it back in.
Use this method for temporary glitches or minor connectivity issues.
Factory Reset (Hard Reset)
This erases all custom settings and returns the router to its default state.
Only perform this if:
* You forgot your custom login password.
* The initial setup fails repeatedly.
* You are selling or giving away the router.
To reset:
1. Locate the Reset button which is a tiny hole on the back or side.
2. Insert a paperclip while the router is powered on and hold for 7–10 seconds.
3. Release when the lights blink rapidly.
4. Wait 2 minutes for the device to reboot completely.
You must reconfigure your Wi-Fi name and password after a hard reset.
Know Your Model’s Capabilities
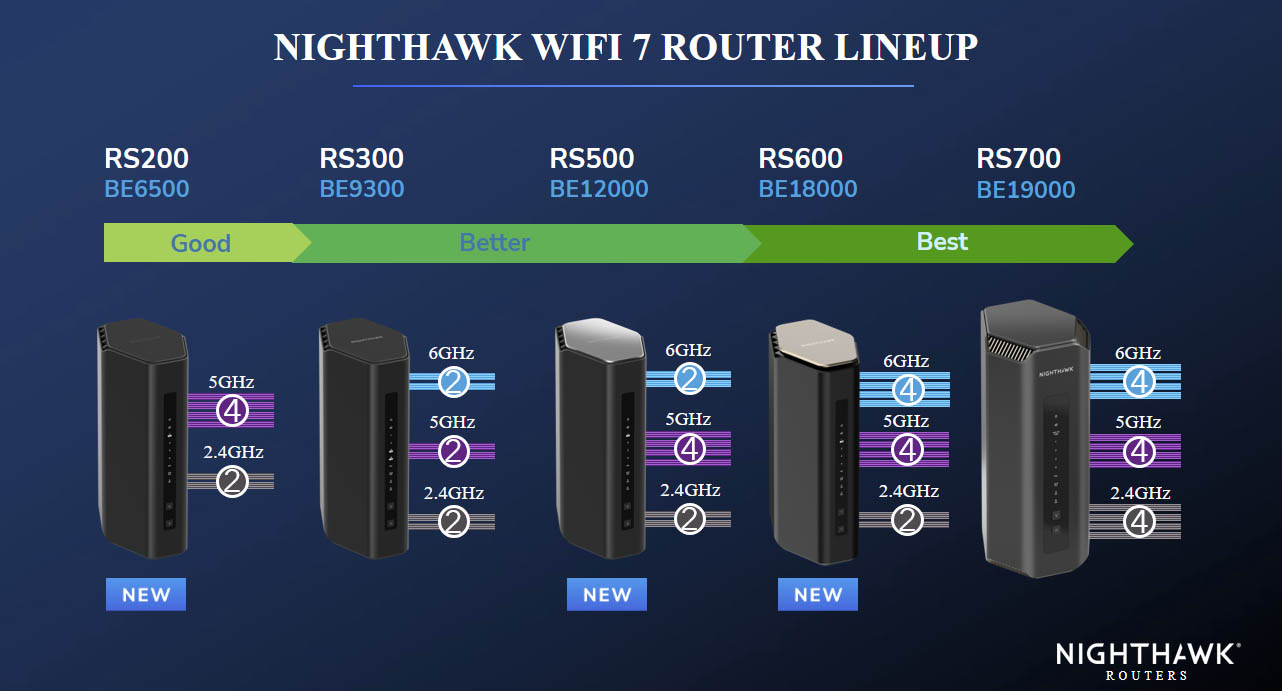
Not all Nighthawk routers offer the same features or support the same setup methods.
Supported by Nighthawk App?
Most WiFi 6, WiFi 6E, and WiFi 7 models fully support the app. Older WiFi 5 (AC series) units may have limited or no app support.
Check your model series:
* App-supported: RAX series, BE series, RS series, XR series.
* Web-only setup: Some older R6xxx and R7xxx models require the browser method.
Try the app first as it will notify you immediately if your model is unsupported.
Maximize Advanced Features
High-end models include specialized tools for specific user needs.
- XR series (Gaming): Use Geofencing and QoS to prioritize game traffic automatically.
- RS series (WiFi 7): Enable MLO (Multi-Link Operation) for faster device connections.
- BE series: Utilize WPA3 encryption for top-tier wireless security.
Explore Advanced Settings in your dashboard to unlock the full potential of your hardware.
Frequently Asked Questions About Netgear Nighthawk Router Setup
What is the default login password for Netgear Nighthawk routers?
The default username is admin and the default password is password. These are case-sensitive and printed on the router label. Do not use generic combinations like admin/1234.
Can I set up my Netgear router without the Nighthawk app?
Yes, you can set up your router using a web browser on a computer. Connect to the router network, open a browser, and go to routerlogin.net to access the setup wizard.
Why is my Netgear router not connecting to the internet?
Check that the Ethernet cable connects the modem to the yellow Internet port on the router. Restart both the modem and router, ensuring the modem powers on first.
How do I reset my Netgear Nighthawk router to factory settings?
Find the Reset button on the back, insert a paperclip, and hold for 7–10 seconds while powered on. Release when lights blink to erase all settings and restart.
Does the Netgear Nighthawk app work with all router models?
Most WiFi 6, WiFi 6E, and WiFi 7 models support the app. Many older WiFi 5 models require setup via the web interface instead of the mobile application.
How often should I update my Netgear router firmware?
You should check for firmware updates monthly to ensure security and performance. The Nighthawk app can notify you automatically when new updates are available.
Key Takeaways for Your Netgear Nighthawk Router Setup
A successful Netgear Nighthawk router setup provides the foundation for fast and secure home internet. Using the Nighthawk app offers the simplest installation path, while the web interface remains a reliable alternative for all models.
Remember to place your router centrally, update firmware regularly, and secure your network with strong passwords. Take action today by checking your current firmware version to ensure your network remains protected.



